• Skip to primary navigation
  • Skip to main content
  • Skip to primary sidebar
  • Skip to footer

Savory Nothings logo

  • Recipe Index
    • Easy Dinner Recipes
      • Slow Cooker
      • One Pot Meals
      • Quick Meals
      • Instant Pot
    • Side Dishes
    • Breakfast
    • Dessert
    • Small Meals
  • Dinner Ideas
  • About
  • Subscribe
menu icon
go to homepage
subscribe
search icon
Homepage link
  • Recipes
  • Dinner Ideas
  • Easter
  • Holidays & Occasions
  • About
  • Subscribe
×

Home / Recipes / Baking / The Best Homemade Cinnamon Rolls

The Best Homemade Cinnamon Rolls

2 hrs 30 mins
| 31 Comments |
5 from 33 votes
Jump to Recipe 12/17/20 | Updated: 12/18/20 | by Nora
Cinnamon Rolls Pin 1

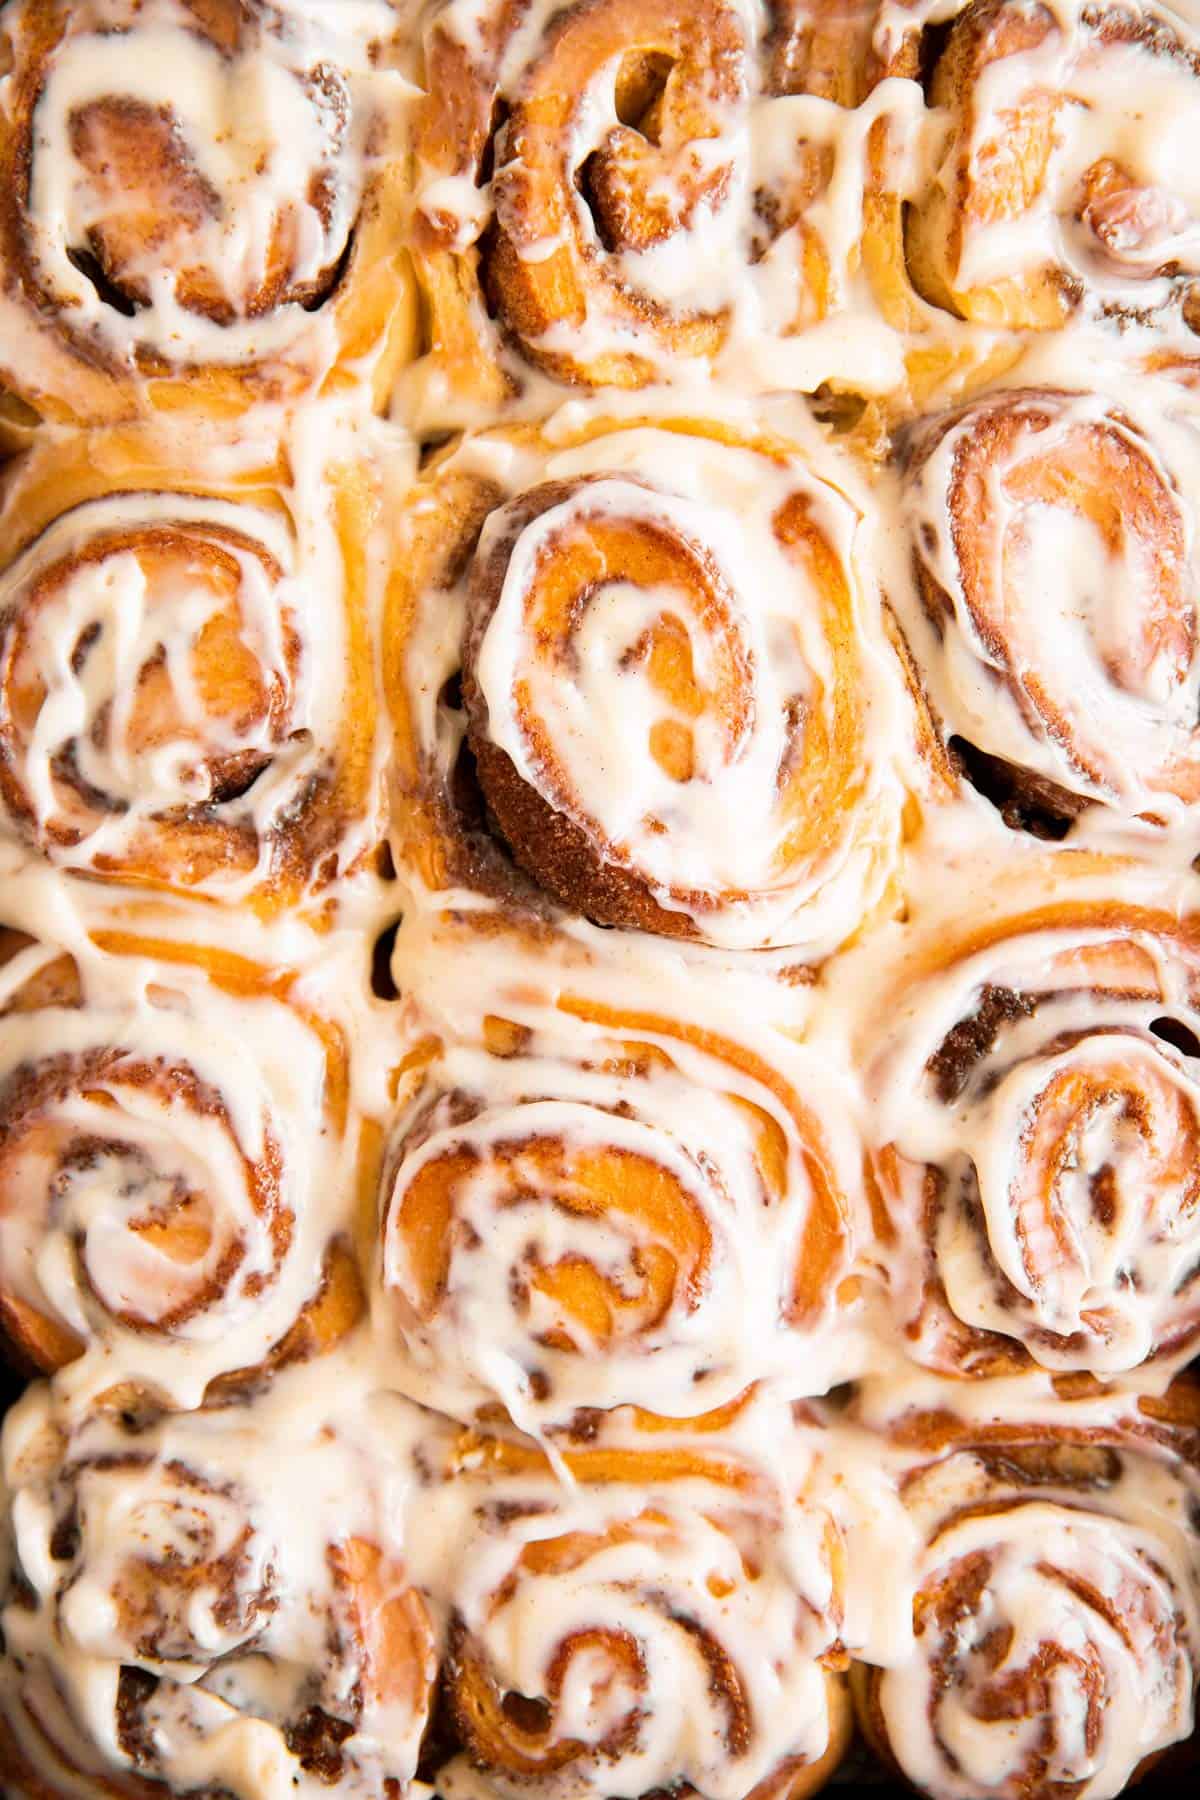
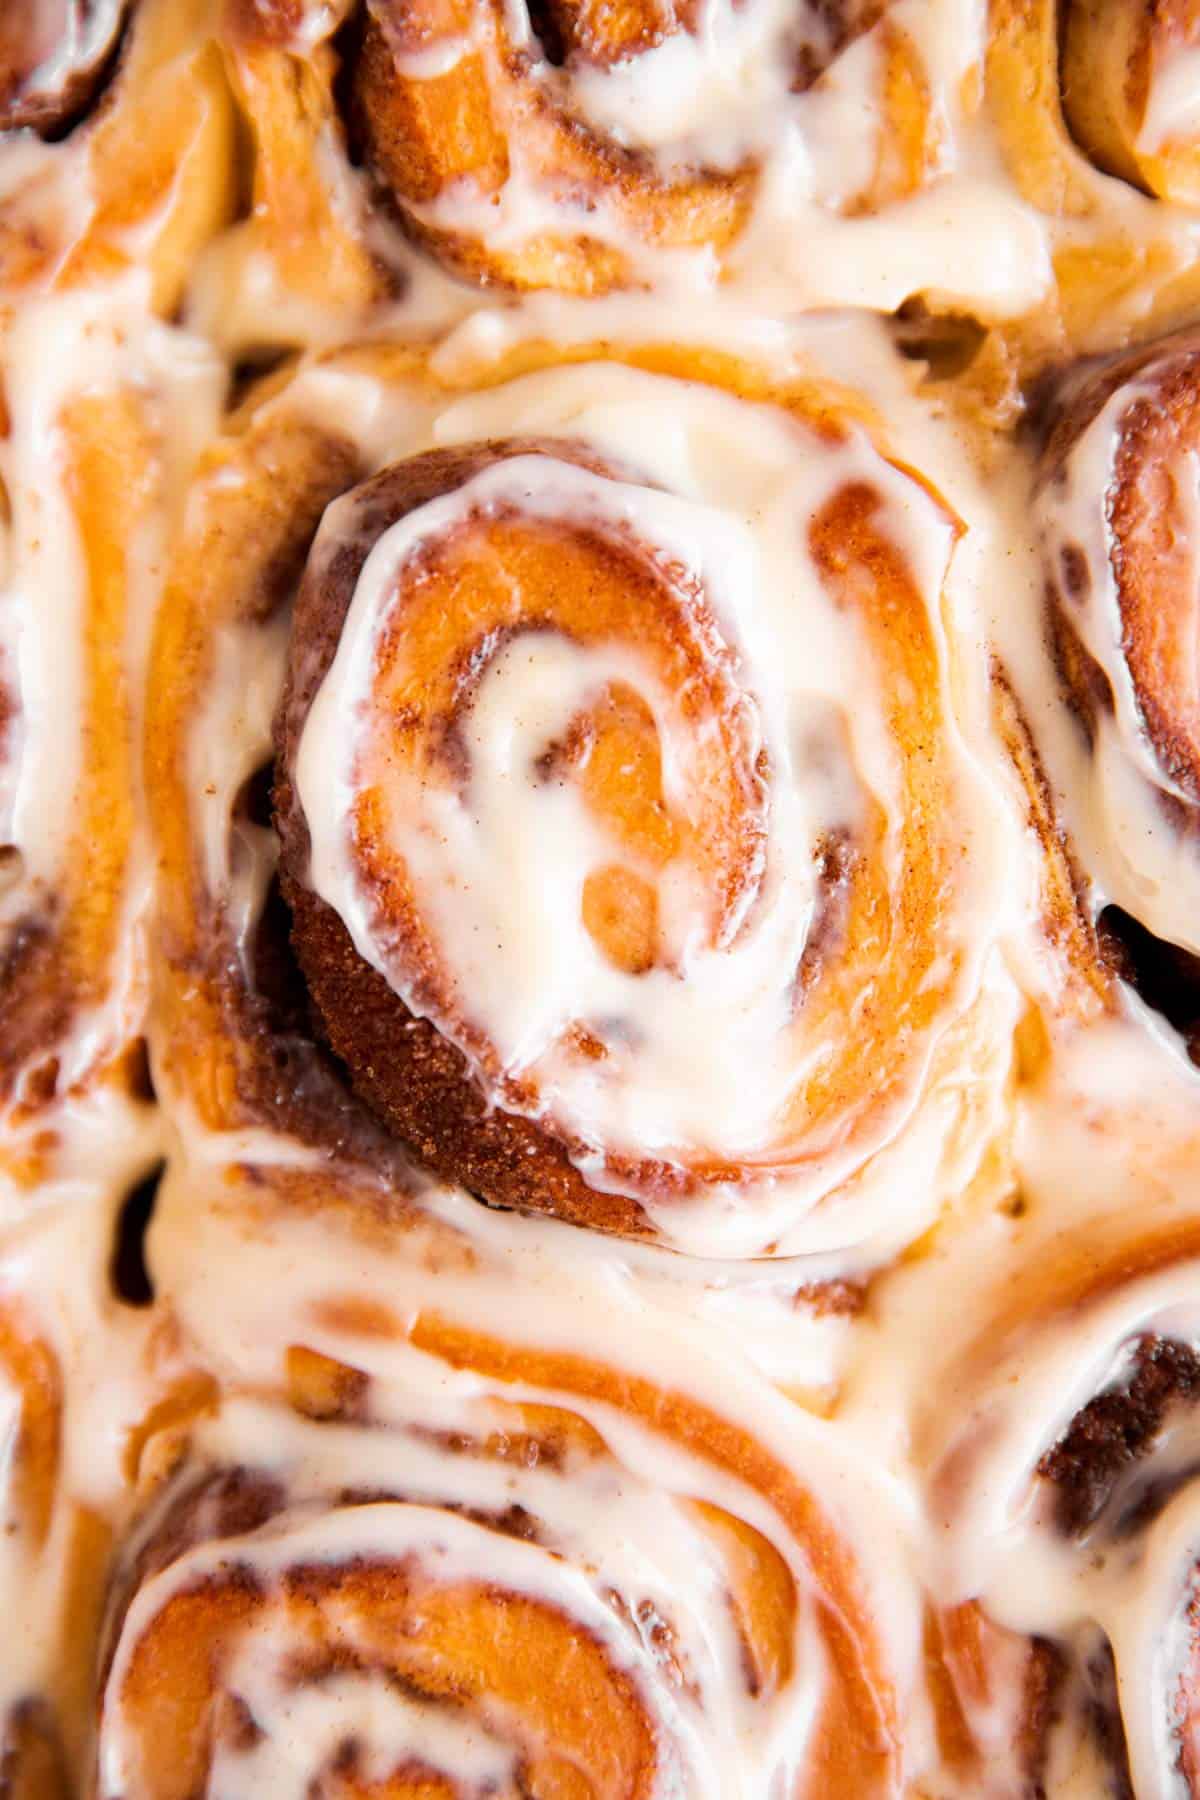
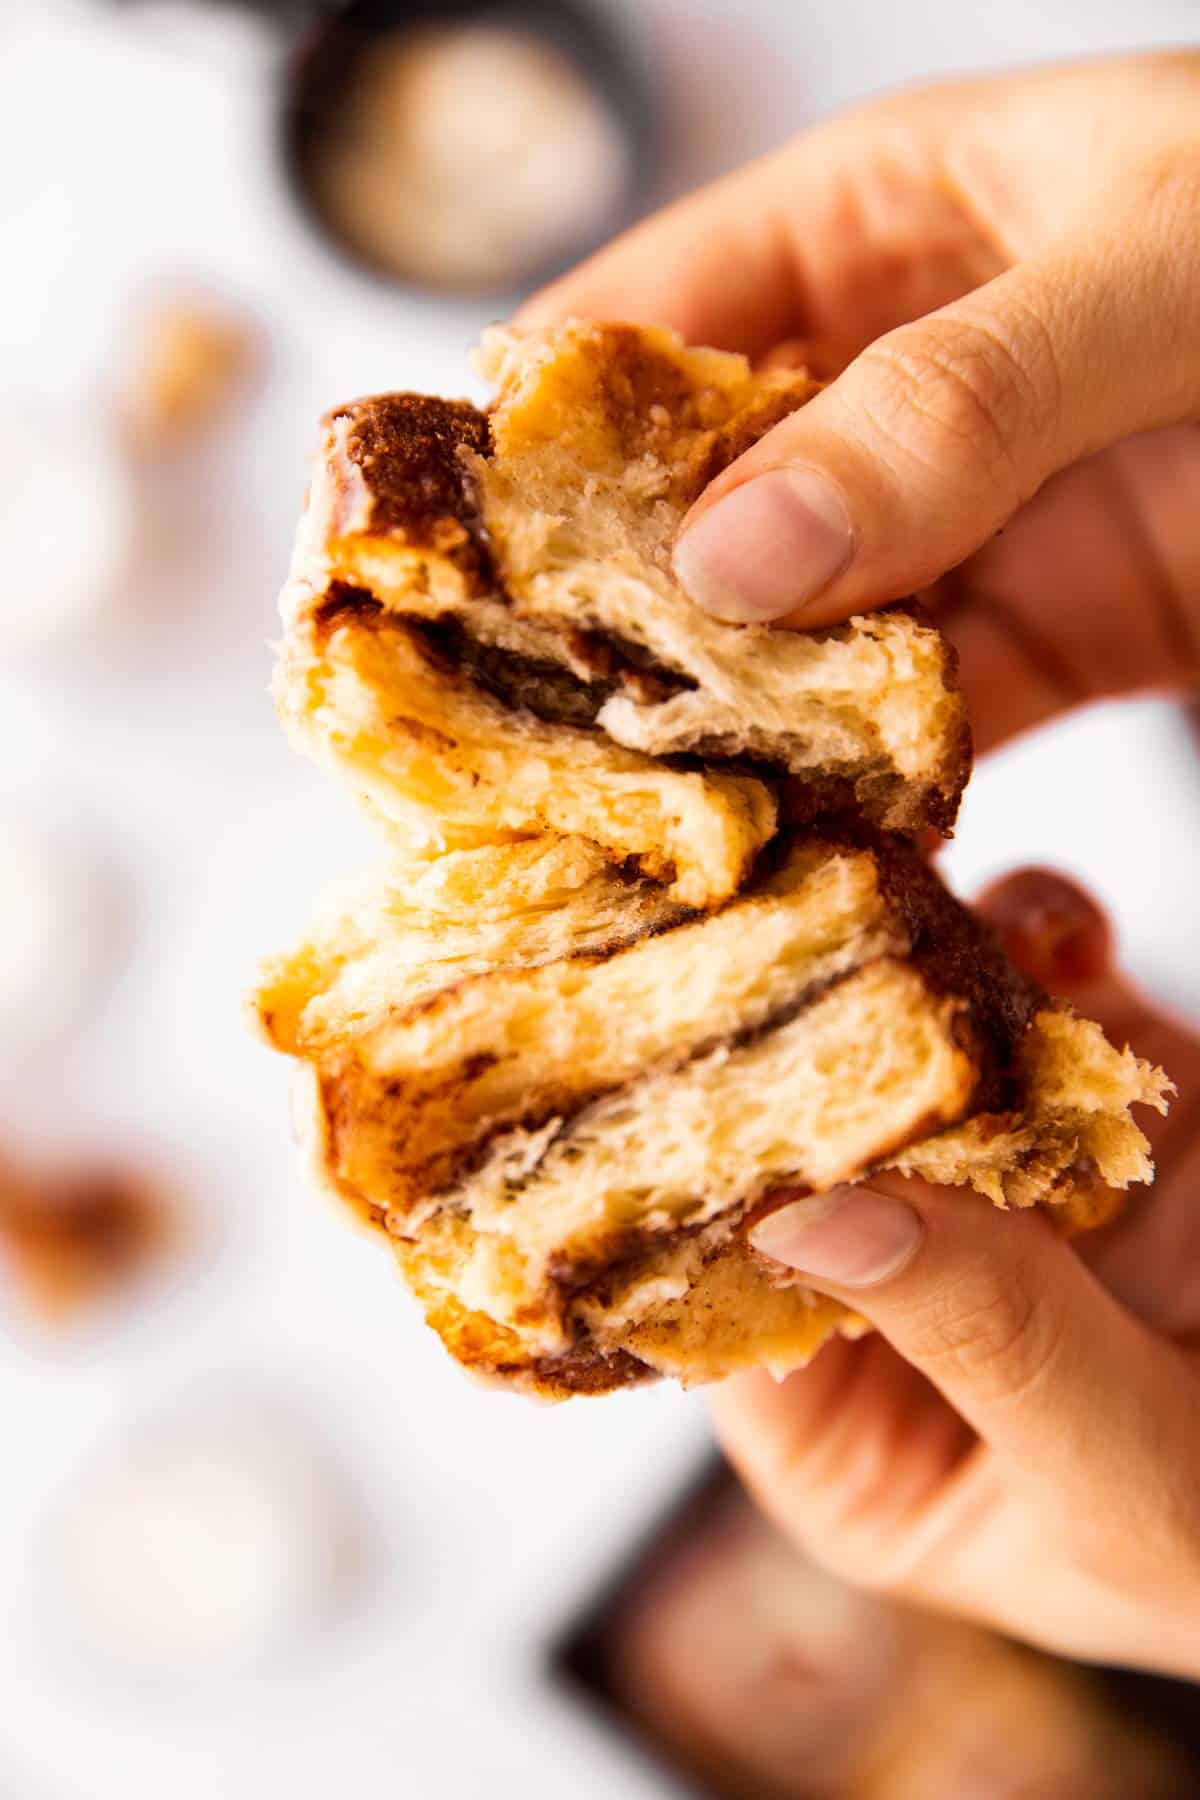
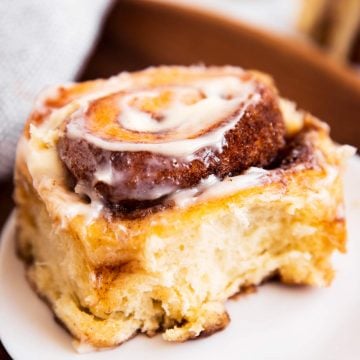
These are the ULTIMATE best Homemade Cinnamon Rolls. Easy to make and so soft, fluffy and perfect ♡ Slather them in your favorite cream cheese frosting for the perfect special brunch.

cinnamon roll sitting on white plate

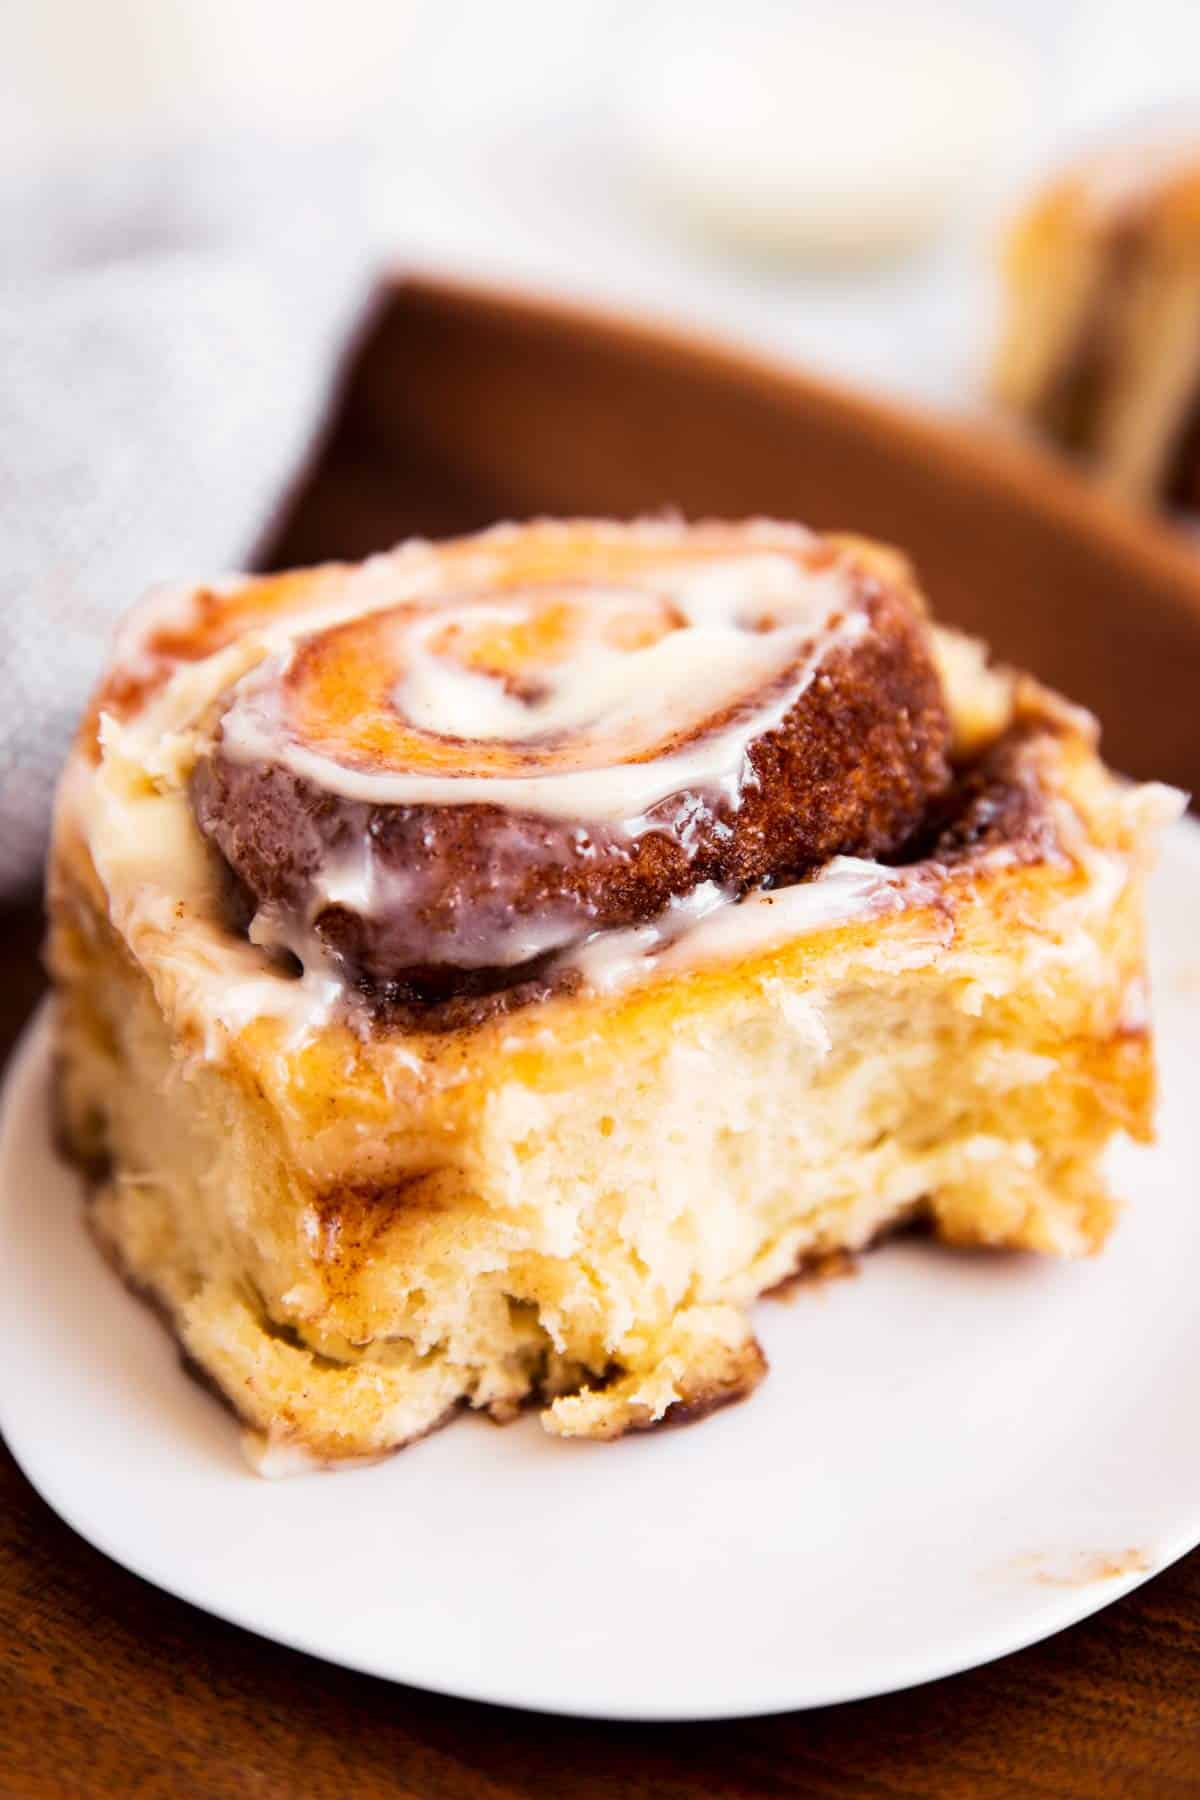
There’s not many things I love more than homemade cinnamon rolls. I guess homemade soft pretzels are very high up that list, too, but otherwise? The perfect soft and fluffy cinnamon rolls is where it’s at.

I used to make cinnamon rolls a little differently, but some readers were having trouble with the dough. Some said they added eggs to the dough, so I tested it an now make them with eggs all the time – and actually like it better! So here is my new favorite easy cinnamon roll recipe.

Please note: If you have made the old recipe (made without eggs) successfully and are looking for that, please print it here.

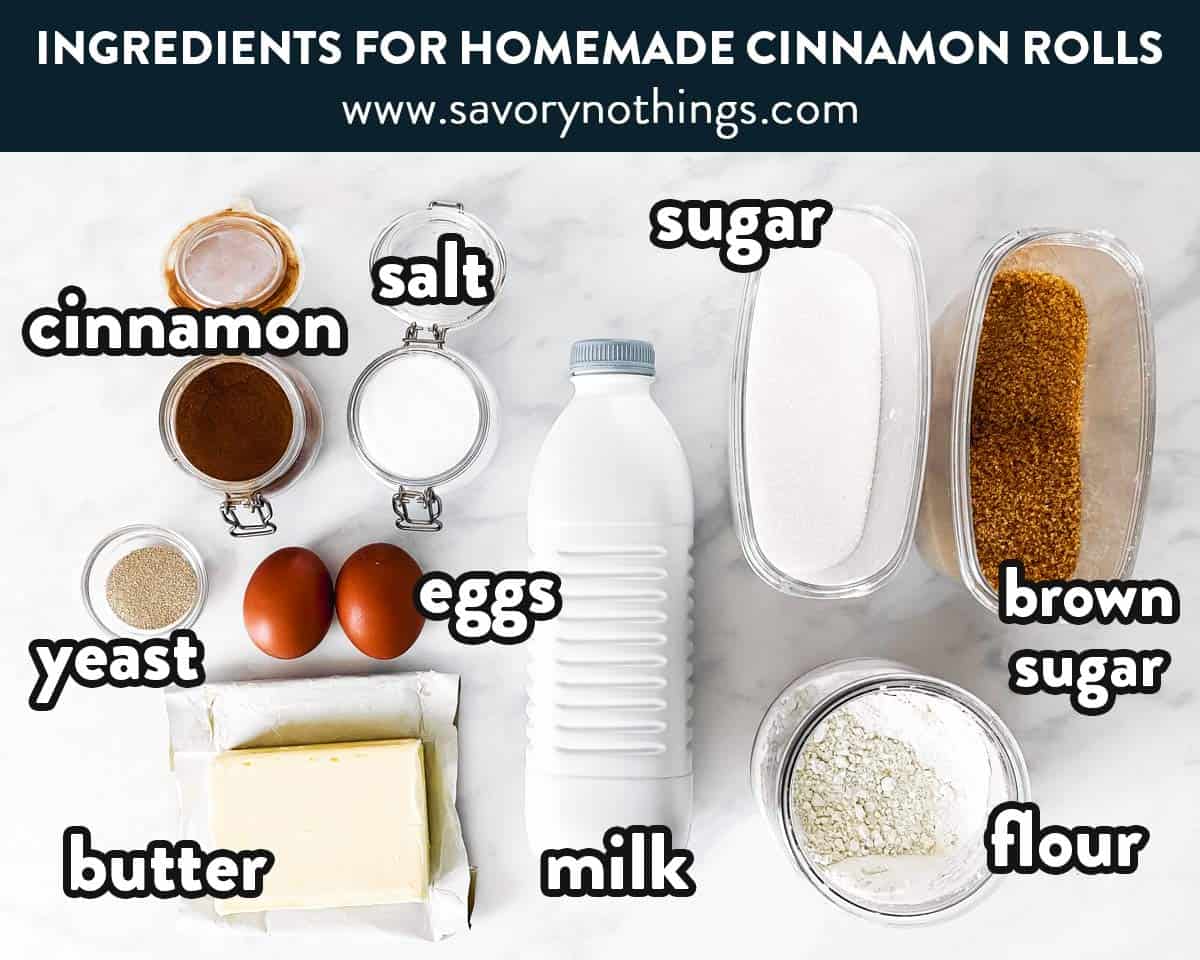
Ingredients you’ll need

Here is a visual overview of the ingredients in the recipe. Scroll down to the printable recipe card at the bottom of this post for quantities!

ingredients for cinnamon rolls with text labels
Ingredients for homemade Cinnamon Rolls: Flour, brown sugar, white sugar, milk, eggs. butter, yeast, cinnamon and salt.

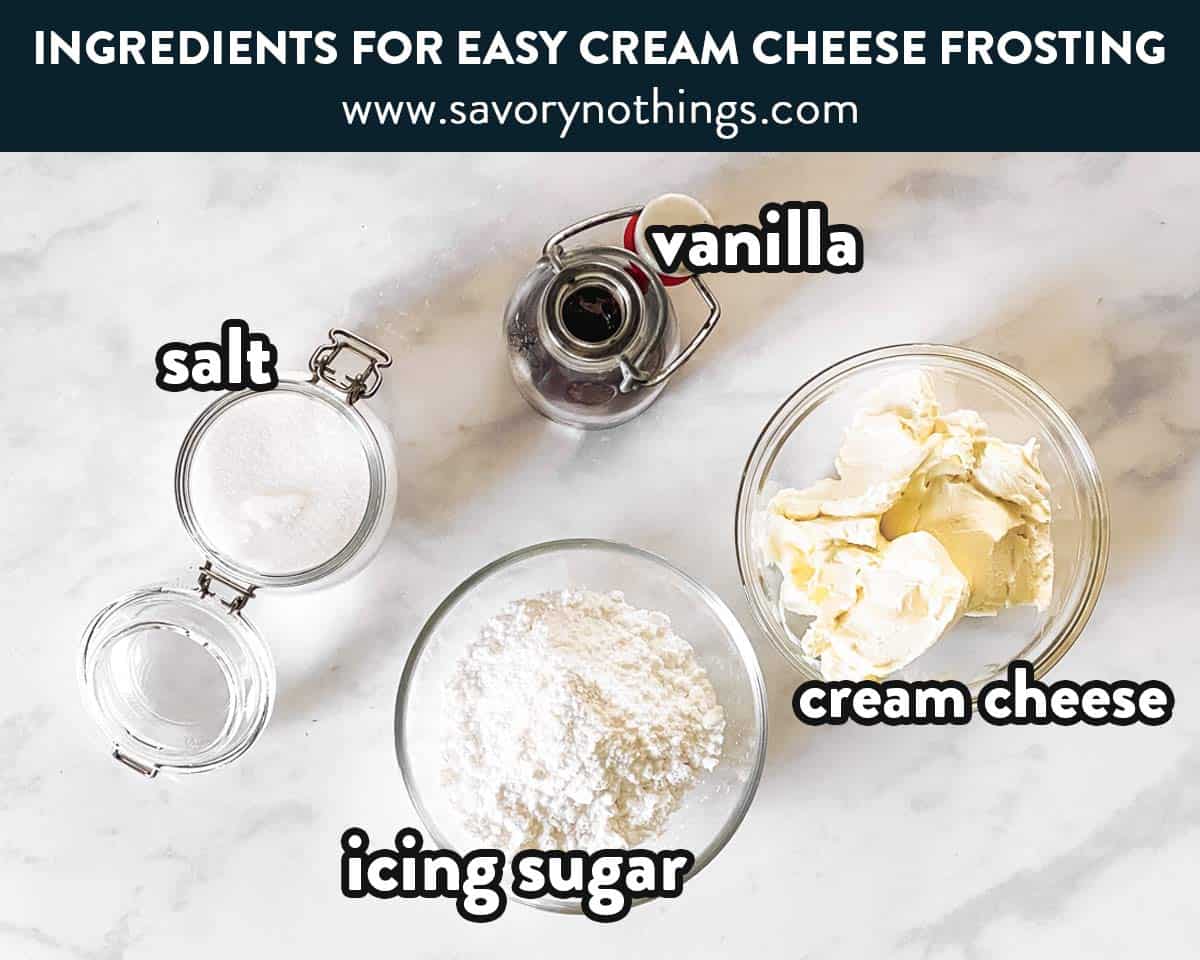
If you want to slather your cinnamon rolls with my 1 minute homemade frosting, you’ll also need these:

ingredients for cream cheese frosting with text labels
Ingredients for easy Cream Cheese Frosting: Cream cheese, icing sugar, vanilla extract and salt.

Ingredient notes

  • Sugar: If you prefer, you can use all white OR all brown sugar for the filling. All brown will yield a more caramel-like taste. All white will make the filling sweeter.
  • Milk: I prefer whole milk for a richer dough, but feel free to use any fat percentage you have at home.
  • Yeast: Use active dried yeast for best results. You can use instant yeast, the dough will rise faster. The rolls tend to have a slightly “yeastier” taste with instant yeast. Organic yeast will rise much slower, so plan accordingly if you’re planning on using that.
  • Butter: I recommend using real butter here. If you have to use margarine for any kind of reason, please use stick margarine for best results.

How to make homemade Cinnamon Rolls

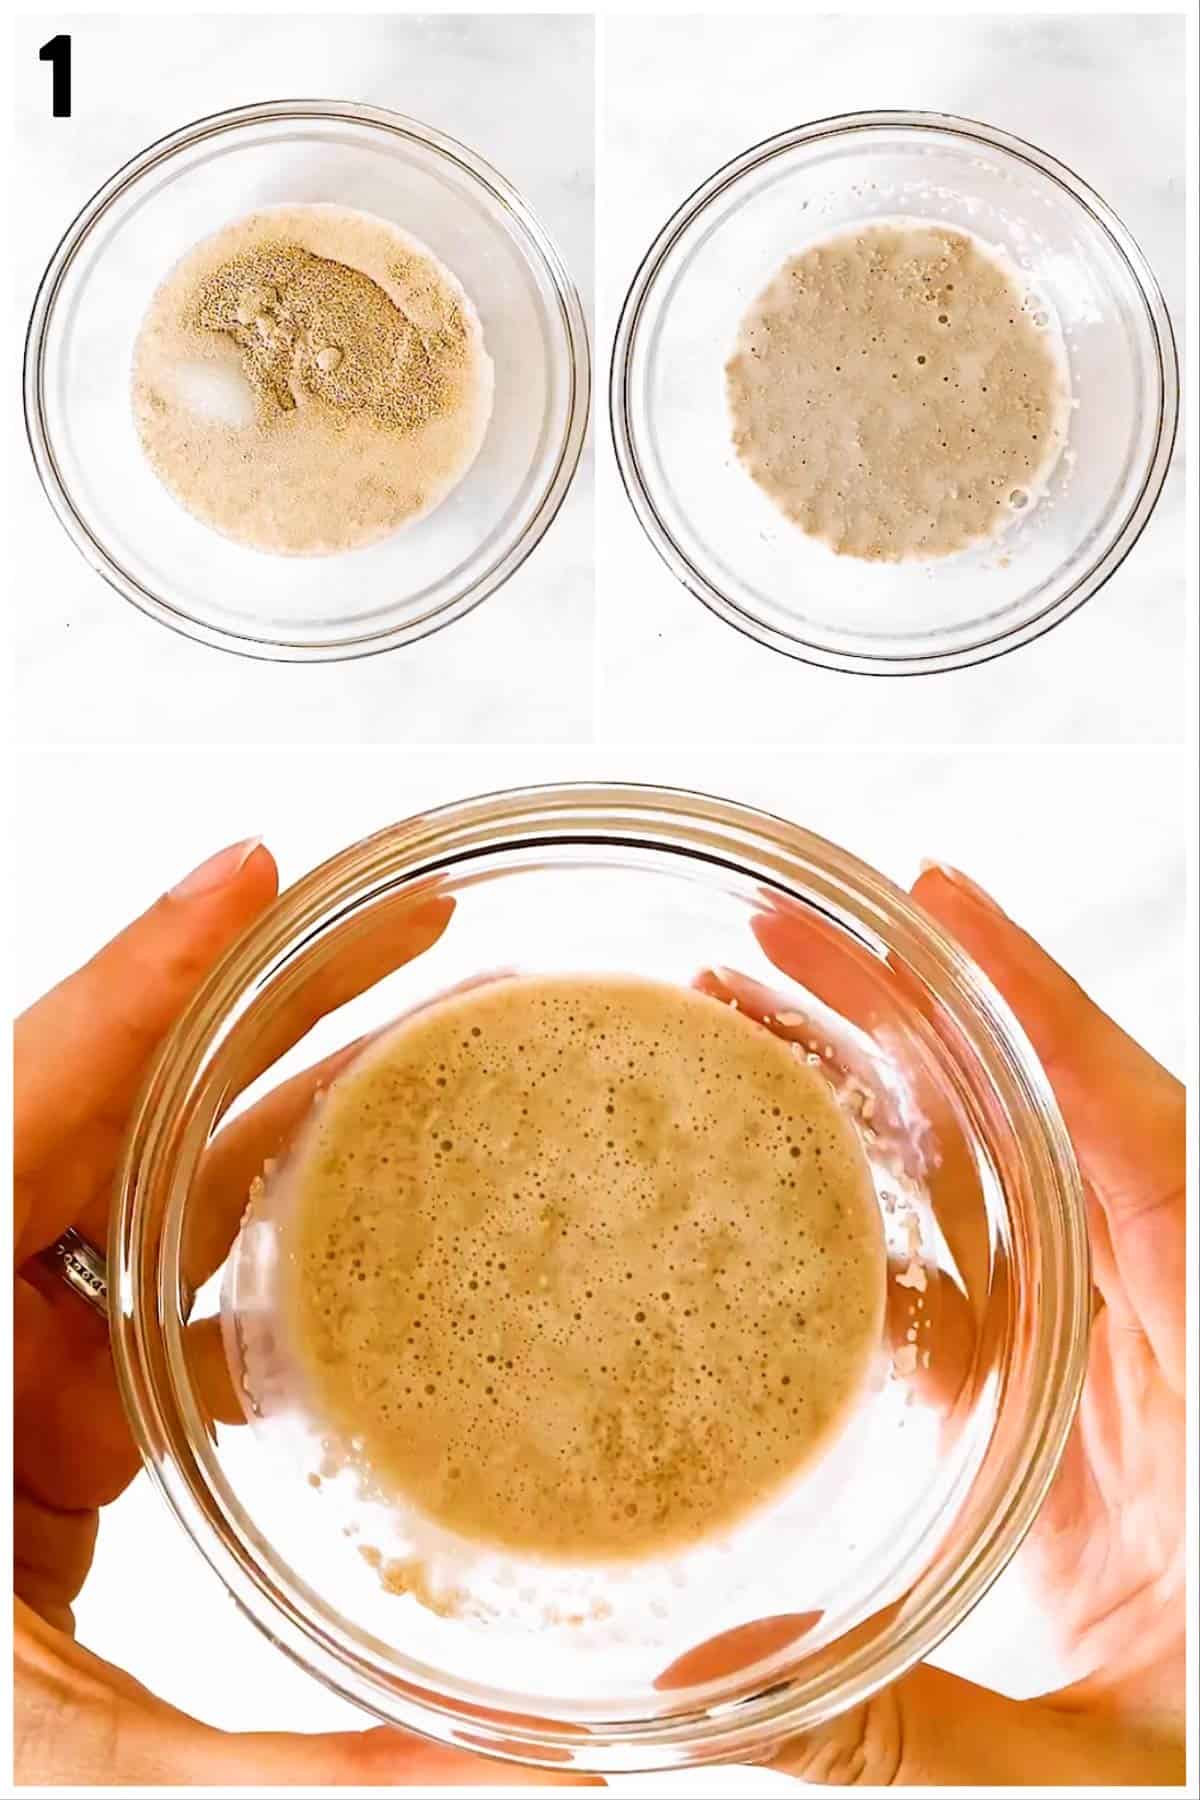
1. Start by activating the yeast: Place it in a small bowl with some milk and sugar. Stir well, then let sit for 5 minutes.

If you see bubbles appearing on the surface, your yeast is good to go! If you don’t see any bubbles within 10 minutes, you need to use a new packet of yeast.

photo collage to show how to activate yeast

2. Next, add all ingredients for the dough to the bowl of your stand mixer. (If you don’t have a hand mixer, you need to knead by hand – stir the ingredients together in the bowl first, then knead on your counter).

You want to knead the dough on medium speed until it’s completely smooth and pliable. You should be able to pull a piece of dough until it’s see-through thin, without it ripping apart. This can take 10 minutes! So be patient.

photo collage to show how to make cinnamon roll dough

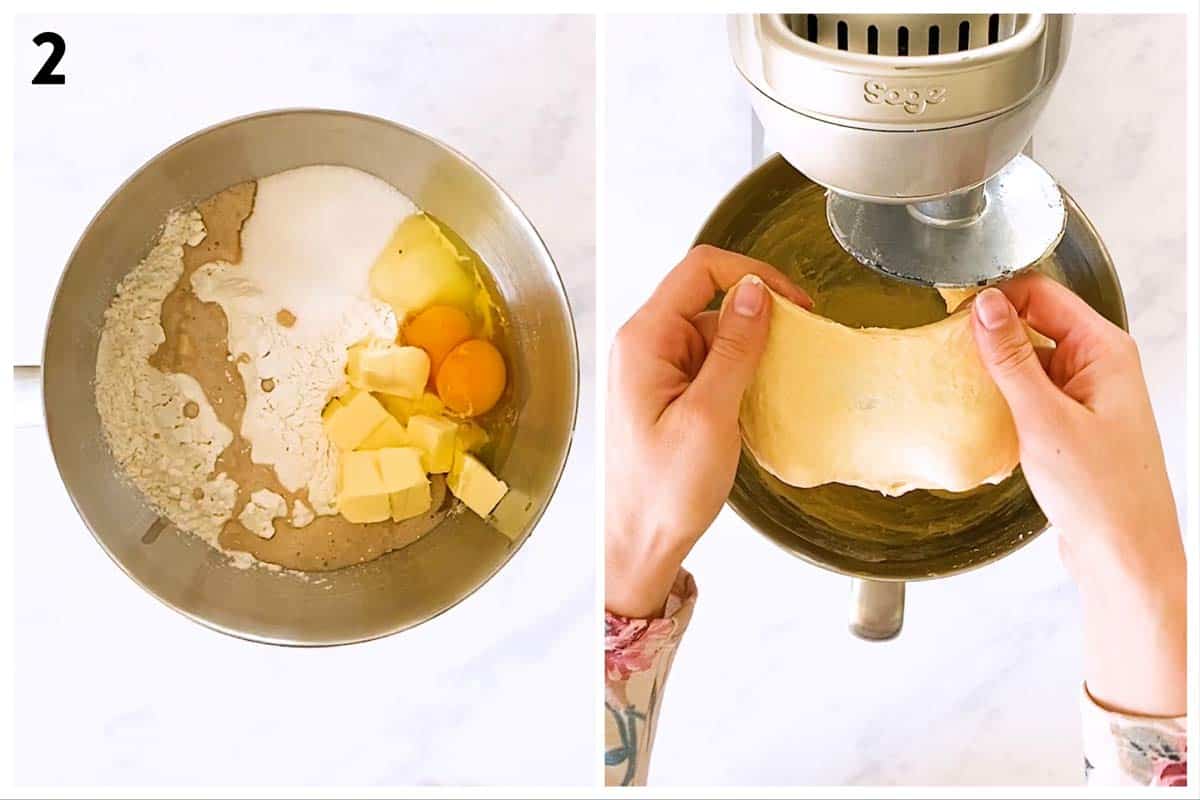
3. Now, transfer the dough to a lightly greased bowl. I recommend using a ceramic bowl for best results. You an leave it in the metal bowl from your stand mixer if you must, but it never gives me the same results as a ceramic bowl!

You’ll want to shape the dough into a ball, pinching the bottom together to create a smooth surface on top. Place the ball, seam down, in your prepared bowl.

photo collage to show how to let cinnamon roll dough rise

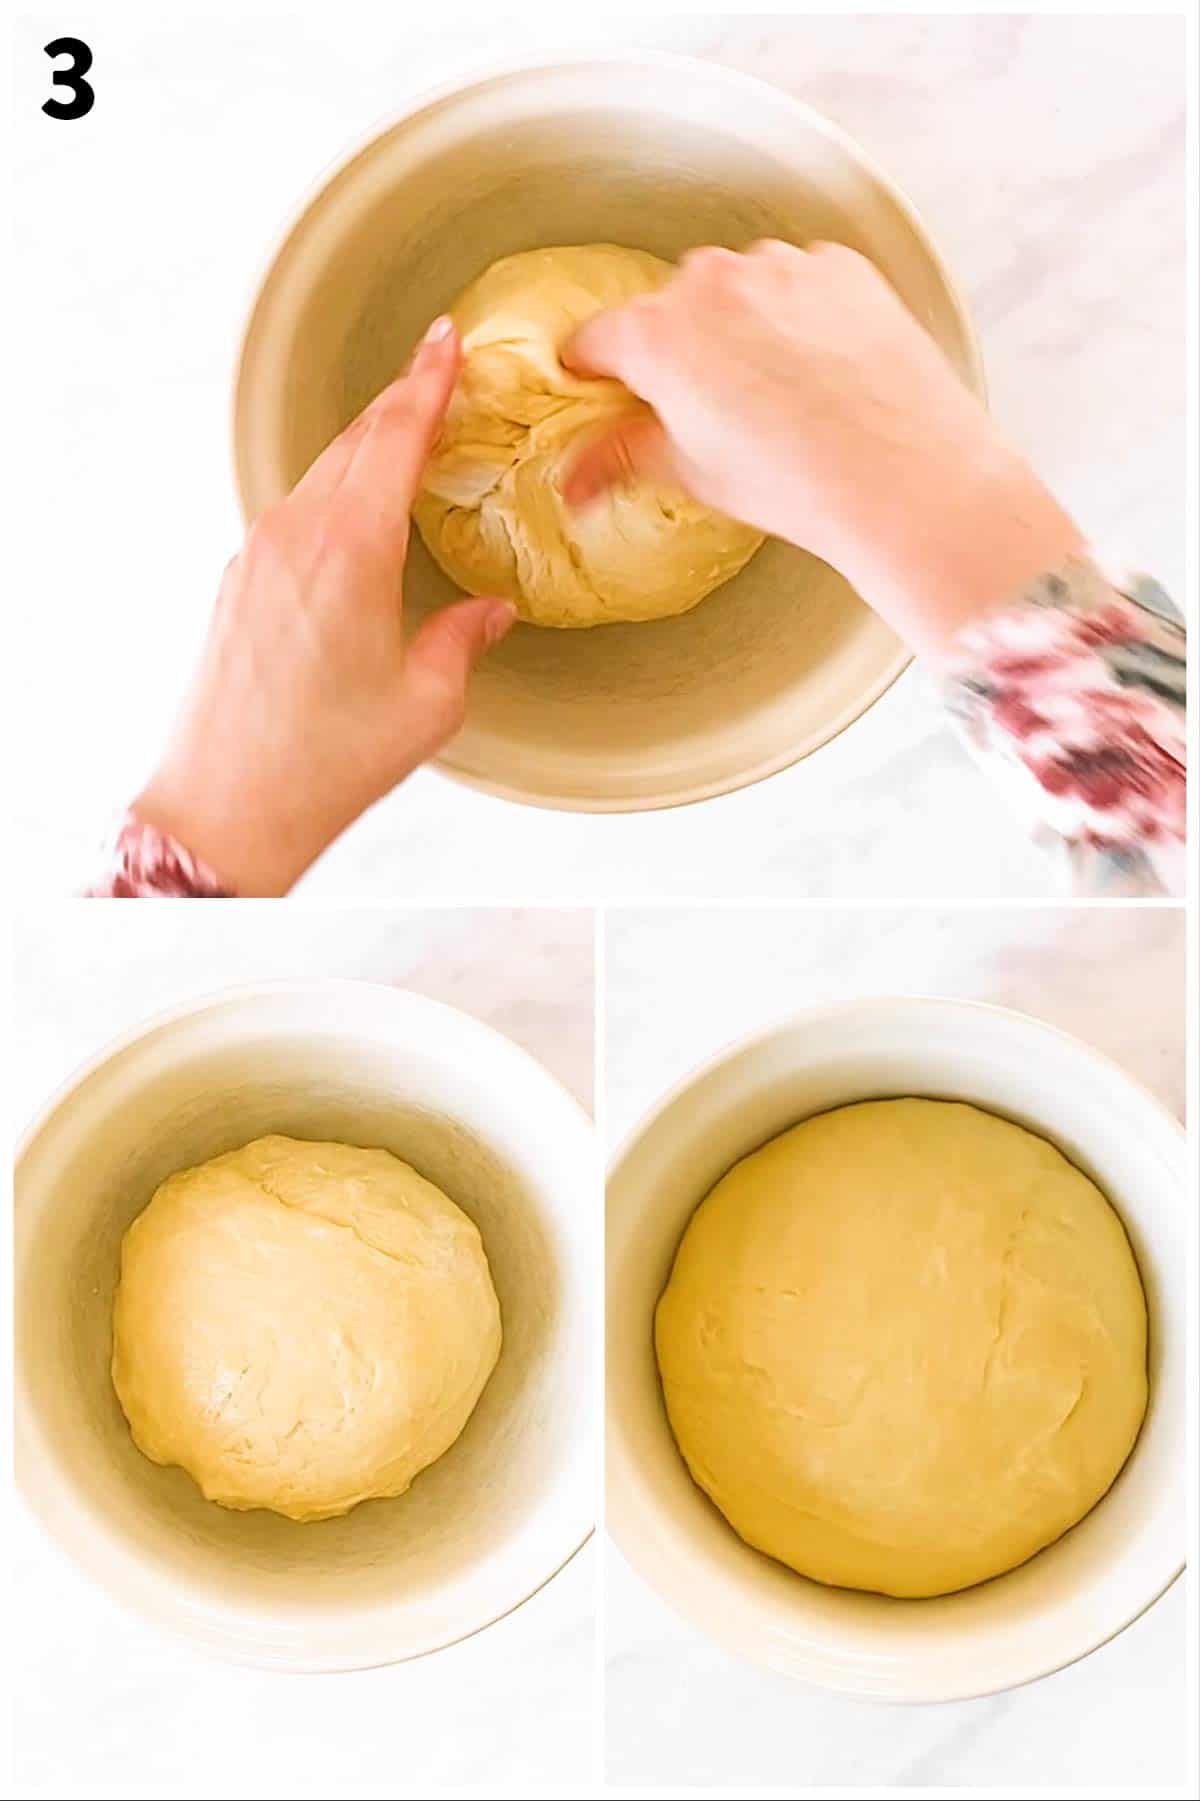
Cover the bowl with a clean tea towel and let it sit at comfortably warm room temperature until doubled in size.

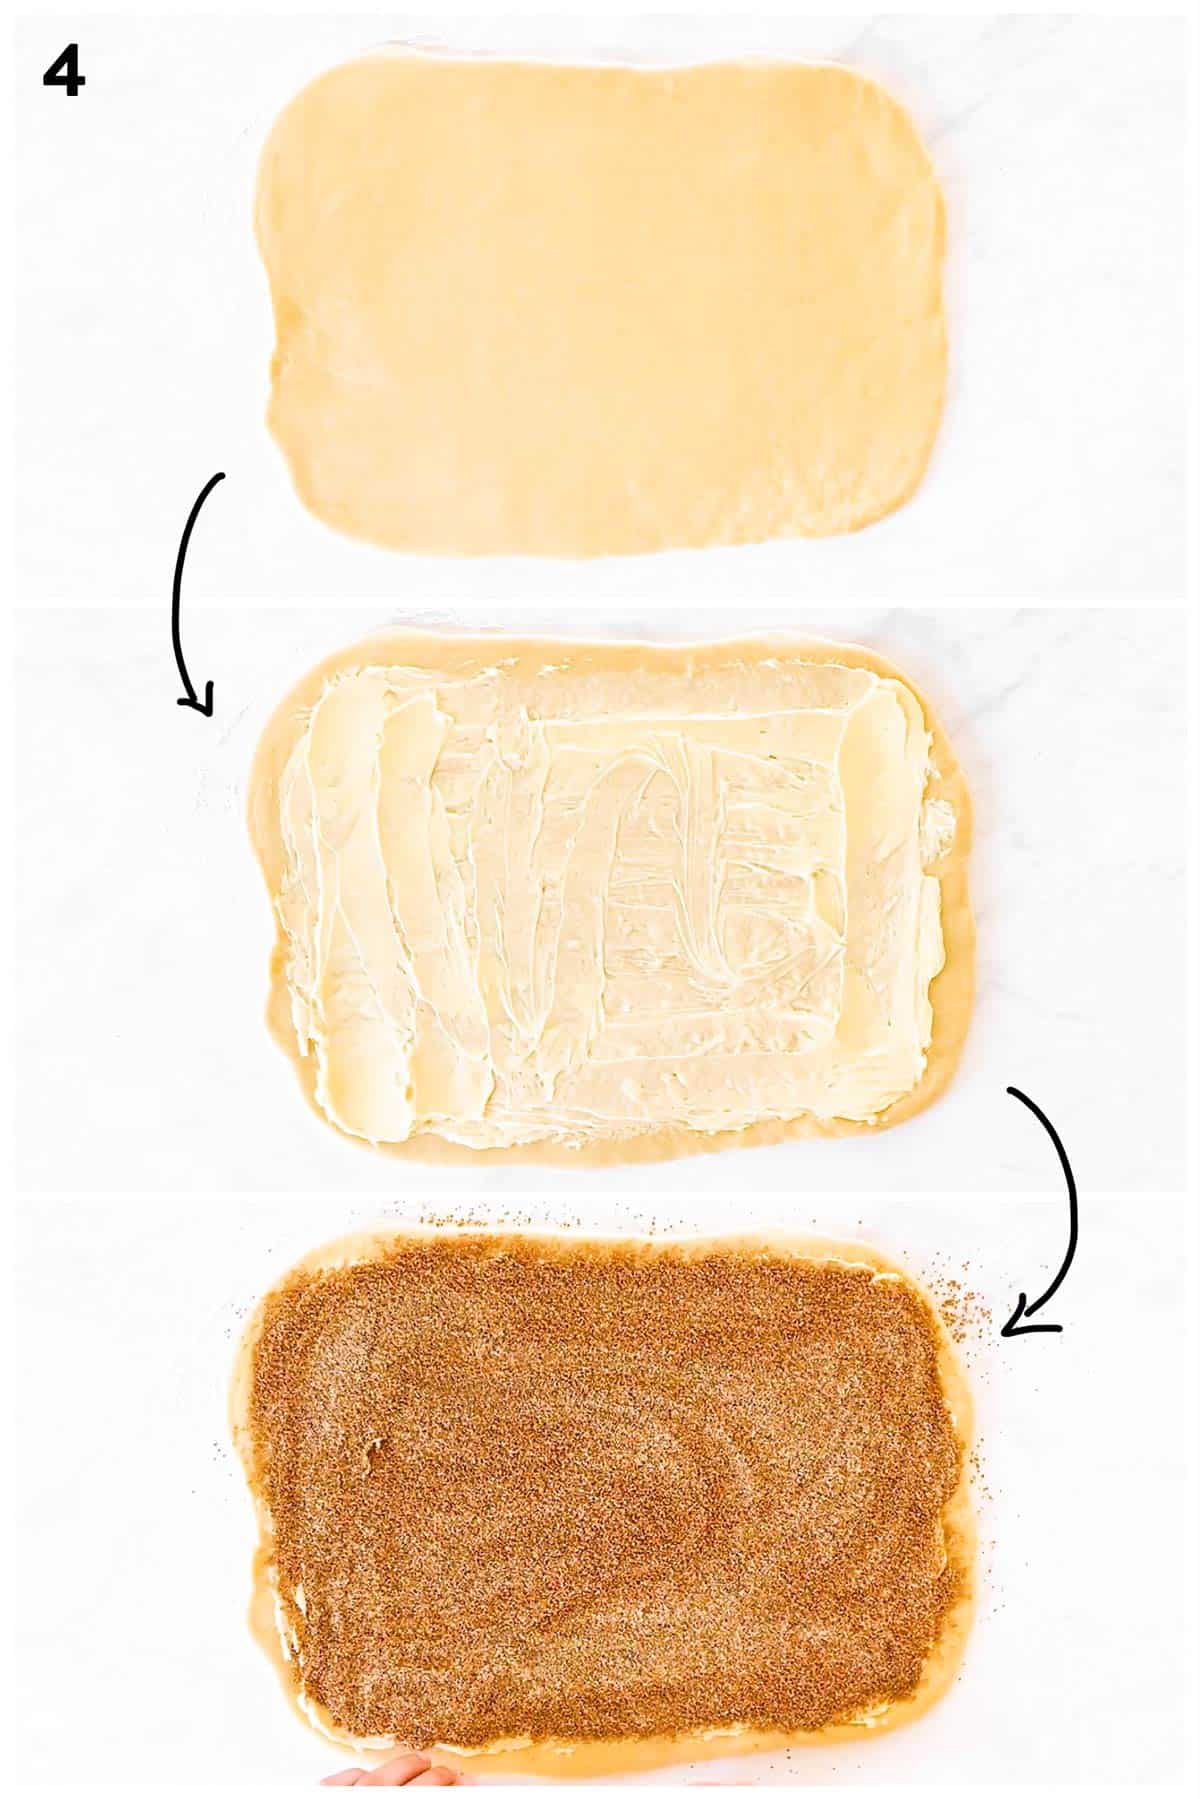
4. Now, roll the dough into a rectangle on a lightly floured surface.

Spread with butter, then sprinkle with cinnamon sugar.

photo collage to show how to spread butter and cinnamon sugar on dough

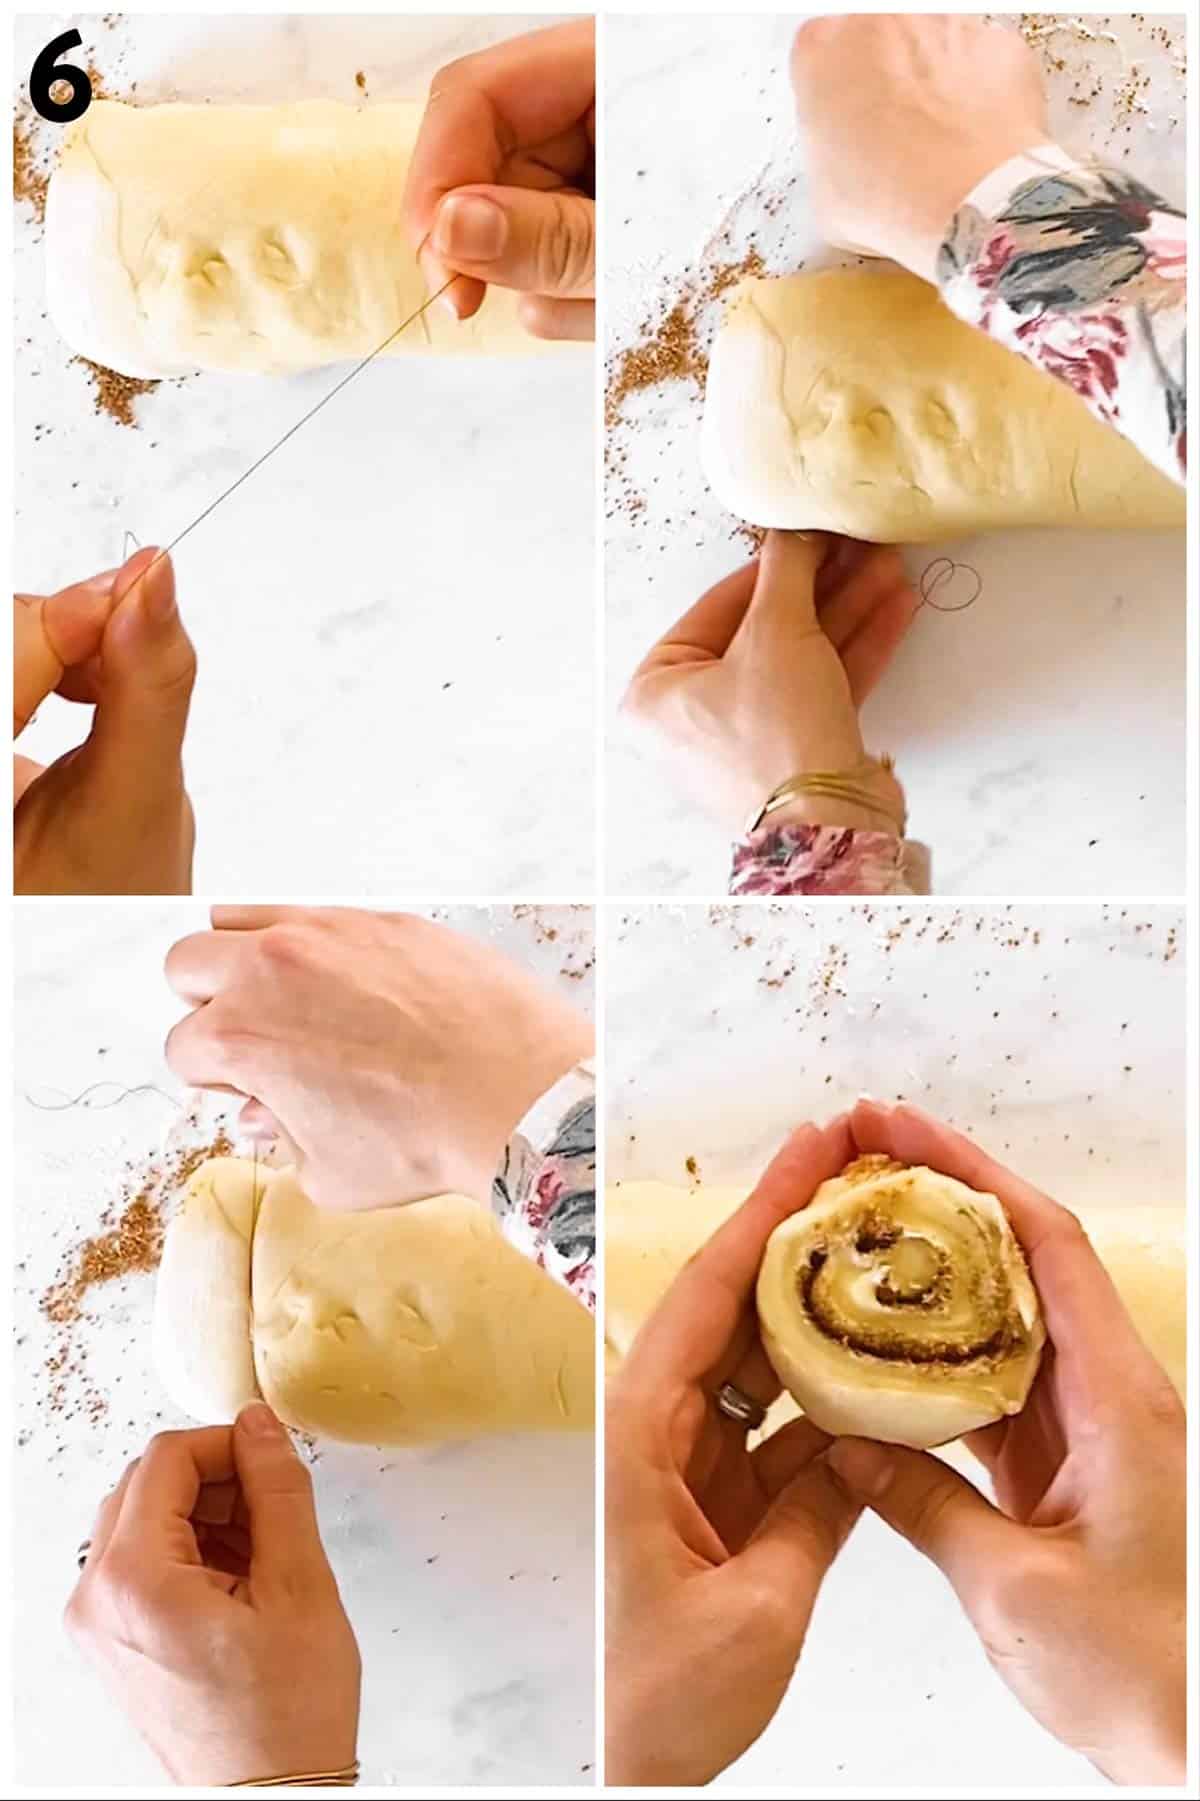
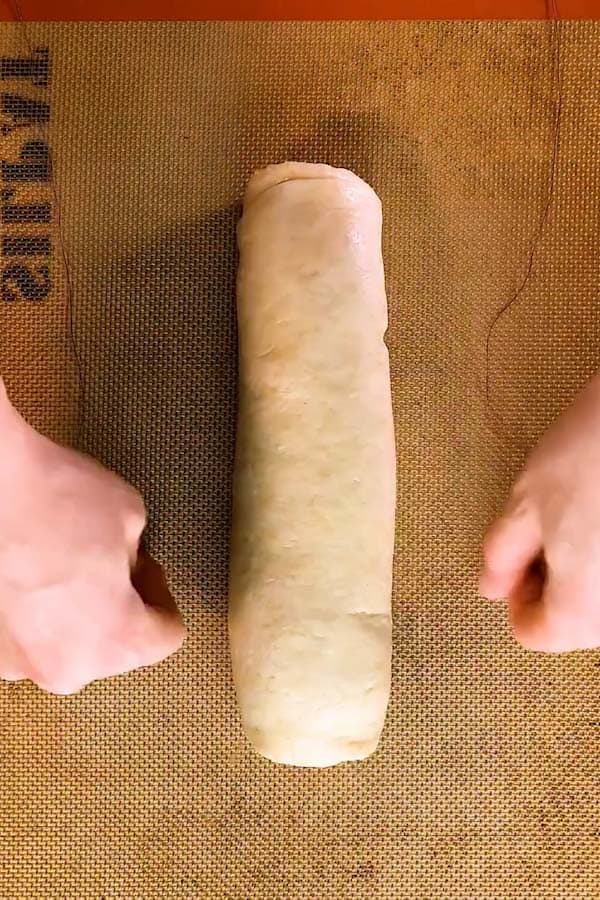
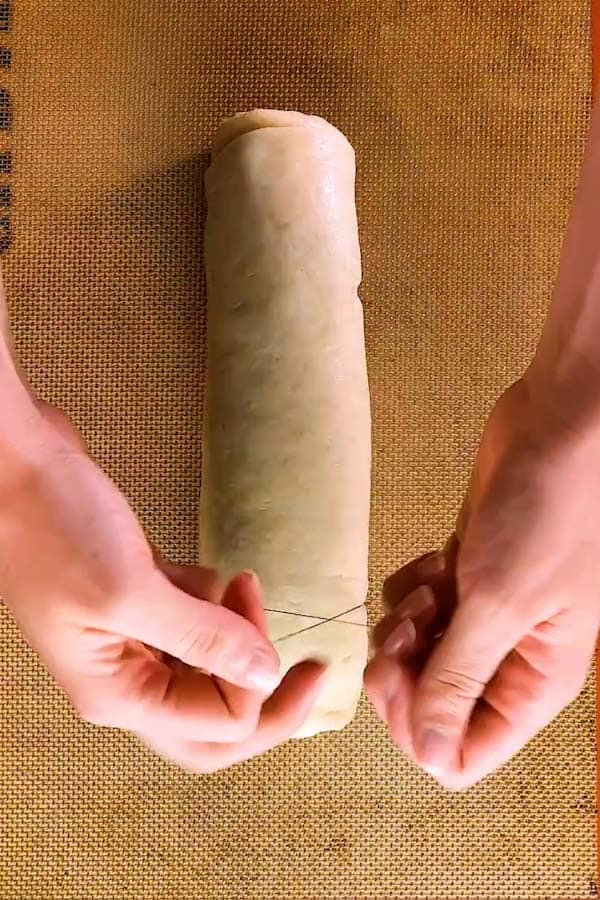
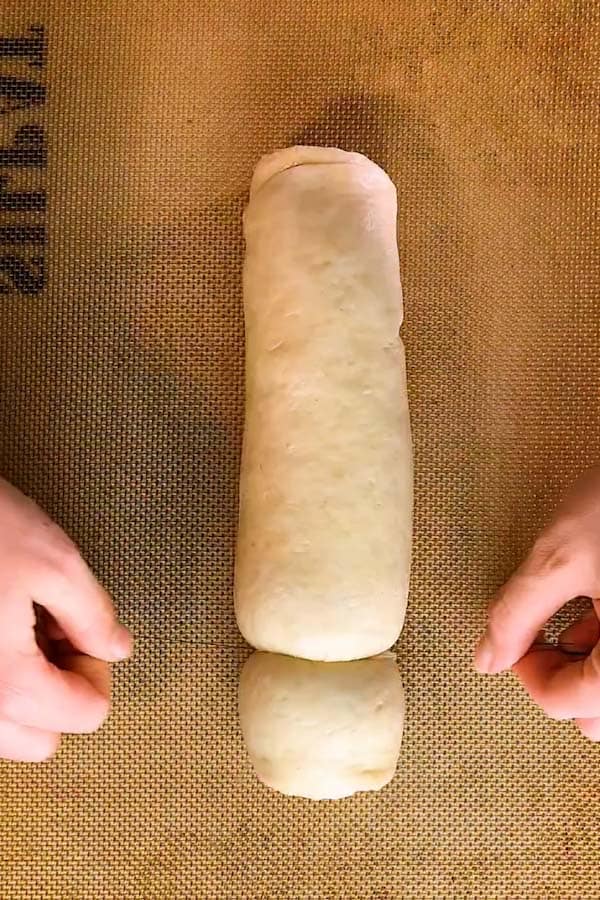
5. Roll the dough up into a firm log and pinch the seam to seal.

photo collage to show how to roll and seal a cinnamon roll log

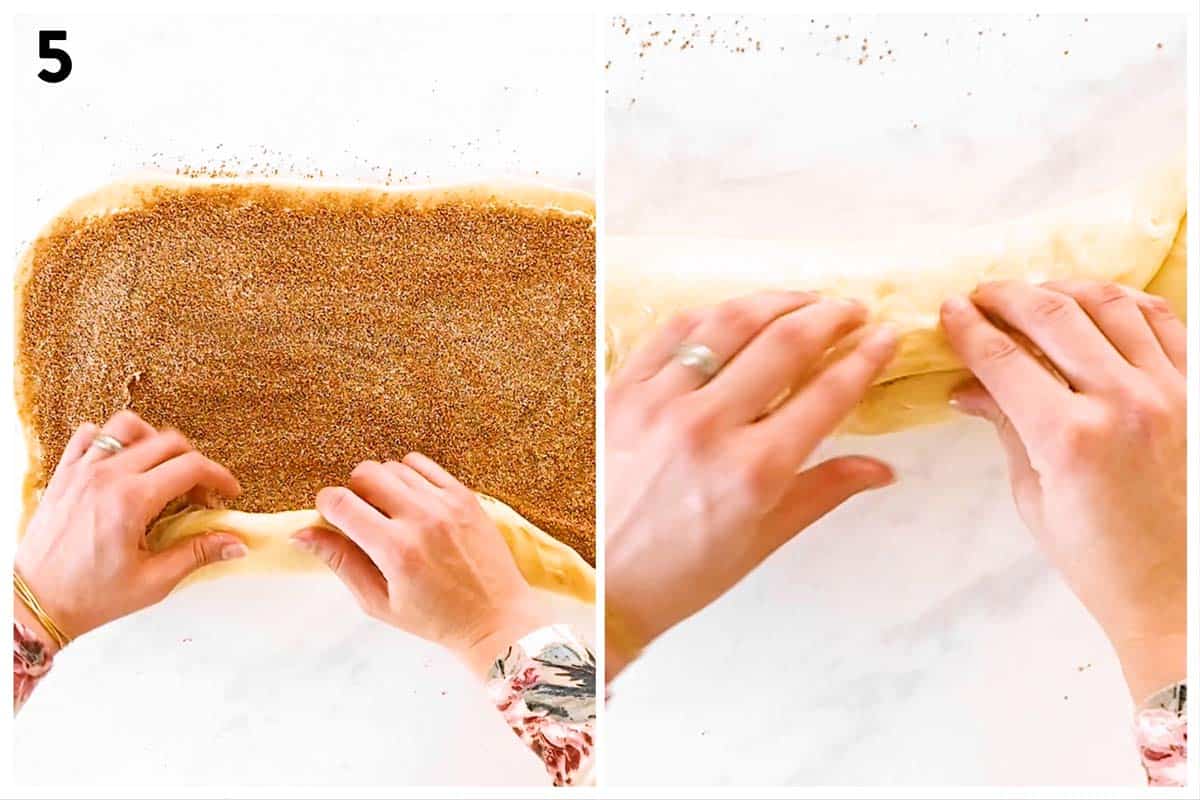
6. Slice the cinnamon roll log into rolls. I like using a piece of sewing thread or dental floss for super neat rolls!

photo collage to show how to slice cinnamon rolls

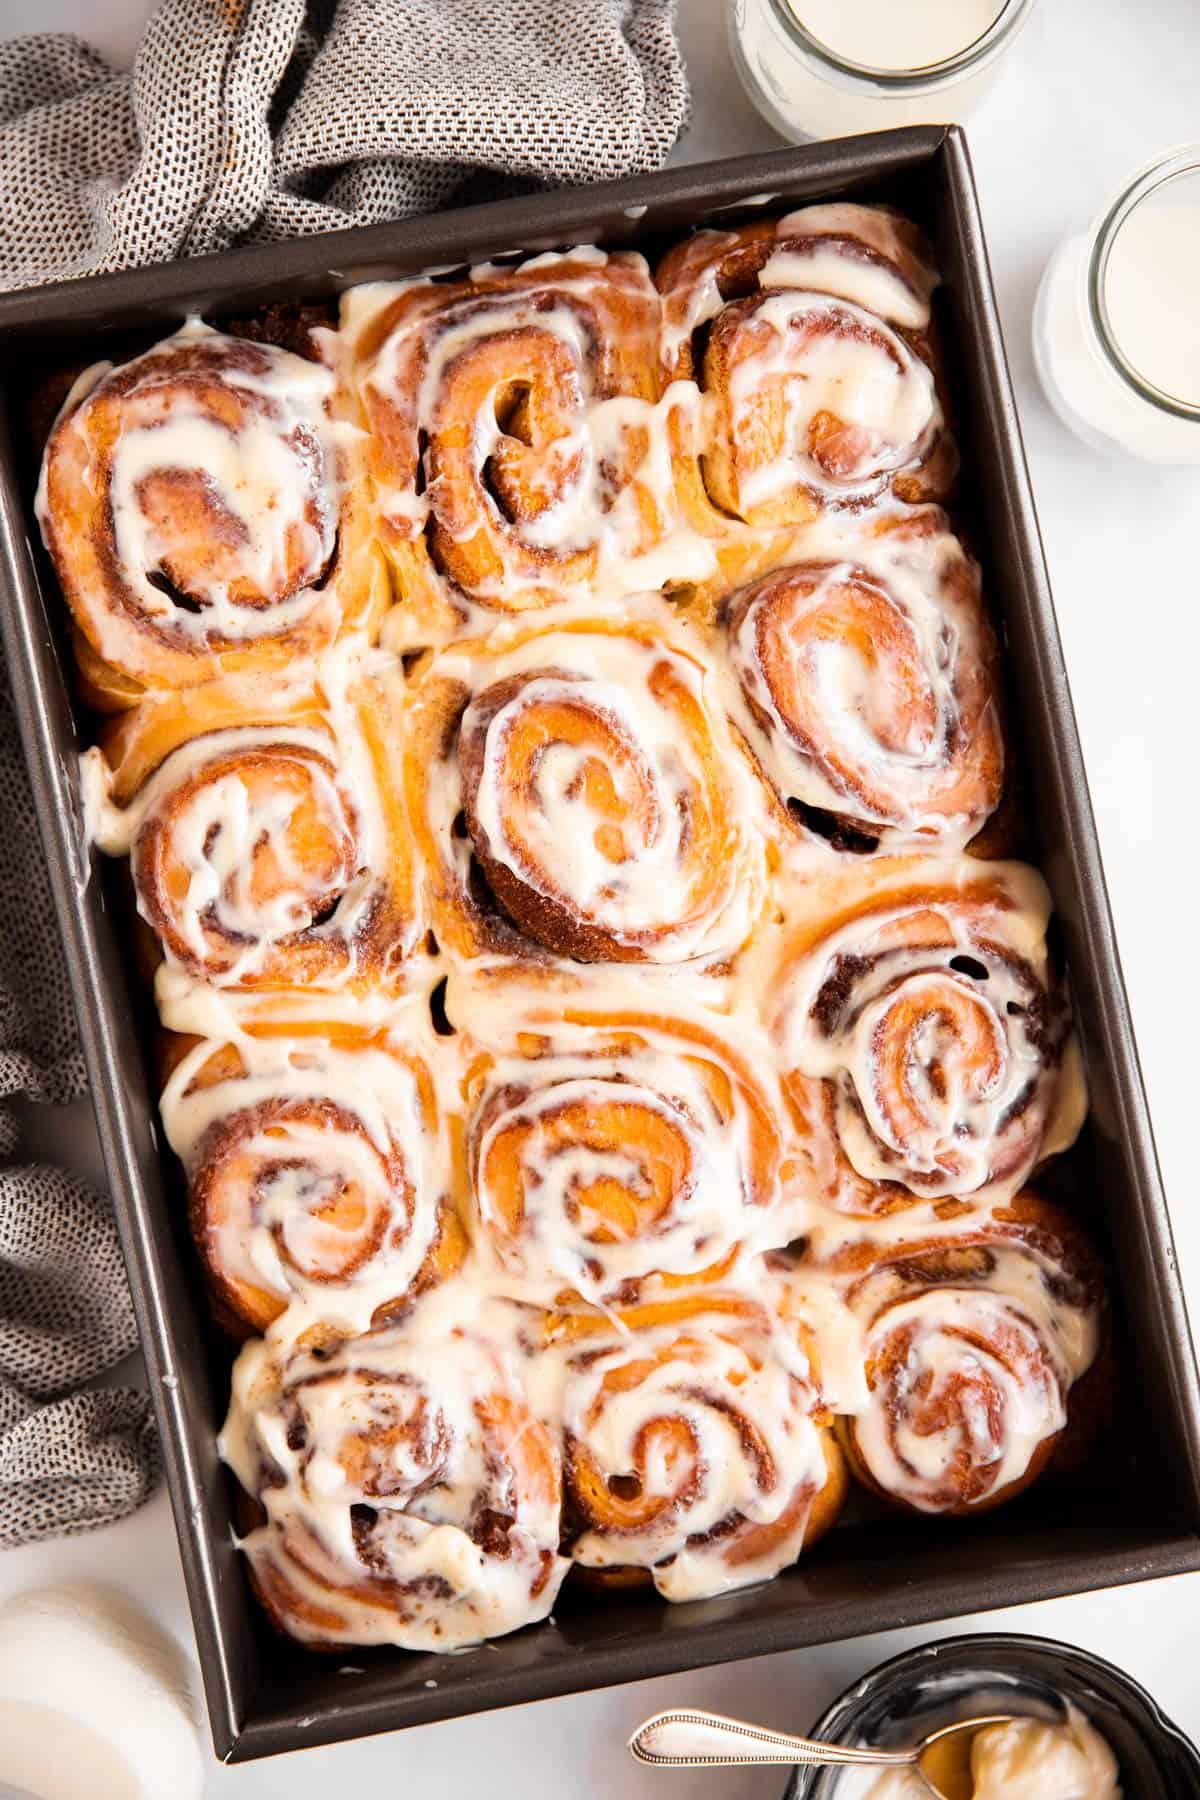
7. Place the rolls in a greased 9×13 inch dish, cover and let sit until puffy.

photo collage to show second rise of cinnamon rolls

Now just bake, then frost warm in the pan!

black pan with frosted cinnamon rolls inside

Recipe tips

Timing of rise

The exact timing will depend on many factors, including:

  • your room temperature (cooler room = slower rise)
  • your bowl (really! ceramic bowls are warmer, so if you want your dough to rise faster, don’t leave it in your mixer’s stainless steel bowl)
  • your altitude (higher altitude = faster rise)
  • your yeast (instant yeast = fast rise; active yeast = regular rise; organic yeast = slow rise)

Note: This stage can also be done in the fridge overnight! Just make sure to remove the dough from the fridge 15-30 minutes before continuing with the recipe, so it can warm up.

Cutting

Now this is where the real magic happens! Ever rolled a beautiful log of cinnamon rolls, only to then destroy their beautiful round shape by running a knife through them?

It’s actually way easier, neater and prettier to cut them with a piece of sewing thread or some unscented dental floss.

Check out my recipe video up in this post or down in the recipe card to see how it’s done!

cutting a log of dough into cinnamon rolls with a pice of string - 1
place a piece of sewing string underneath the log…
cutting a log of dough into cinnamon rolls with a pice of string - 2
… cross it over…
cutting a log of dough into cinnamon rolls with a pice of string - 3
… then pull to slice off a cinnamon roll

Baking

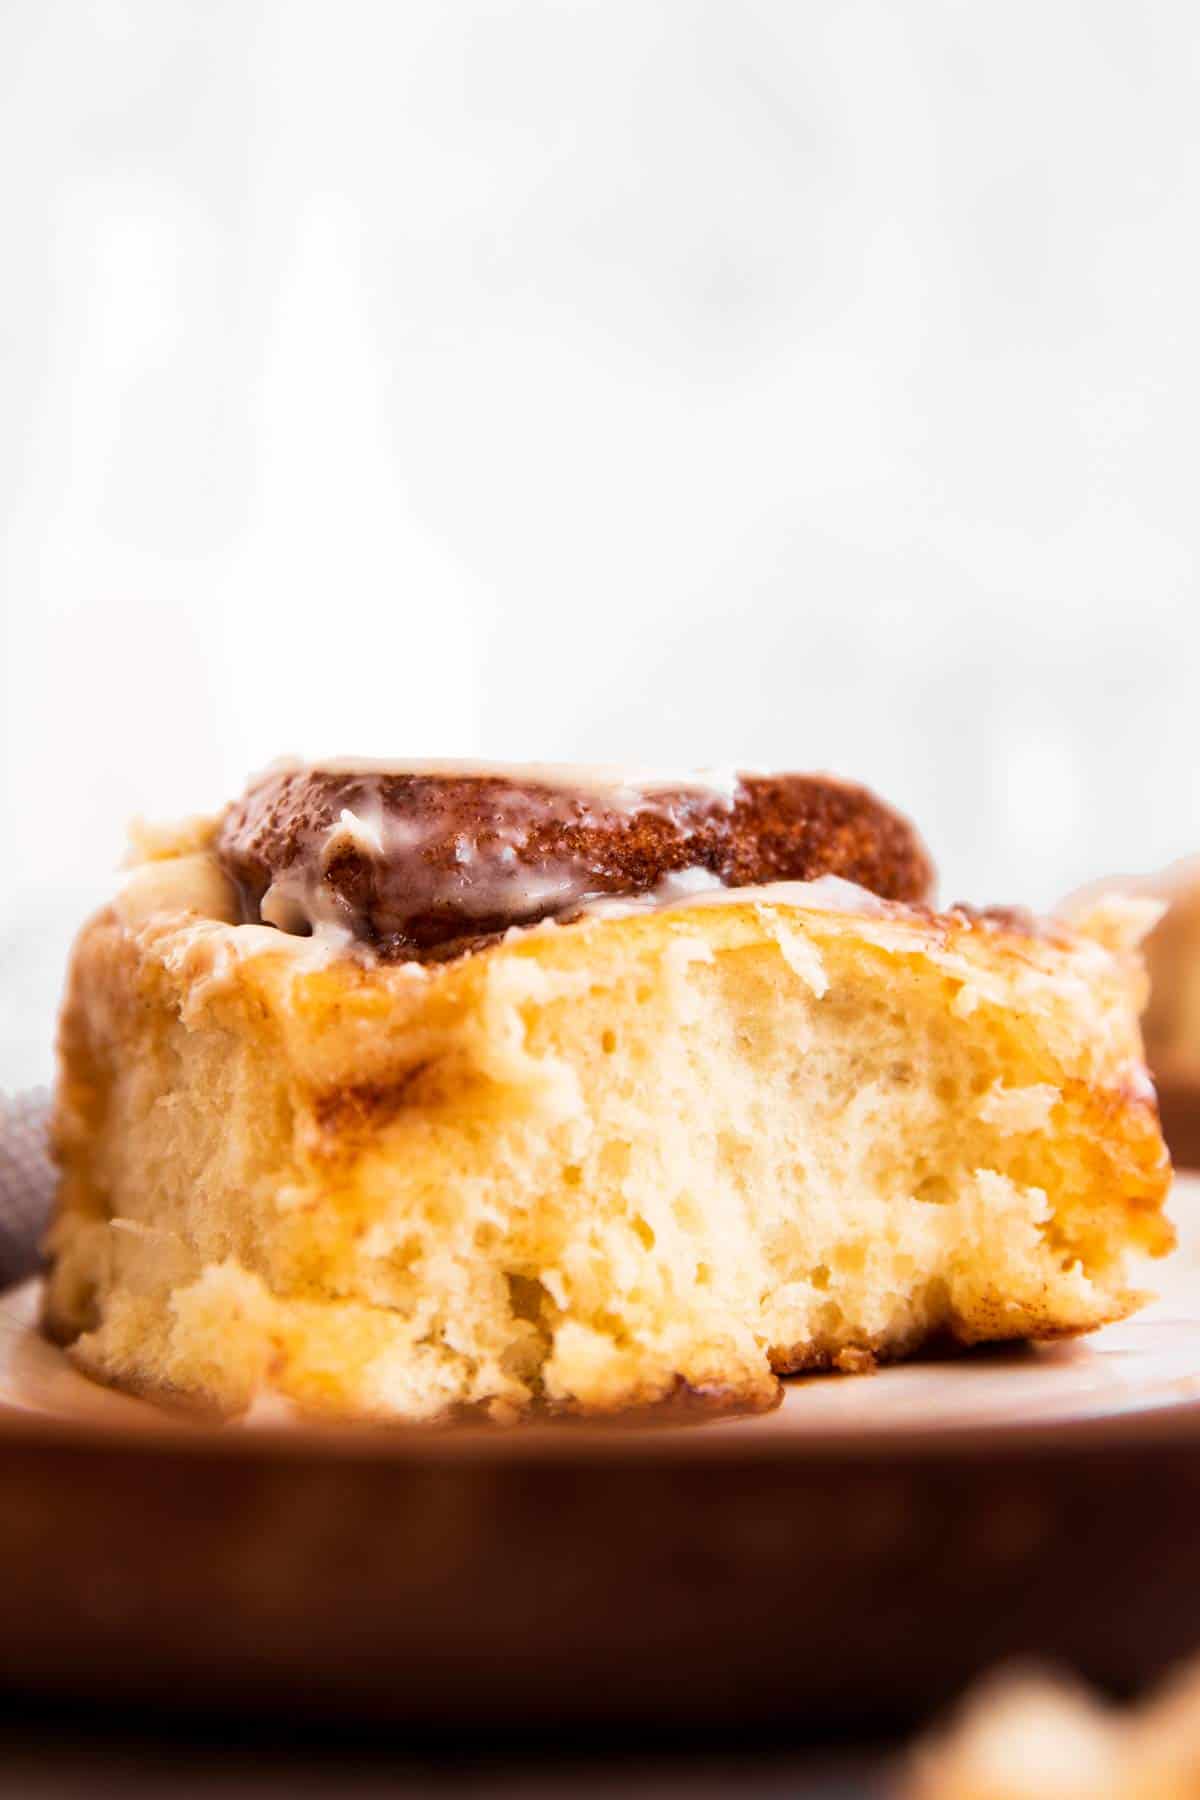
Cinnamon rolls are supposed to be soft and a bit gooey, so don’t overbake them – they’ll be dry.

It’s perfectly fine if they turn a light golden on top, but they shouldn’t turn out crispy and dark brown on top.

Be sure to watch them like a hawk! No shame in hanging out in front of your oven just to get that perfect batch of homemade cinnamon rolls 🙂

Frosting

I like to let my cinnamon rolls cool for about 5 minutes, then I frost them warm straight in the pan.

This will keep the top of your cinnamon rolls extra-soft, but the frosting will also kind of sink in as they cool. If you have leftovers and are a huge fan of the frosting, you might need to spread on some more.

overhead view of frosted cinnamon rolls

Cinnamon Roll FAQs

Why are my cinnamon rolls tough?

Tough cinnamon rolls are usually the result of a tough dough. Make sure you do not add too much flour to the dough, it is a very soft dough – it just shouldn’t be paste-like or overly sticky.

Add any extra flour one tablespoon at a time and mix it in for a minute before adding more.

What can I use instead of cinnamon in cinnamon rolls?

You can try using a spice blend such as pumpkin pie spice or gingerbread spice.

Cardamom is also really delicious, it goes well with grated orange zest and a touch of ground ginger.

How do you keep the filling from spilling out?

Sometimes, the filling can leak out from the bottom of the rolls.

If you let the rolls sit for a little, they will soak back up some of the filling as they cool.

You can also remove one roll, then tilt the pan (careful if it’s still hot – use an oven glove!) and use a spoon to catch any leaked filling. Spoon it back over the rolls before frosting them.

close up of homemade cinnamon rolls

Make ahead instructions

You can do the first rise in the fridge overnight. Make sure to remove the dough from the fridge about 30 minutes before continuing with the recipe.

I suppose you could try letting the finished rolls do the second rise in the fridge overnight if you know you’ll be short on time in the morning! They may need a few extra minutes to bake, be sure to watch them in the oven.

Freezer instructions

I recommend freezing the baked, unfrosted rolls. I separate them for convenience, that way we can pull out as many as we need.

Flash freeze the separated cinnamon rolls, spaced apart, on a baking sheet for 1-2 hours, until solid. Once frozen, wrap each in foil and place them into a large freezer bag. Label with the name and use-by date (freeze for up to 3 months).

To reheat, leave them at room temperature for 10 minutes, then unwrap. Either defrost at room temperature on a wire rack. OR defrost in the microwave.

Warm them in the microwave for 30 seconds, or in the oven at 300°F until warm. Frost them, if you like, then serve.

frontal view of cinnamon roll on wooden platter

Serving suggestions

We love these by themselves, but they do go perfectly with a mug of hot chocolate. If you’re looking for a lighter side, try my winter fruit salad!

female hands breaking apart a cinnamon roll

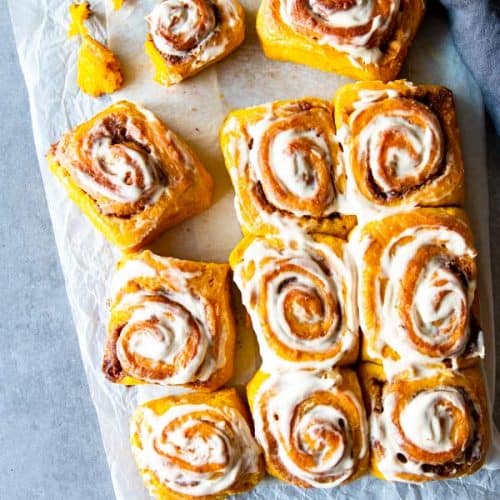
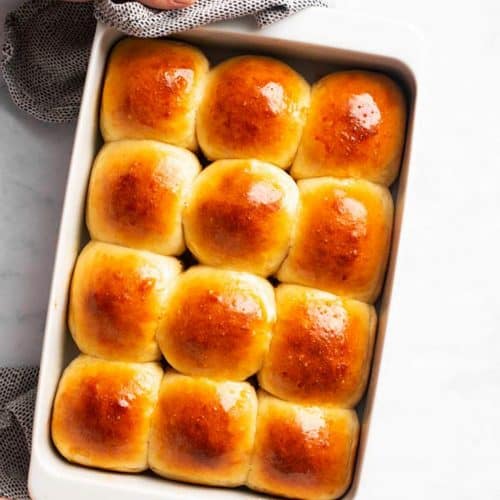
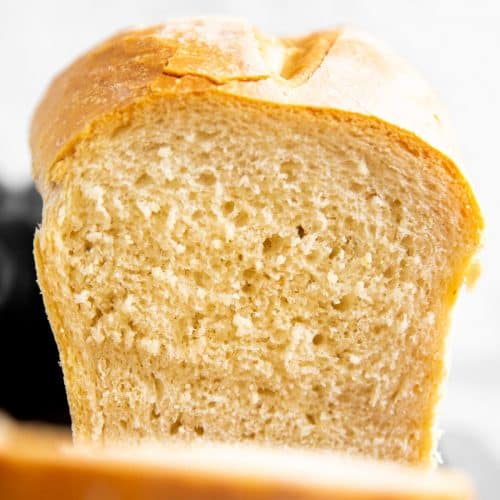
More homemade baked goods

  • pumpkin cinnamon rolls on the counter
    No Knead Pumpkin Cinnamon Rolls
  • female hands holding a white pan filled with dinner rolls
    Easy Homemade Dinner Rolls
  • close up photo of homemade German soft pretzels
    Homemade German Soft Pretzels
  • frontal view on sliced loaf of bread
    Easy Homemade Bread

PS If you try this recipe, please leave a review in the comment section and add a star rating in the recipe card – I appreciate your feedback! Follow along on Pinterest, Facebook or Instagram.

Please note: If you have made the old recipe (made without eggs) successfully and are looking for that, please print it here.

Printable Recipe Card
cinnamon roll sitting on white plate
Save Recipe Saved!

Best Homemade Cinnamon Rolls

Make the BEST Homemade Cinnamon Rolls with my easy Cinnamon Roll recipe. They're soft, fluffy and perfect for a special holiday brunch!
Recipe by Nora from Savory Nothings
made it? tap the stars to add your rating!
5 from 33 votes
Print Add Review

Recipe details

Prep 10 mins
Cook 20 mins
Rising 2 hrs
Total 2 hrs 30 mins
Servings 12 cinnamon rolls
Difficulty Easy

Ingredients
 

Dough

  • 1 package yeast 2 ¼ teaspoons
  • 1 cup milk
  • ½ cup granulated sugar
  • 4 cups all-purpose flour plus up to ½ cup more as needed
  • 6 tablespoons butter diced and softened
  • 1 teaspoon salt
  • 2 large eggs

Filling

  • 1 stick butter softened
  • ½ cup brown sugar packed
  • ½ cup white sugar
  • 3 tablespoons ground cinnamon

Easy cream cheese frosting

  • ¾ cup cream cheese
  • 1 cup icing sugar or more to taste
  • ½ teaspoon vanilla extract
  • pinch salt

Instructions
 

Make the dough

  • Warm milk to around 100°F. This will take 30-45 seconds in the microwave – do not use milk that is hotter than 105°F, or you will destroy the yeast!
  • Place yeast in small bowl with 1 tablespoon warm milk and 1 teaspoon granulated sugar. Stir, then let sit for 5 minutes, until bubbles appear on the surface.
  • Place flour, butter, salt, eggs, yeast mixture, remaining milk and sugar in the bowl of your stand mixer. Stir a little to roughly combine.
  • Knead dough in the mixer with the dough hook attached on medium speed until dough forms a ball. Dough should be completely smooth. If dough doesn't form a ball: Add more flour, 1 tablespoon at a time with the mixer running on low speed, until dough pulls together (do not add too much flour, or dough will have a biscuit-like texture). Kneading can take around 10-12 minutes, so be patient.
  • Turn dough out into a greased bowl. Shape into a ball, pinching the bottom to form a smooth surface. Place it seam down, then cover with a clean tea towel. Let the dough rise in a warm place for 1 hour, or until doubled in size.

Shape the cinnamon rolls

  • Dust work surface with flour. Turn out dough on floured surface, punch down and shape into a rectangle.
  • Roll dough into rectangle, about 18×12 inches. Dough should be around ¼ inch thick.
  • Spread 1 stick softened butter over dough. Combine both sugars and the cinnamon for the filling in a small bowl. Evenly sprinkle over butter.
  • Roll up into a log from the longer side and pinch the seam to seal. Place log seam-side down. Slice into 12 rolls (I use a piece of sewing thread or dental floss for neat rolls).
  • Place rolls in greased 9×13 inch pan. Cover with the tea towel and let sit until puffy and almost doubled in size, about 30 minutes.

Bake cinnamon rolls

  • As rolls rise, heat oven to 350°F.
  • Bake risen rolls in the hot oven until lightly golden brown. This takes around 18 minutes. Be sure to check the rolls often. If center rolls aren't baked after 20 minutes, tent pan with aluminum foil and continue baking for up to 15-20 extra minutes (this can happen if your room was cool and the dough is colder due to it).

Frost rolls

  • Place ingredients for the frosting in a medium mixing bowl. Beat with a hand mixer until smooth.
  • Once cinnamon rolls are done, remove pan form oven and place on a wire rack. Let sit for 5 minutes, then frost rolls while warm.
  • Let cinnamon rolls cool until they can be touched, then serve warm.
Want to save this recipe?Create an account for free to start your personal recipe box. Save any recipe by tapping the heart in the bottom right corner.
Join Now

Notes

Ingredient notes

  • Sugar: If you prefer, you can use all white OR all brown sugar for the filling. All brown will yield a more caramel-like taste. All white will make the filling sweeter.
  • Milk: I prefer whole milk for a richer dough, but feel free to use any fat percentage you have at home.
  • Yeast: Use active dried yeast for best results. You can use instant yeast, the dough will rise faster. The rolls tend to have a slightly “yeastier” taste with instant yeast. Organic yeast will rise much slower, so plan accordingly if you’re planning on using that.
  • Butter: I recommend using real butter here. If you have to use margarine for any kind of reason, please use stick margarine for best results.
Also please note about the butter: I used to have 8 tablespoons butter in the recipe, but some readers were having trouble managing such a fatty dough. I re-tested the recipe with 6 tablespoons, and it’s just as nice with an easier dough!

Timing of rise

The exact timing will depend on many factors, including:
  • your room temperature (cooler room = slower rise)
  • your bowl (really! ceramic bowls are warmer, so if you want your dough to rise faster, don’t leave it in your mixer’s stainless steel bowl)
  • your altitude (higher altitude = faster rise)
  • your yeast (instant yeast = fast rise; active yeast = regular rise; organic yeast = slow rise)
Note: This stage can also be done in the fridge overnight! Just make sure to remove the dough from the fridge 15-30 minutes before continuing with the recipe, so it can warm up.

Freezer instructions

I recommend freezing the baked, unfrosted rolls. I separate them for convenience, that way we can pull out as many as we need.
Flash freeze the separated cinnamon rolls, spaced apart, on a baking sheet for 1-2 hours, until solid. Once frozen, wrap each in foil and place them into a large freezer bag. Label with the name and use-by date (freeze for up to 3 months).
To reheat, leave them at room temperature for 10 minutes, then unwrap. Either defrost at room temperature on a wire rack. OR defrost in the microwave.
Warm them in the microwave for 30 seconds, or in the oven at 300°F until warm. Frost them, if you like, then serve.
Nutrition is an estimate.

More recipe information

Course: Baking, Breakfast
Cuisine: American

Nora Rusev from Savory Nothings
About Nora 
When I got married to my professional chef husband, I realized I had to step up my game in the kitchen. Now I share my favorite foolproof family recipes here on Savory Nothings: Chef-approved, kid-vetted and easy enough for everyday home cooks like you and me!   Learn more.

Reader Interactions

platter filled with ginger molasses cookies

< Previous Post

white plate with slices of ham covered in honey glaze

Next Post >

Add a Review or Ask a Question Cancel reply

Your email address will not be published. Required fields are marked *

Made this recipe? Rate it:


Comments

  1. Elda says

    March 11, 2023 at 5:37 pm

    Seems it’s taking longer than one hour to rise, is that normal?

    Reply
    • Nora says

      March 14, 2023 at 11:35 am

      Elda, did you read the notes on the rising time? The type of yeast you’re using, your altitude, the temperature of your home, the type of bowl you use… They can all have a huge impact on the rising time. For example, high altitude makes yeast dough rise much, much faster. Conversely, organic yeast for example or a cooler room temperature can make a yeast dough rise much more slowly.

      It’s also possible your yeast was not active anymore, which is why I always recommend to activate it with a little milk and sugar. If you did this and your yeast was bubbling before you added it to the remaining ingredients, you would just have to wait for the dough to rise a little longer. If you skipped activating the yeast, or used it despite not seeing any bubbles/activity, then it’s possible your yeast wasn’t good anymore and your dough would not rise no matter how long you wait.

      Writing recipes for baking with yeast can be tricky, because so many factors can alter the process and the outcome. I never want anyone to be disappointed, and I can honestly say my family makes this recipe very often, year round, and it does work beautifully as written. But still, your ingredients and environment are naturally different from mine, so your baking process may look a little different. Maybe you need to try a different brand of yeast next time, or just make sure to start the process earlier to give your dough more time. Maybe you measured out too much flour, which would make the dough stiff and difficult to rise (measuring out too much flour when using cups happens to many, many home bakers! I’m not saying this is what happened, but it is possible to impact yeast this way so I wanted to mention it).

      Finally I do want to add, I have also experienced before that a dough would just rise very little, I would get impatient and bake it anyway – only to have it rise beautifully in the oven. Even the current weather, humidity etc. can change how your yeast behaves.

      The most important thing in my humble opinion is to just bake a lot, and to get the “feel” for working with yeast, if you want to be able to bake under any and all circumstances. My grandma makes yeast dough without measuring any ingredients, goes out to feed the cattle in between kneading and her bread always comes out perfectly… It’s the decades of experience nothing can ever come close to!

      Reply
  2. Connie says

    December 25, 2021 at 8:43 pm

    5 stars
    I made these for Christmas breakfast and they were amazing! Thank you!

    Reply
    • Nora says

      January 01, 2022 at 10:32 am

      I’m so glad, Connie!

      Reply
  3. Tom motschman says

    October 31, 2021 at 3:38 pm

    Wonderful rolls, MAKE THEM A LOT.

    Reply
    • Nora says

      November 01, 2021 at 5:02 pm

      I’m so glad, Tom! They are one of my family’s favorite recipes.

      Reply
  4. Arlyn says

    April 05, 2021 at 4:26 am

    5 stars
    My first time making homemade cinnamon rolls and this recipe was amazing! Definitely keeping this one for the future! Yum😋

    Reply
    • Nora says

      April 08, 2021 at 9:34 am

      I’m so glad, Arlyn!

      Reply
  5. Paula says

    January 15, 2021 at 2:41 am

    5 stars
    First attempt at homemade cinnamon rolls. Tried another recipe first and had to toss the dough. Found your recipe with more detail and it worked much better. Dough did take much longer to rise the dirst round than I’m used to and was afraid I’d messed up again, but after about 2 hours it was good to go. 2nd rise went much quicker. Very good and hubby loved them. Will make again but will try halving the recipe as it’s only the two of us and stuff gets lost in our freezer. 😉. Thanks for all the details and notes. Very helpful!

    Reply
  6. Angela says

    January 02, 2021 at 7:51 pm

    5 stars
    I literally have never left a recipe review. This is THE best recipe for cinnamon rolls I have ever used. I made three batches in one day for a breakfast for my huge extended family. They were a huge hit and I’ll never be able to buy pillsbury again! This recipe is absolutely perfect with no substitutions used. PERFECT! Thank you for sharing!

    Reply
    • Nora says

      January 10, 2021 at 4:23 pm

      I’m so glad, Angela!

      Reply
  7. B. Morgan says

    December 24, 2020 at 6:38 pm

    5 stars
    I was super confused this morning when I pulled up this recipe and saw all the changes. I went back to reread and saw the link to the old recipe, much to my relief! I’ve never ever had a problem with the old recipe without eggs and I’ve made this several times. Thank you for keeping the old recipe around! I may try the new recipe eventually, but for now I’m sticking with tried and true lol

    Reply
  8. Michele says

    December 23, 2020 at 2:56 am

    5 stars
    Let me preface this by saying, I’m very much a fan of “dump and go” recipes. That being said, I LOVED this recipe. This was my first time making cinnamon rolls from scratch and I have to say…I impressed myself! My friend has tweaked her own recipe to give her cinnamon rolls a gooey bottom layer. I’m going to try that bottom layer with this recipe the next time I make them. Thank you very much for sharing this recipe!

    Reply
    • Nora says

      December 23, 2020 at 10:44 pm

      Michele, I’m so glad to hear this. And now I need to know this trick with the gooey bottom layer 🙂

      Reply
  9. Cindy says

    August 21, 2020 at 2:11 am

    5 stars
    I was somewhat worried as they did not seem to rise as much as I thought they would, but they turned out fabulous. Not quite as big or puffy as I have made in the past, but here in SC the humidity changes everything when it comes to yeast and rising!!! Thank you so much!!

    Reply
  10. Sherry says

    May 30, 2020 at 2:21 pm

    5 stars
    Made these this morning for my anniversary breakfast. It was my first time making cinnamon rolls ever! And these did NOT disappoint. So so so good!!! I followed your recipe to the T and wouldn’t change a thing. Thank you! 🙂

    Reply
  11. Sue says

    May 01, 2020 at 12:52 am

    5 stars
    This is by far the best cinnamon role recipe I have ever made. It is very “Cinnabon” in taste and texture!!
    The only adjustment that I felt I had to make was reduce the butter. I used half a stick of butter in each of the dough and the filling. The rolls were amazing!!

    Reply
  12. Christina says

    April 18, 2020 at 8:22 pm

    Recipe is missing an egg, dough was tough even after allowing it to rise for over 1 1/2 hours.

    Reply
    • Nora Rusev says

      April 18, 2020 at 9:53 pm

      I’m very sorry to contradict, Christina, but the recipe is definitely accurate as-written – it’s not missing an egg. The melted butter plus milk yield more liquid than an average bread dough uses for this amount of flour, so it should be a rather slack dough already. I’m sorry the recipe didn’t work out for you. Please make sure to always spoon and level flour for baking recipes, never scoop it out with the measuring cup. Scooping the flour with the measuring cup almost always results in too much flour being used, yielding a tough dough.

      Reply
      • Gayla Snowdon says

        May 12, 2020 at 3:57 pm

        I’m finding the same results. I’ve been making yeasted products for years, and this dough is so tough. Slow to rise. Think I will go back to my old recipe where the butter is incorporated after the first rise. Making bread at the same time and looks beautiful, so not ingredients.

        Reply
    • Victoria says

      May 13, 2020 at 5:37 pm

      I found the same. I even read comments first and made sure to measure my flower accurately. Not sure where I went wrong but my dough was very tough

      Reply
      • Nora Rusev says

        May 13, 2020 at 9:25 pm

        My husband makes this recipe once a week from September through to February with our kids, so I can assure you that it works well for us. Baking with yeast can depend on so many factors, but please know that I truly am very sorry the recipe didn’t come out as you expected.

        We bake all of our own bread etc, so I have a few ideas why it might be tricky for some people and very successful for others (there are many successful photos of this recipe on Pinterest and Instagram):

        – if your milk/butter mixture is too hot, it will instantly kill the yeast and the dough will stay tough. Make sure it’s no hotter than 105°F before adding it to the mixer. If you heated your milk in addition to the butter, that’s a big no-no for this recipe. I’m sure you know this, but I thought I’d mention it anyways for others who might not be experienced bakers.
        – if you’re using butter with a lower fat content, the dough may not come out as smooth as it should be. In this case, a few extra tablespoons milk will help.
        – your humidity and altitude play a huge role in baking with yeast. They affect everything from liquid required to rising time. Unfortunately, it’s hard to make recommendations for these as they’re so individual.
        – Cinnamon roll dough generally does take a much longer time to rise than plain bread dough – the sheer load of butter in the dough makes the yeast grow slower, so patience is an absolute must. Sure, you could just add more yeast to make it grow faster – but the taste will be negatively affected. I prefer to wait it out a bit longer for a better tasting baked good.

        In any case, I have updated the recipe with a few suggestions related to the issues I outlined above. Again, I’m very sorry the recipe gave you trouble.

        Reply
  13. Judy says

    April 09, 2020 at 11:01 pm

    Hello
    I tried your recipe this afternoon and enjoyed the cinnamon rolls with my best friend 😉
    It was my first batch ever; the rolls looked savory and tasted delicious!
    Thank you,
    Judy

    Reply
    • Nora Rusev says

      April 13, 2020 at 3:17 pm

      Judy, I’m so glad! Thank YOU for making my recipe, and for combing back to leave a review. I appreciate it!

      Reply
  14. Lindi says

    November 28, 2019 at 3:36 pm

    I haven’t made yet only just now found your recipe…. I’m now doing cartwheels and grandstands in my big comfortable lounge chair and hopefully my very long search for the ultimate cinnamon roll has finally come to an end…. lol Every recipe well 80% of them use America’s crescent roll as a base and you can’t buy it here in Australia, I have tried your (US) biscuits recipe and our (AUS) scones dough but are a bit heavy and doggie. I love everyone describes their Cinnamon Srolls as the best ever, but I haven’t thought so. I also had a look at your pumpkin scrolls and the to sound Devine. I love Butternut pumpkin, not sure if you have them up in the States, it’s a sweeterone and so very versitle fantastic for steaming, mash, oven roasted, pan roasted and baking… once I have made I will post a photo… Happy Thanksgiving to you…

    Reply
  15. Charlene says

    May 18, 2019 at 3:18 pm

    How many days do the rolls last after they are made?

    Reply
    • Nora says

      June 06, 2019 at 3:26 pm

      I honestly don’t know, Charlene… Never more than a day around here 😉

      Reply
  16. Claire says

    December 26, 2018 at 7:16 pm

    5 stars
    Thanks for all the details. Tried it, turned out amazing so I’m making it again!
    Quick question since I’m planning to make the dough a couple days in advance, how long does the dough last in the fridge?

    Reply
    • Nora says

      December 27, 2018 at 8:57 am

      Hi Claire, happy to hear the cinnamon rolls turned out well for you! It’s one of my favorite recipes this time of the year.

      You can absolutely make the dough a few days in advance, but you have to freeze it BEFORE the 45 minute rise in step 5 of “making the dough”.

      When defrosting, you have to account for the time it takes for the dough to thaw and rise until doubled in size. It still needs to be chilled after the rise, too.

      I have tried pretty much every other way of chilling or freezing the dough, and this is by far the best method with the best baking results. Anything else turned out flat and/or soggy. Hope that helps!

      Reply
  17. Rosa says

    August 14, 2018 at 12:43 am

    5 stars
    I loved every single detail in the recipe.
    thank you so much.

    Reply
    • Nora says

      August 17, 2018 at 8:44 am

      I’m glad you enjoyed the recipe, Rosa! Thank you so much for coming back to leave a review – I appreciate it.

      Reply

Primary Sidebar

Nora Rusev from Savory Nothings

welcome to

logo for the Savory Nothings brand

Hi, I'm Nora! I wasn't always a good cook, but then I fell in love with a professional chef and learned my way around the kitchen. Now I share all my secrets to effortlessly great food here on my blog, bite-sized for home cooks just like me and you.

More about me →

Easter Recipes

  • close up photo of glazed carrots with parsley
    Perfect Glazed Carrots
  • overhead view of strawberry rhubarb pie with dish towel and fresh fruit next to it
    Strawberry Rhubarb Pie
  • frontal view of sliced lemon loaf cake
    Glazed Lemon Loaf Cake
  • overhead view of roasted carrots on foil lined pan
    Honey Roasted Carrots

see all >

Popular

  • overhead close up view of garlic parmesan oven fried chicken piece on black pan
    Garlic Parmesan Crispy Oven Fried Chicken
  • overhead view of three oven baked chicken breasts in white casserole dish
    Oven Baked Chicken Breast
  • overhead close up photo of a piece of oven fried chicken on a black sheet pan
    Crispy Oven Fried Chicken
  • overhead close up photo of chocolate chip baked oats
    TikTok Baked Oats: 6 Ways!
  • white bowl with rigatoni bolognese
    One Pot Rigatoni Bolognese
  • chicken tacos on wooden platter
    Southwestern Crockpot Chicken Tacos
  • casserole dish with shepherd's pie
    Homemade Shepherd’s Pie
  • close up photo of a sliced banana bread
    Whole Wheat Cinnamon Crunch Banana Bread

Trending on Pinterest

  • Balsamic Chicken Marinade
  • Swedish Meatballs
  • Mexican Beef and Rice Skillet
  • Instant Pot Pot Roast
  • Homemade Salisbury Steak
  • About
  • Contact

Footer

Footer

Follow Along


Recipes

Breakfast
Lunch
Dinner
Sides
Dessert
Appetizers

Instant Pot
Slow Cooker
One Pot
Casseroles
Ground Beef
Chicken

Featured On

different logos of publications Savory Nothings' content has been featured on

↑ back to top

About | Contact | Work with Us

Copyright Savory Nothings © 2023

Made with lots of love and spices ♥︎
PRIVACY POLICY | ACCESSIBILITY STATEMENT |
As an Amazon associate, I earn from qualifying purchases.

  • Facebook
  • Pinterest
  • Email
  • Yummly
  • Mix