

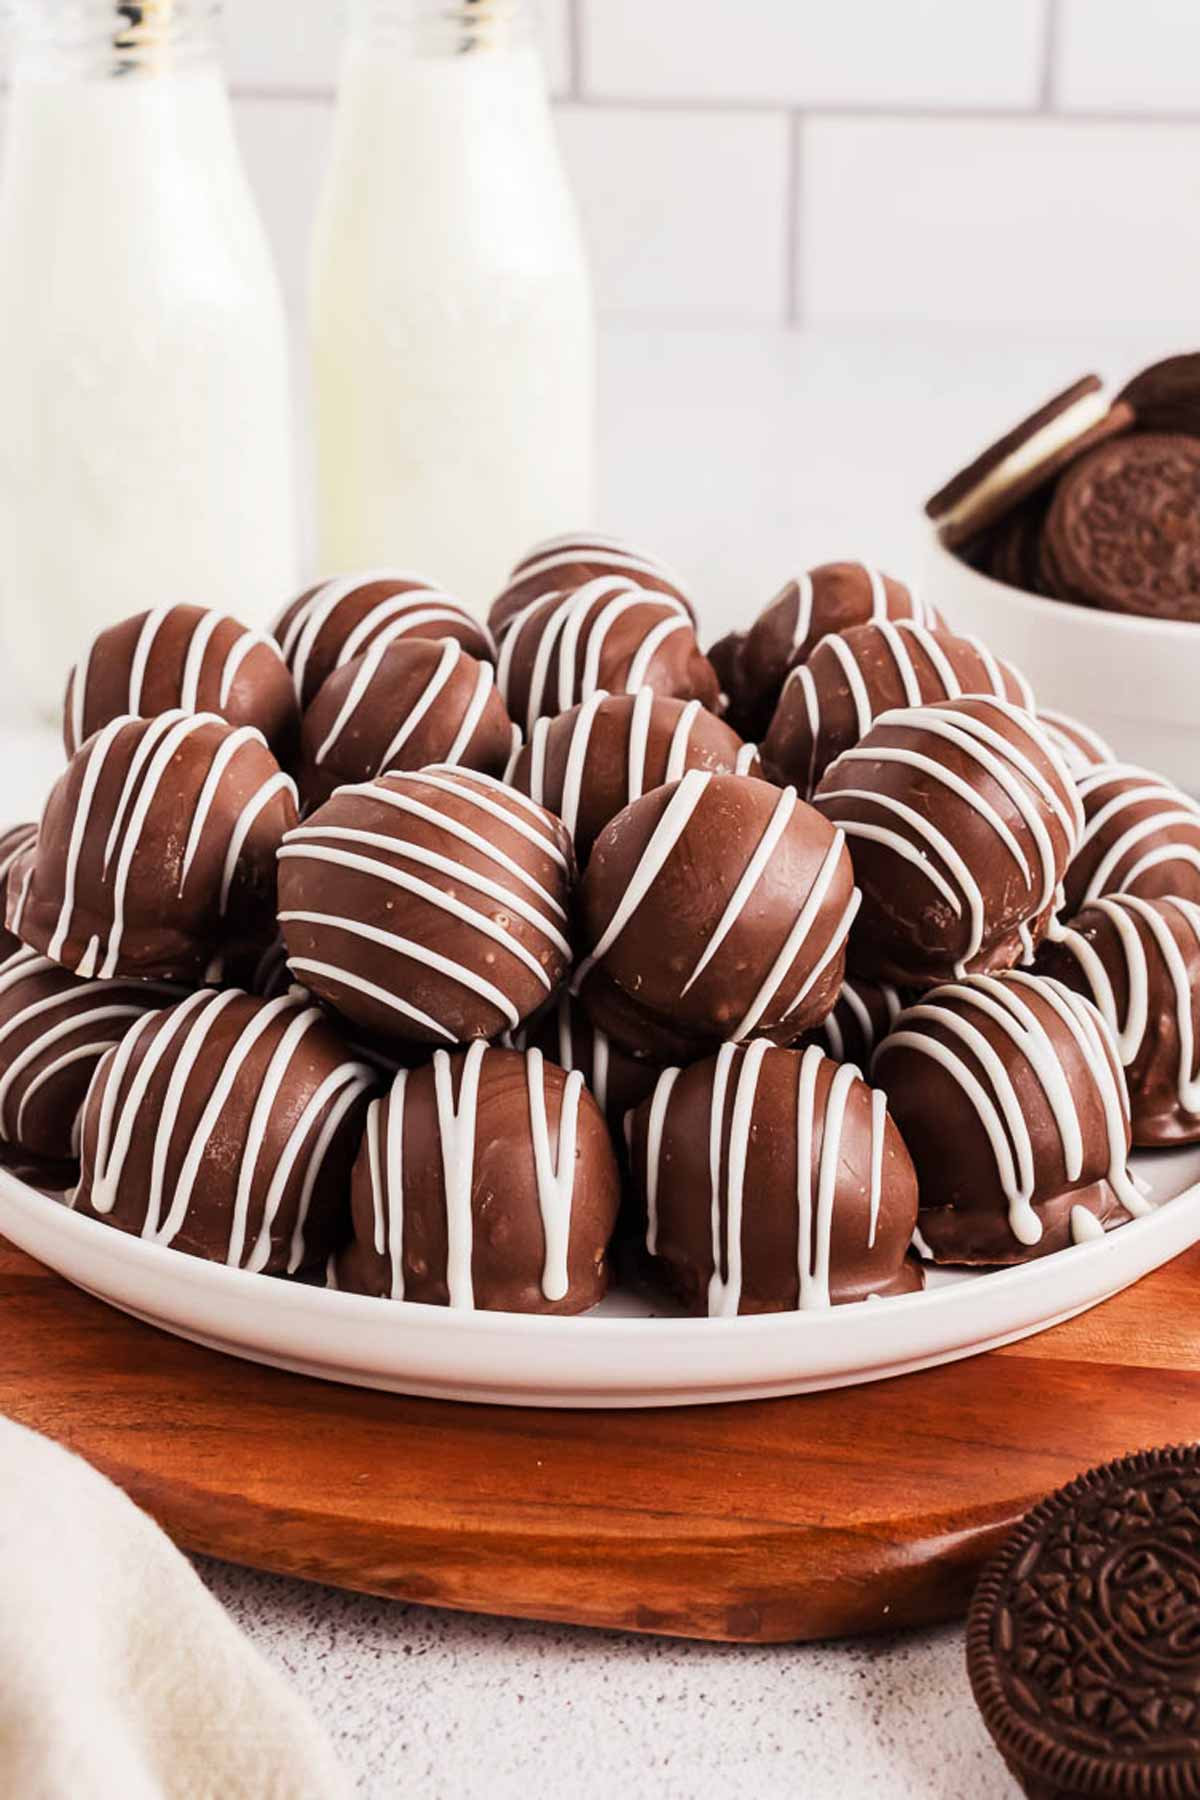
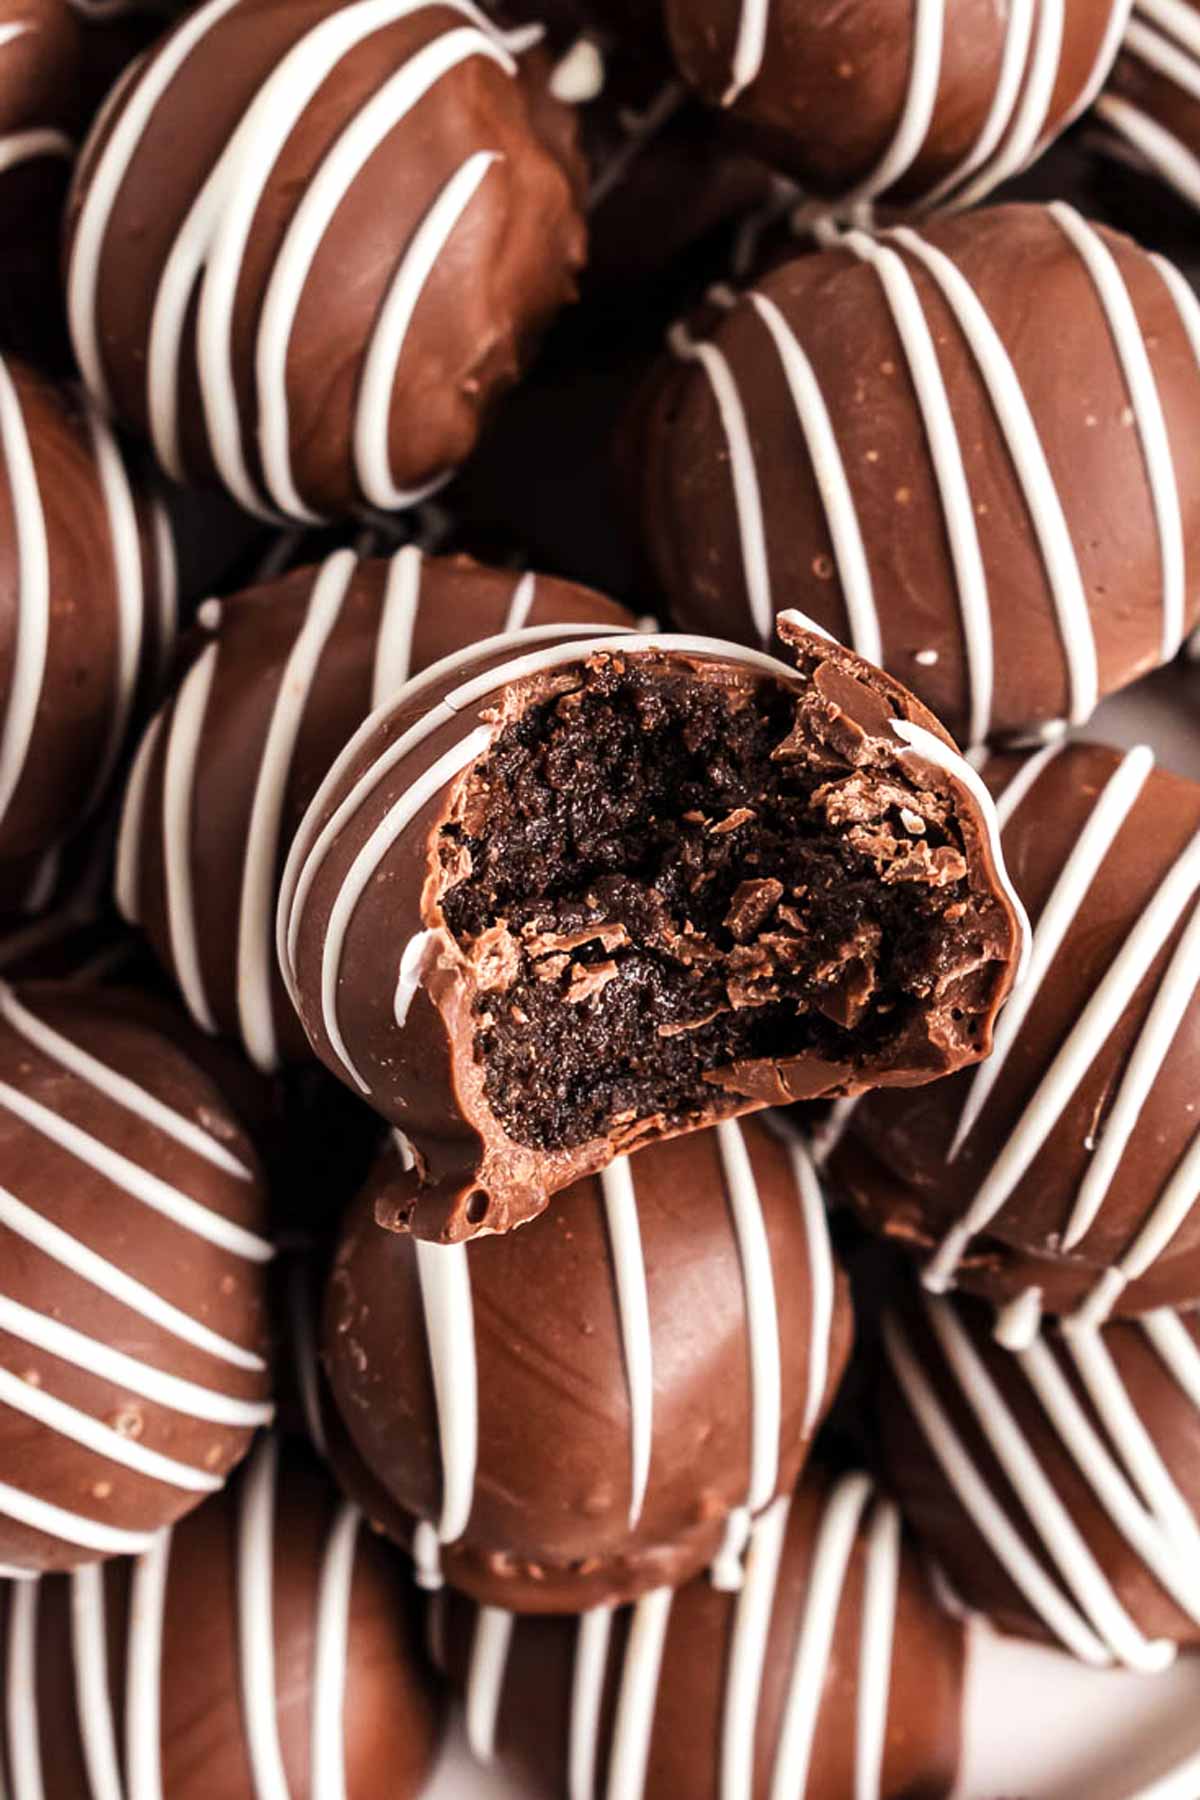
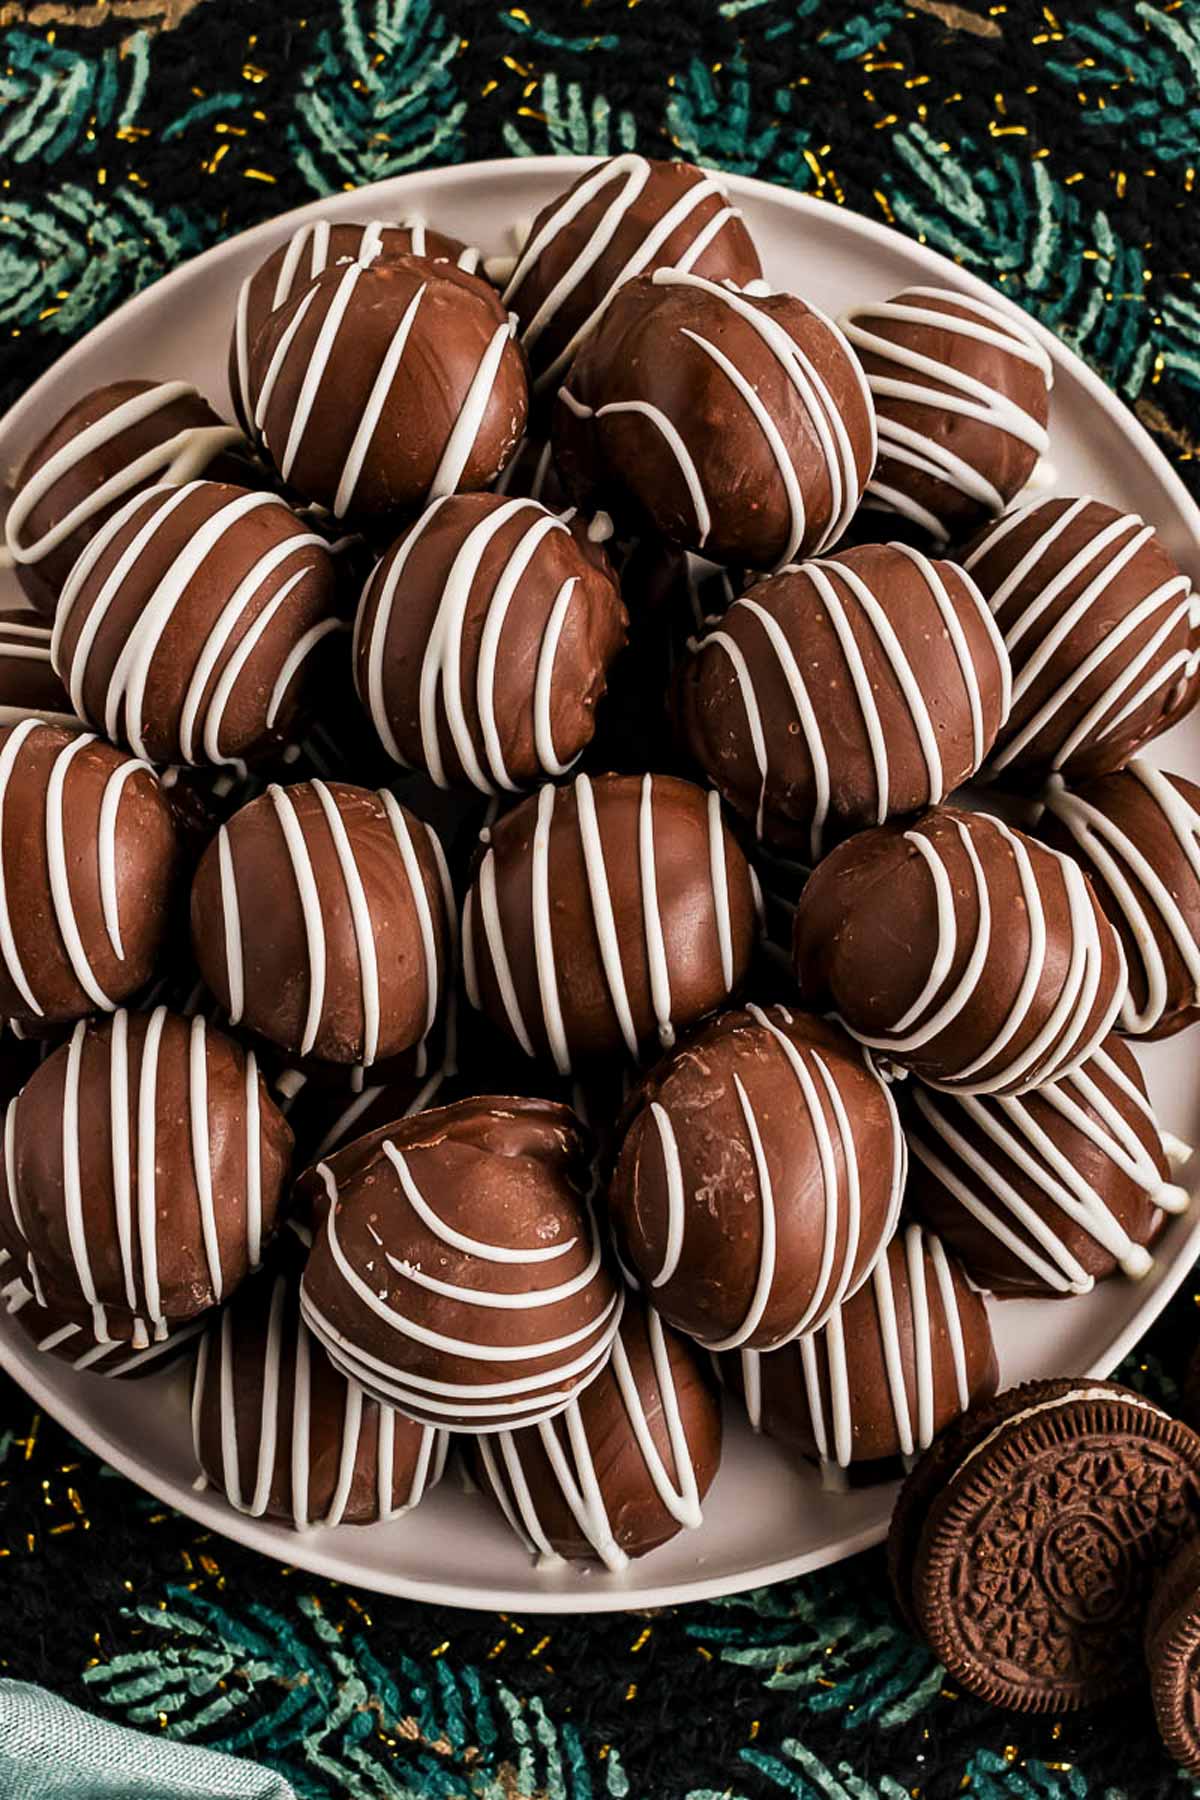
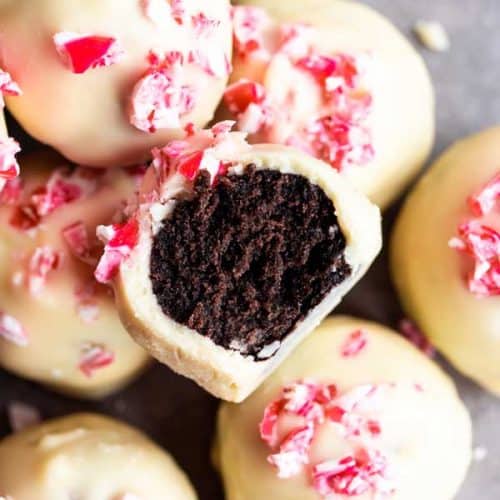
If you’re looking for the ultimate crowd-pleaser, these Oreo truffles are it! They’re rich, chocolatey, and irresistibly creamy – the kind of treat that makes you the hero of every potluck, party, or cozy family night.
Trust me, this is the BEST Oreo truffles recipe out there, and I’m sharing all my secrets to make sure they turn out perfectly every single time!
Why you’ll love this recipe
- Incredibly easy to make: With just a few simple ingredients and no baking required, these truffles come together in no time – perfect for busy families who need a quick win in the kitchen!
- Crowd-pleasing perfection: Whether it’s a holiday gathering, a birthday party, or a sweet treat for the family, these Oreo truffles always disappear faster than you can say “dessert’s ready!”
- Foolproof chocolate coating tips included: I’ll walk you through the best way to coat these truffles without the mess or stress, so they look just as amazing as they taste!
Ingredients you’ll need
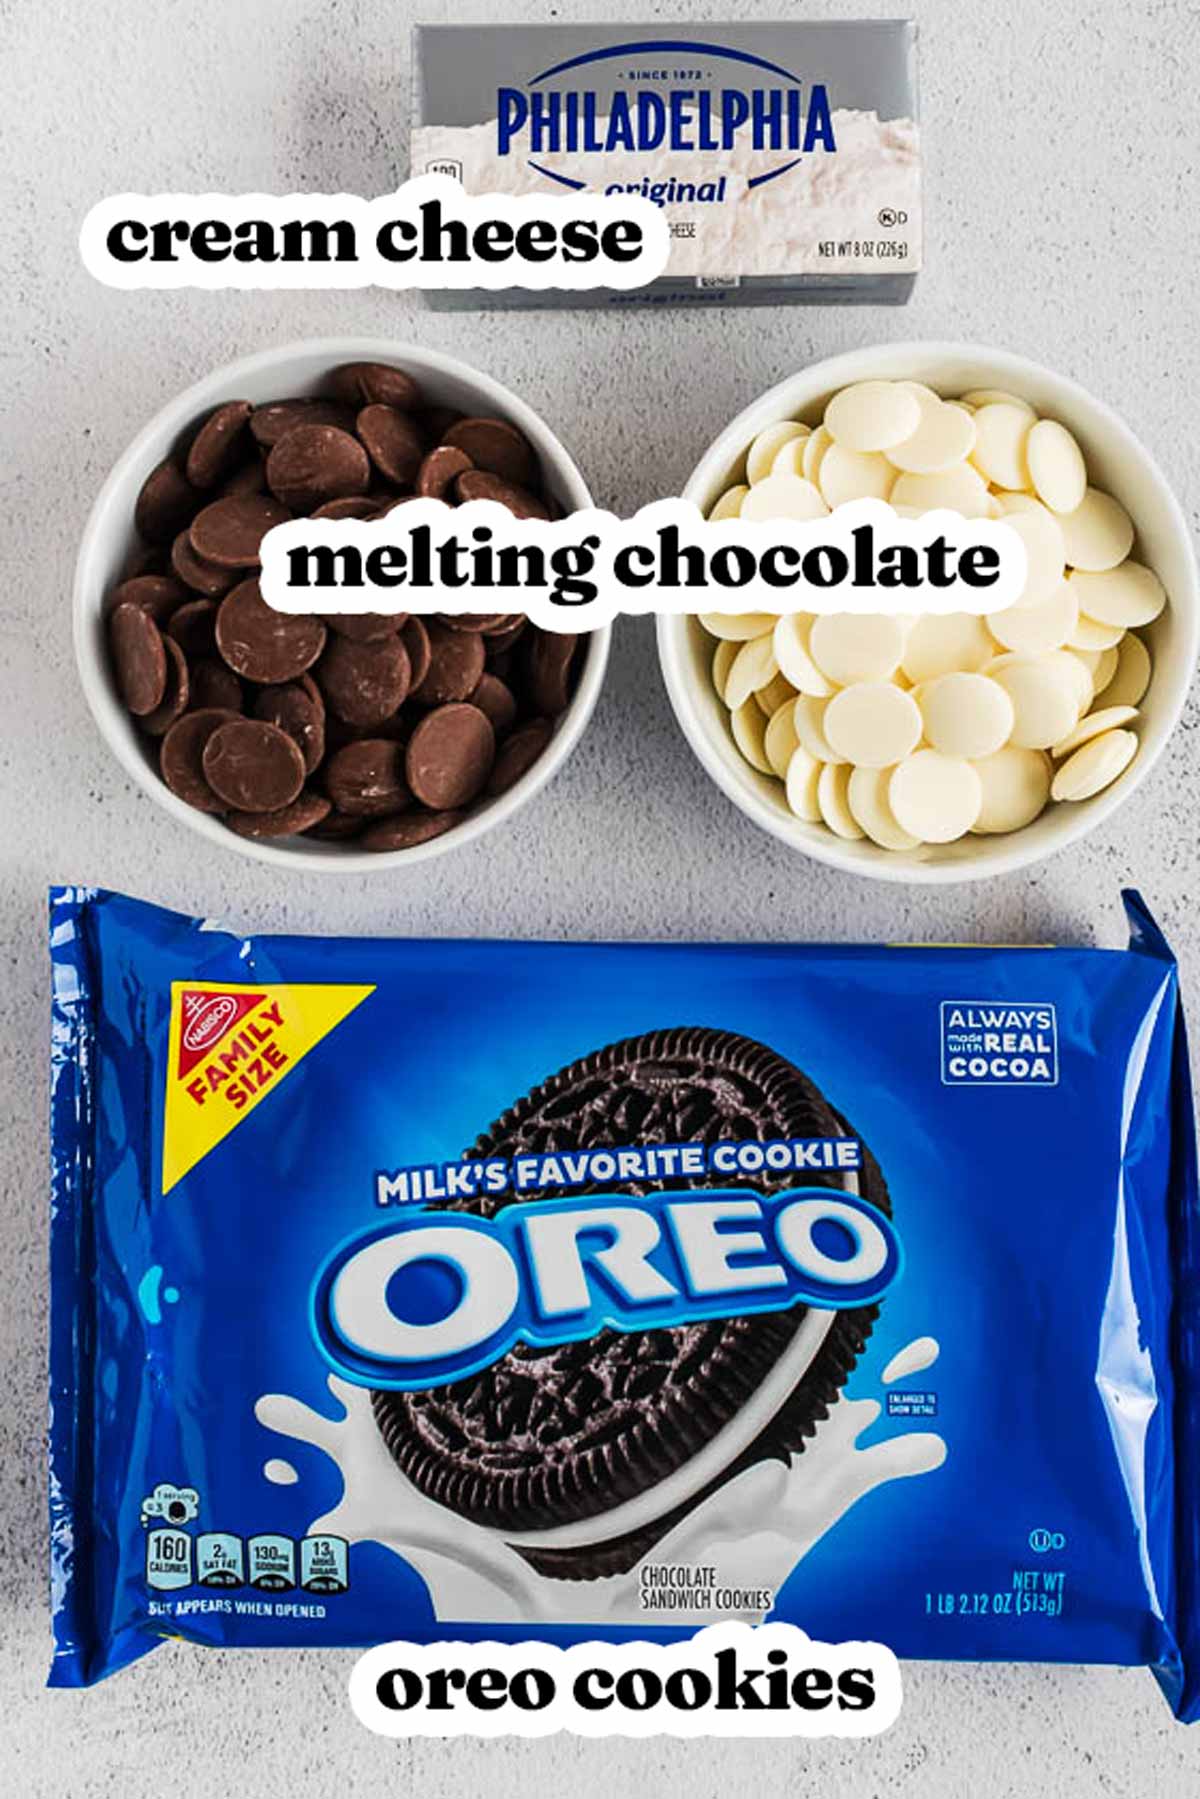
Here is a visual overview of the ingredients in the recipe. Scroll down to the printable recipe card at the bottom of this post for quantities!
Ingredient notes
- Oreos: Stick with classic Oreos for that iconic cookies-and-cream flavor, but feel free to get creative with seasonal or flavored varieties like peppermint, peanut butter, or red velvet! If using double-stuffed Oreos, reduce the cream cheese to 4 ounces to keep the texture just right.
- Cream cheese: Use full-fat, brick-style cream cheese for the best results – the tub-style cream cheese is too soft and won’t hold up as well. Mascarpone can work as a fancy substitute, but it will make the truffles slightly sweeter.
- Melting chocolate: Opt for high-quality melting chocolate for a smooth, professional-looking coating. You can use almond bark, candy melts, or even chocolate chips (just add 1 teaspoon of coconut oil or shortening to help with melting). White chocolate is optional for decorating but adds a fun and pretty touch!
How to make Oreo balls
Let’s make these Oreo truffles together – I promise, it’s super easy, and I’m here to guide you every step of the way.
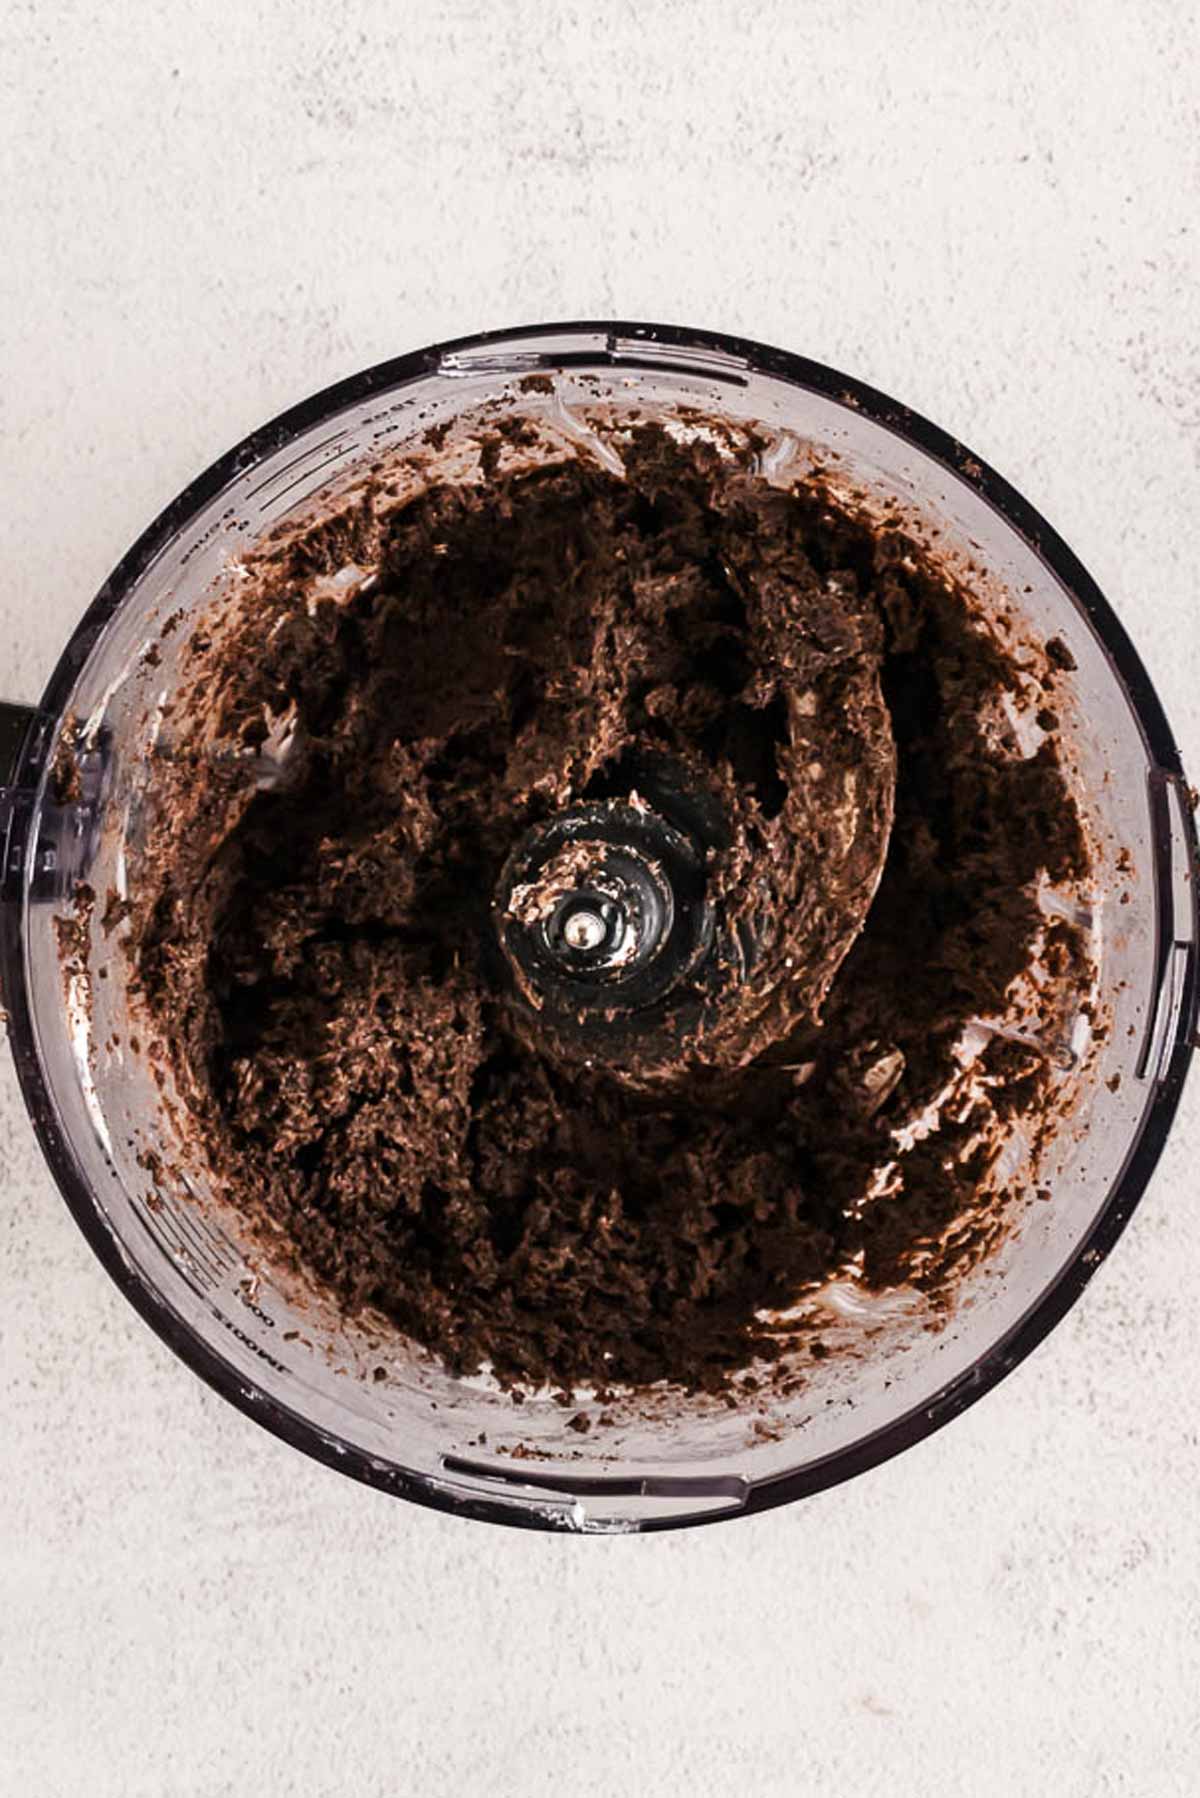
1. Crush and mix: First, grab your Oreos and cream cheese. Toss them into your food processor with the blade attachment, and let it do the hard work for you. It’ll crush those cookies and mix everything into a sticky dough that starts to clump together.
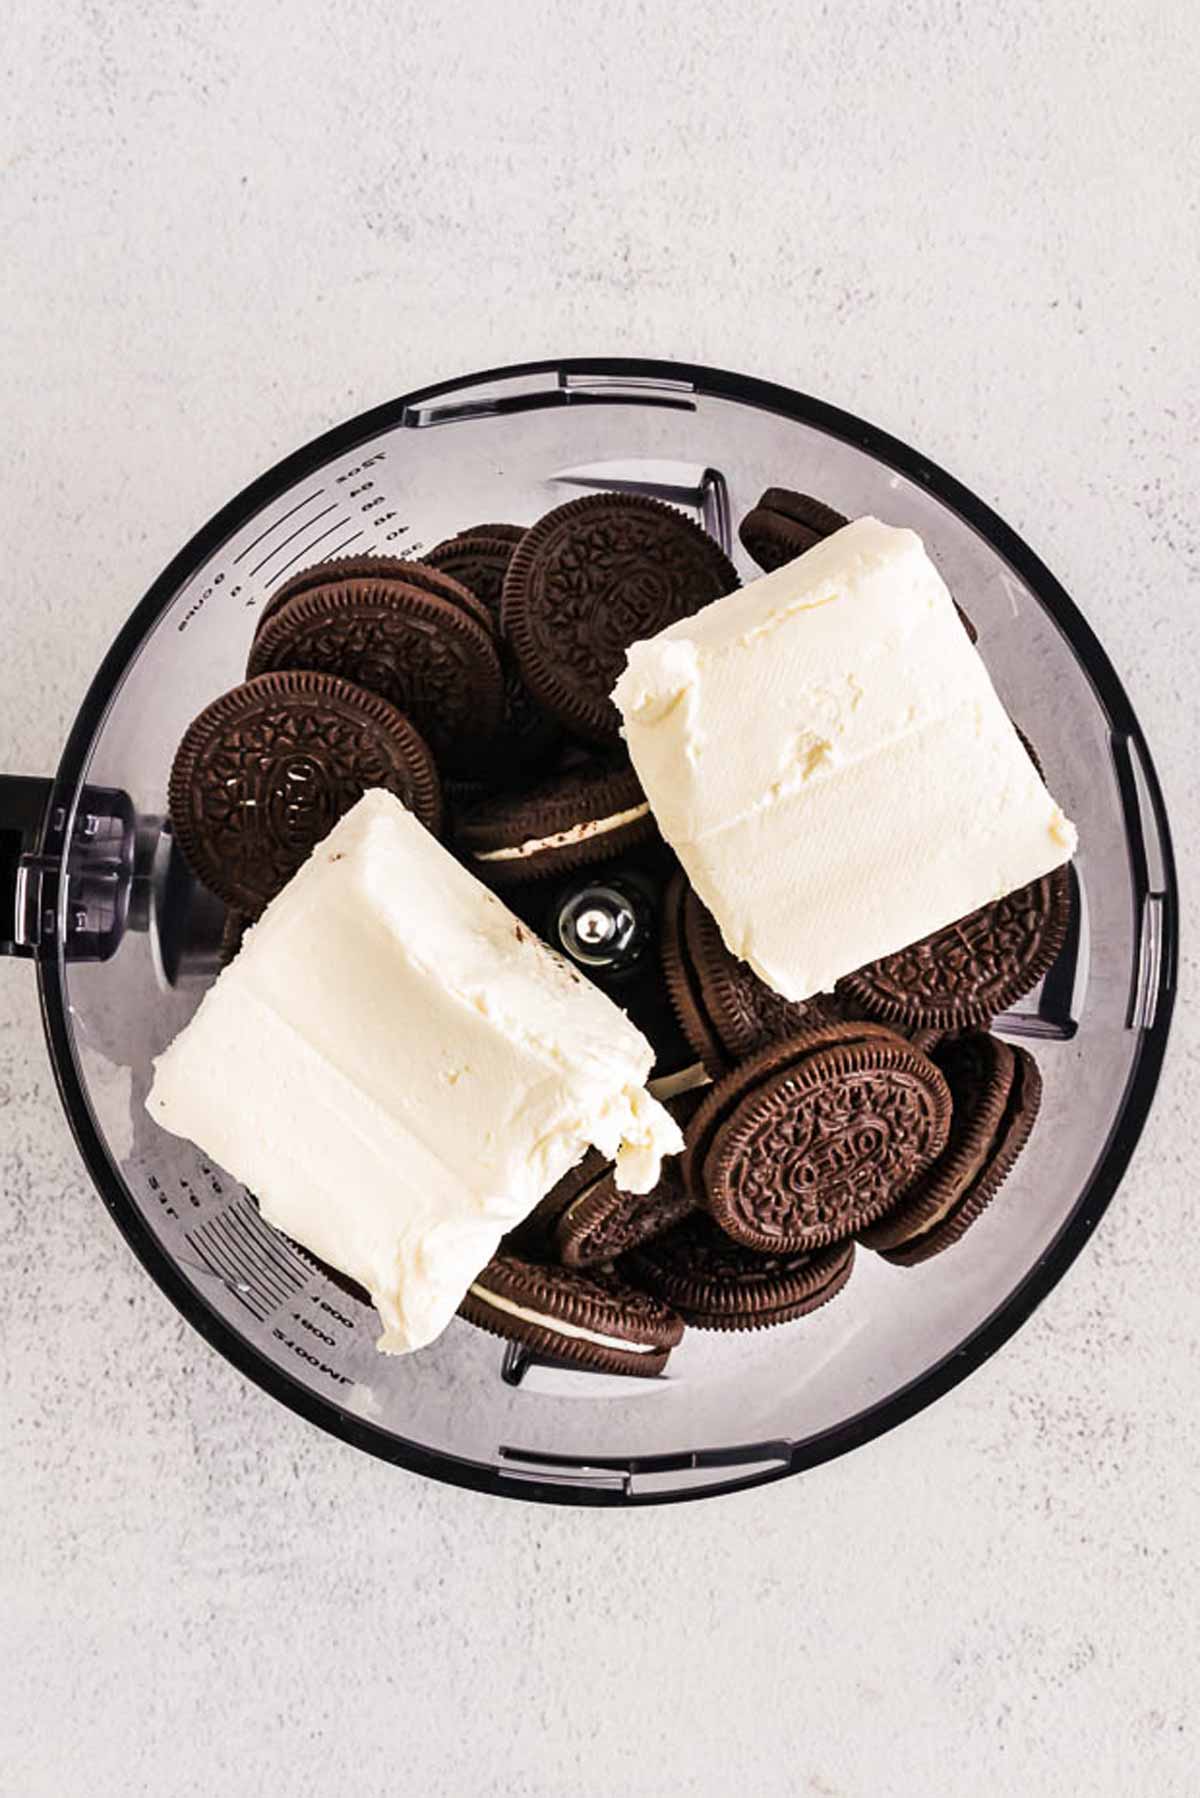
No food processor? No worries! You can crush the Oreos in a resealable bag with a rolling pin and mix them with the cream cheese in a bowl – it’s a little more effort, but totally doable (and maybe a good arm workout!).
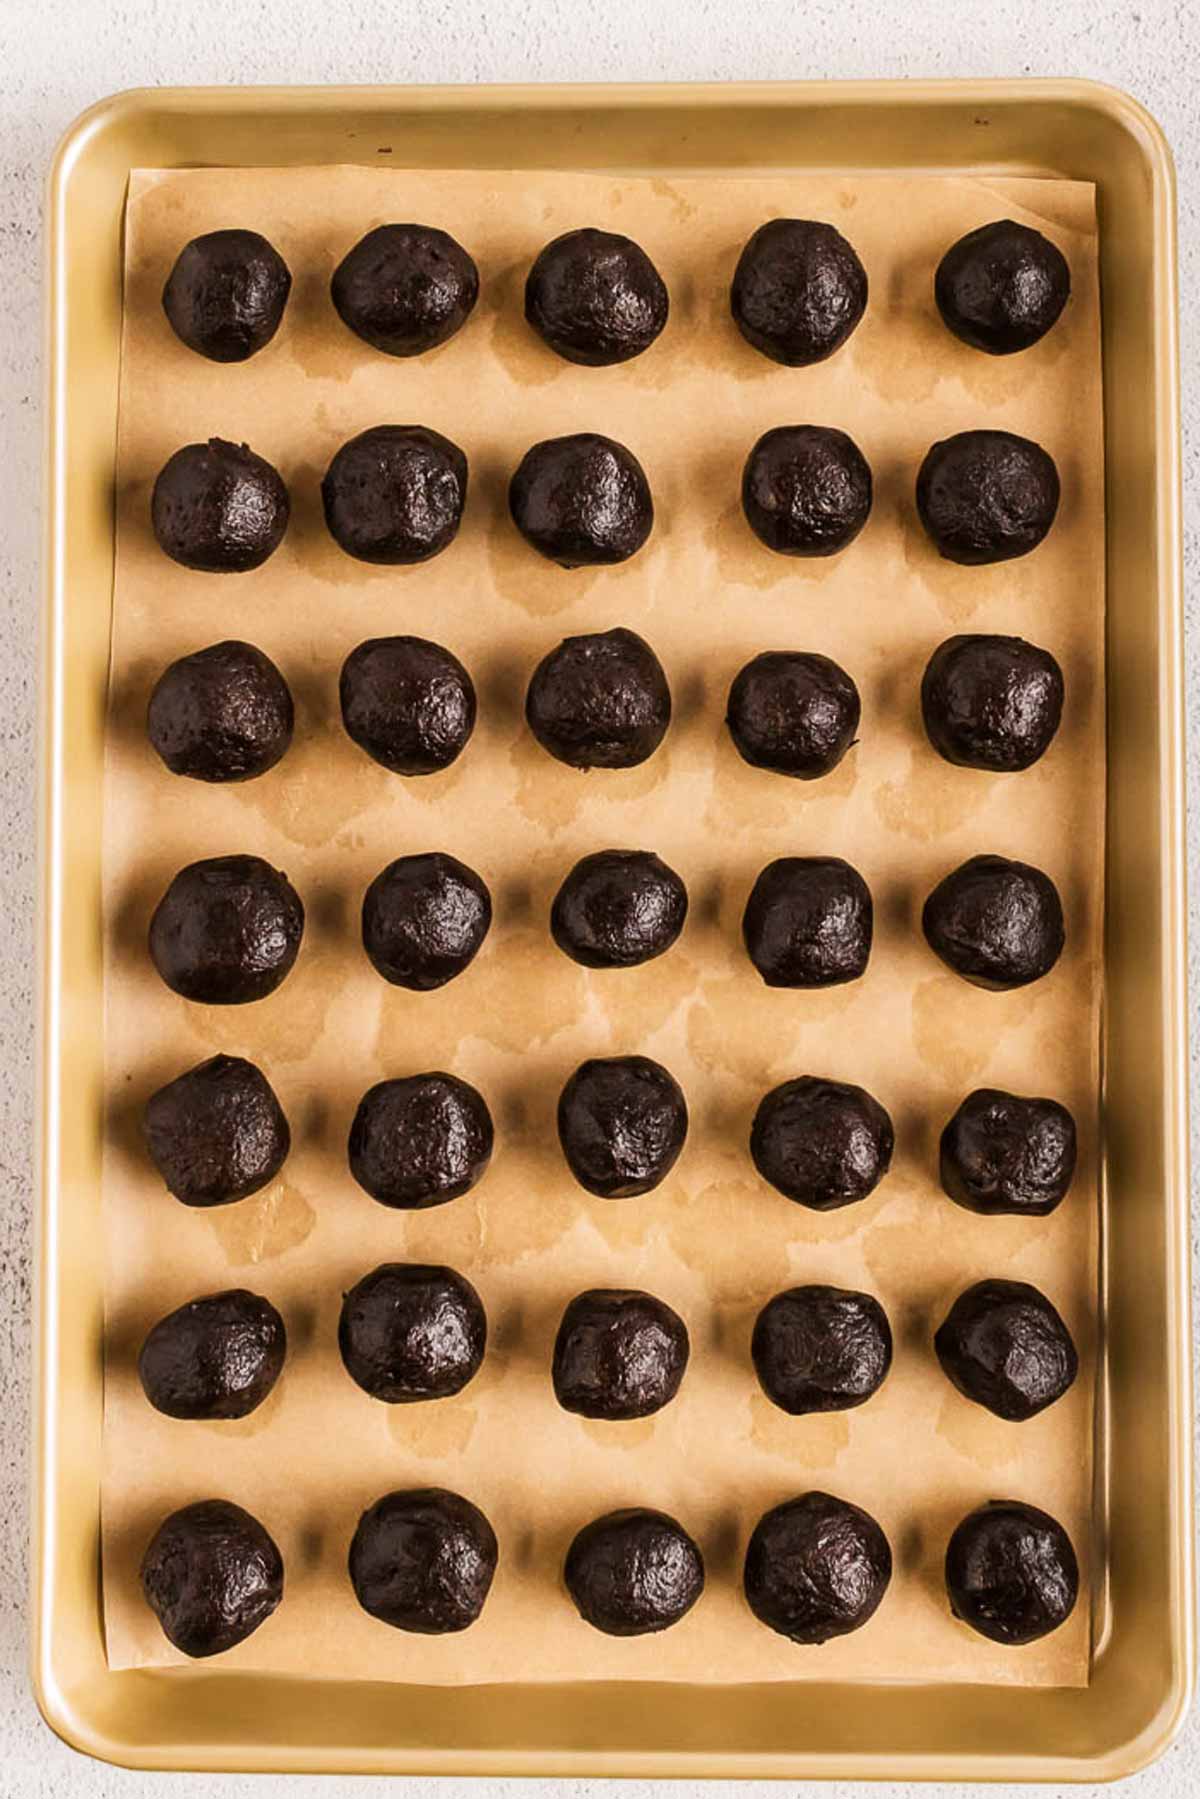
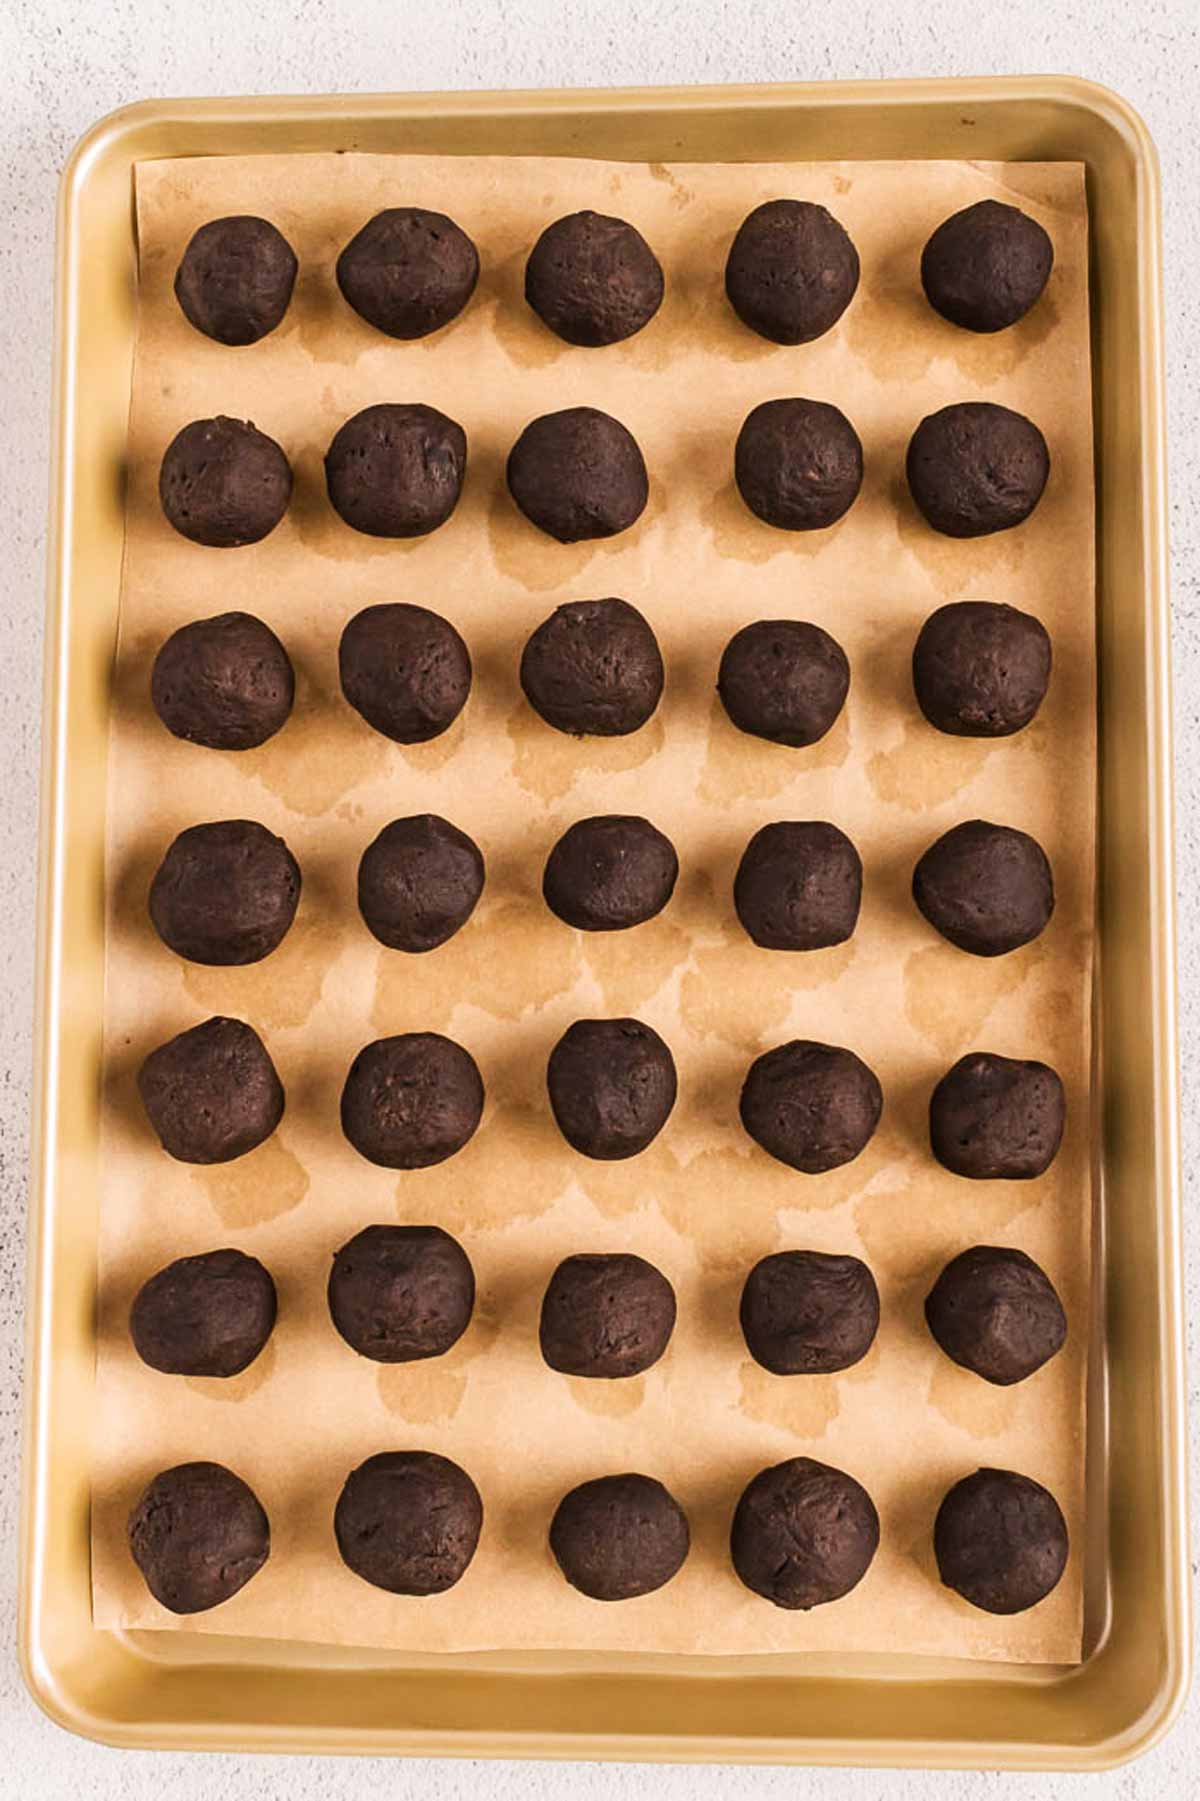
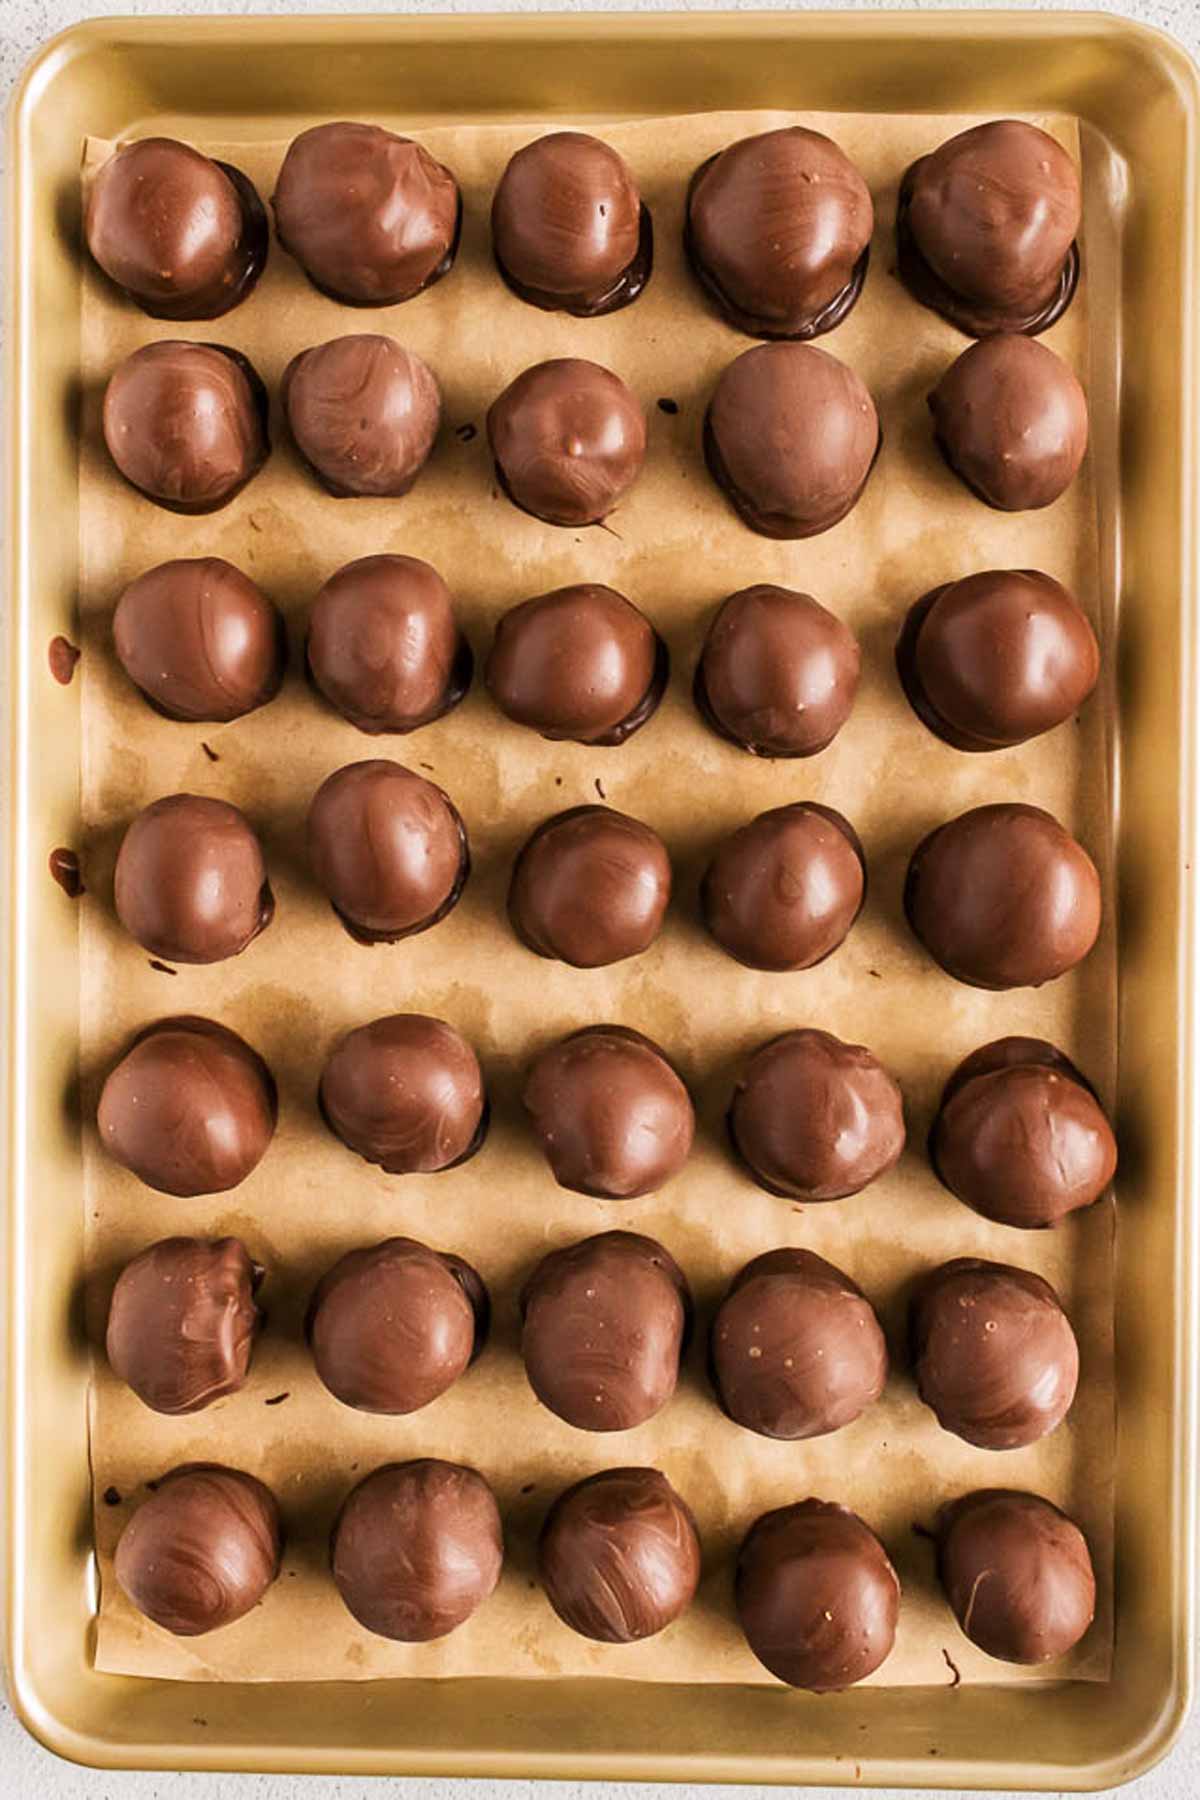
2. Roll into truffle balls: Now for the fun part – rolling the truffles! Take about 1-2 teaspoons of the mixture (I just eyeball it) and roll it between your palms into little 1-inch balls.
Place them on a baking sheet lined with parchment paper as you go. If the dough feels sticky, pop it in the fridge for a few minutes to firm up – trust me, it makes rolling so much easier.
Once you’ve got all your truffles rolled, slide the tray into the freezer for at least 15 minutes. This step is key to keeping them from falling apart when we dip them in chocolate later.
3. Melt the chocolate: While the truffles are chilling, let’s melt the chocolate. Follow the instructions on the package – whether you’re using the microwave or a double boiler, go slow and stir often to keep it smooth. If you’re using chocolate chips, adding a teaspoon of coconut oil or shortening helps with melting and makes the coating silky.
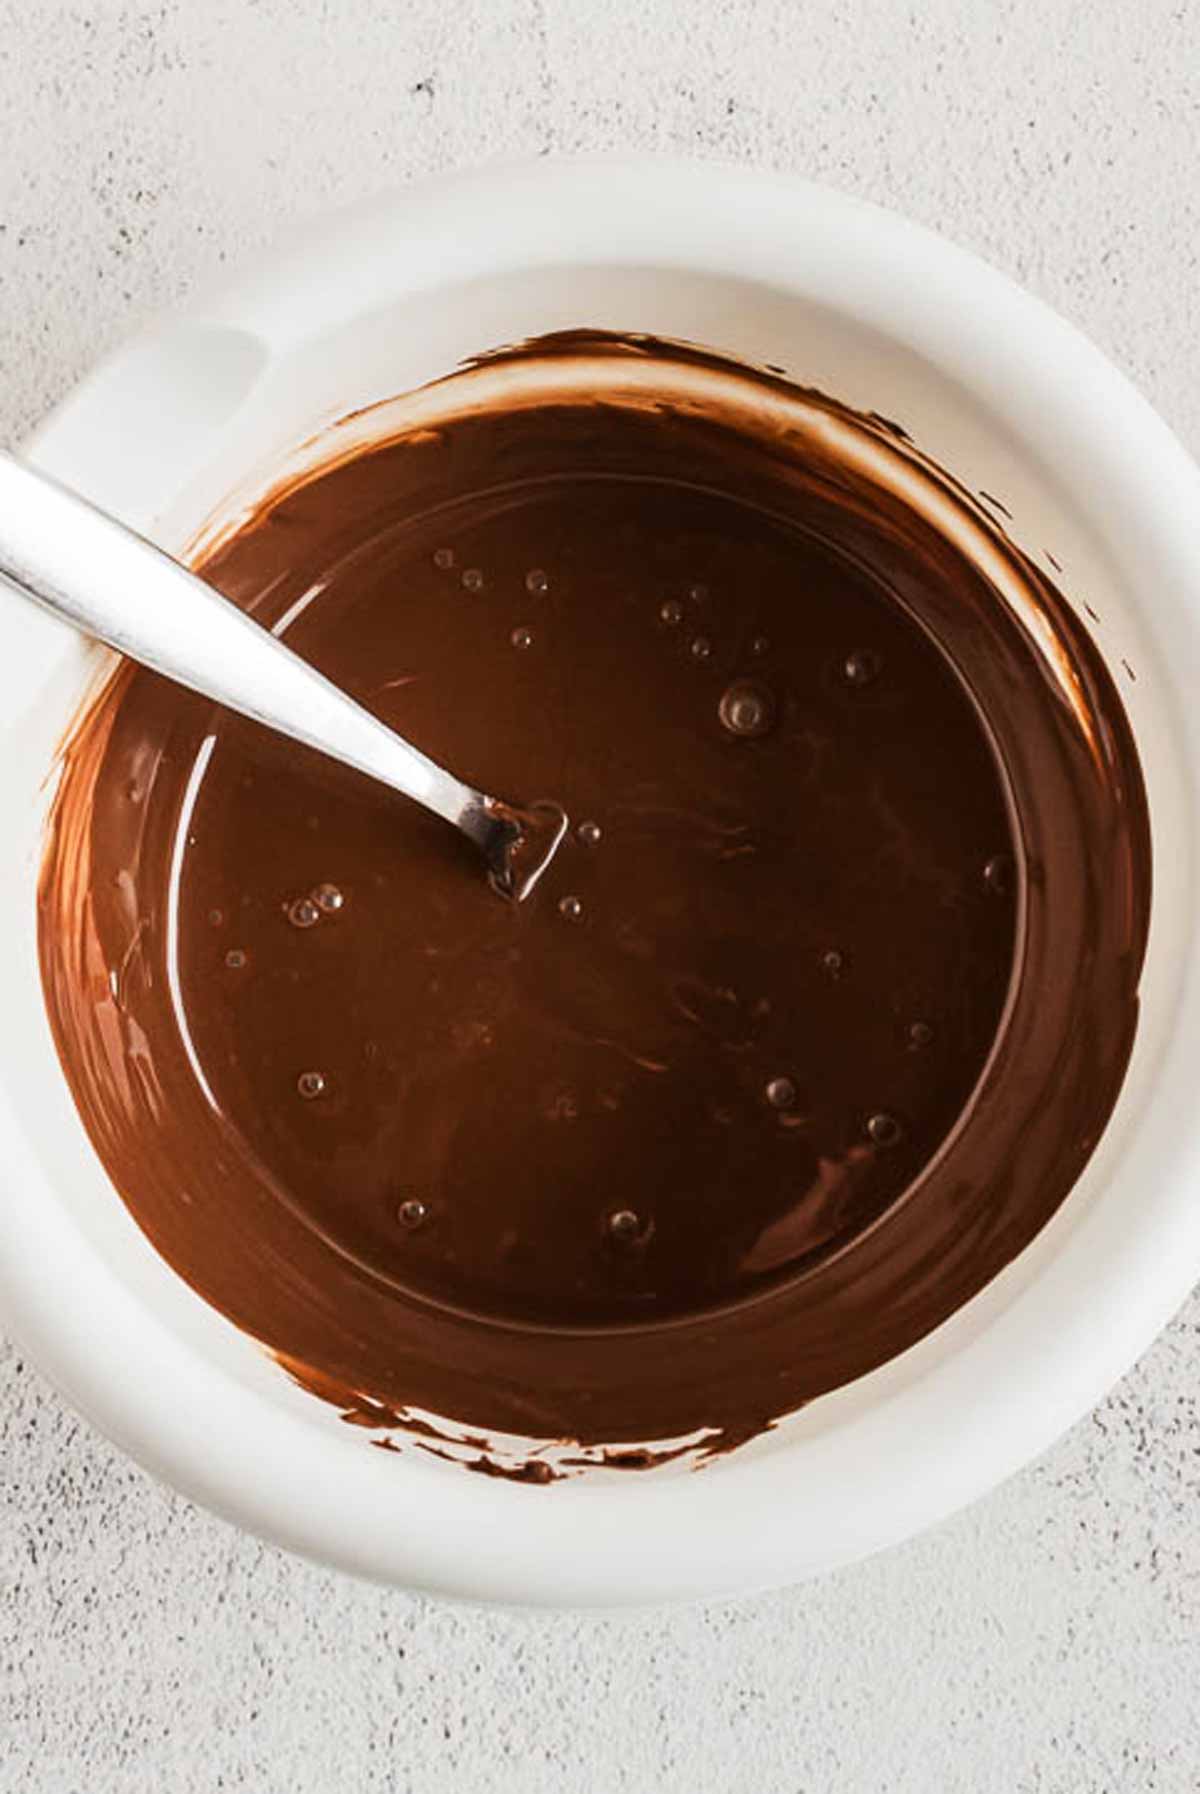
Set up your dipping station with the melted chocolate, a fork, a spoon, a few toothpicks, and your parchment-lined baking sheet – it’s all about being prepared!
4. Coat the truffles: This is when the real fun (and mess, ha!) begins!
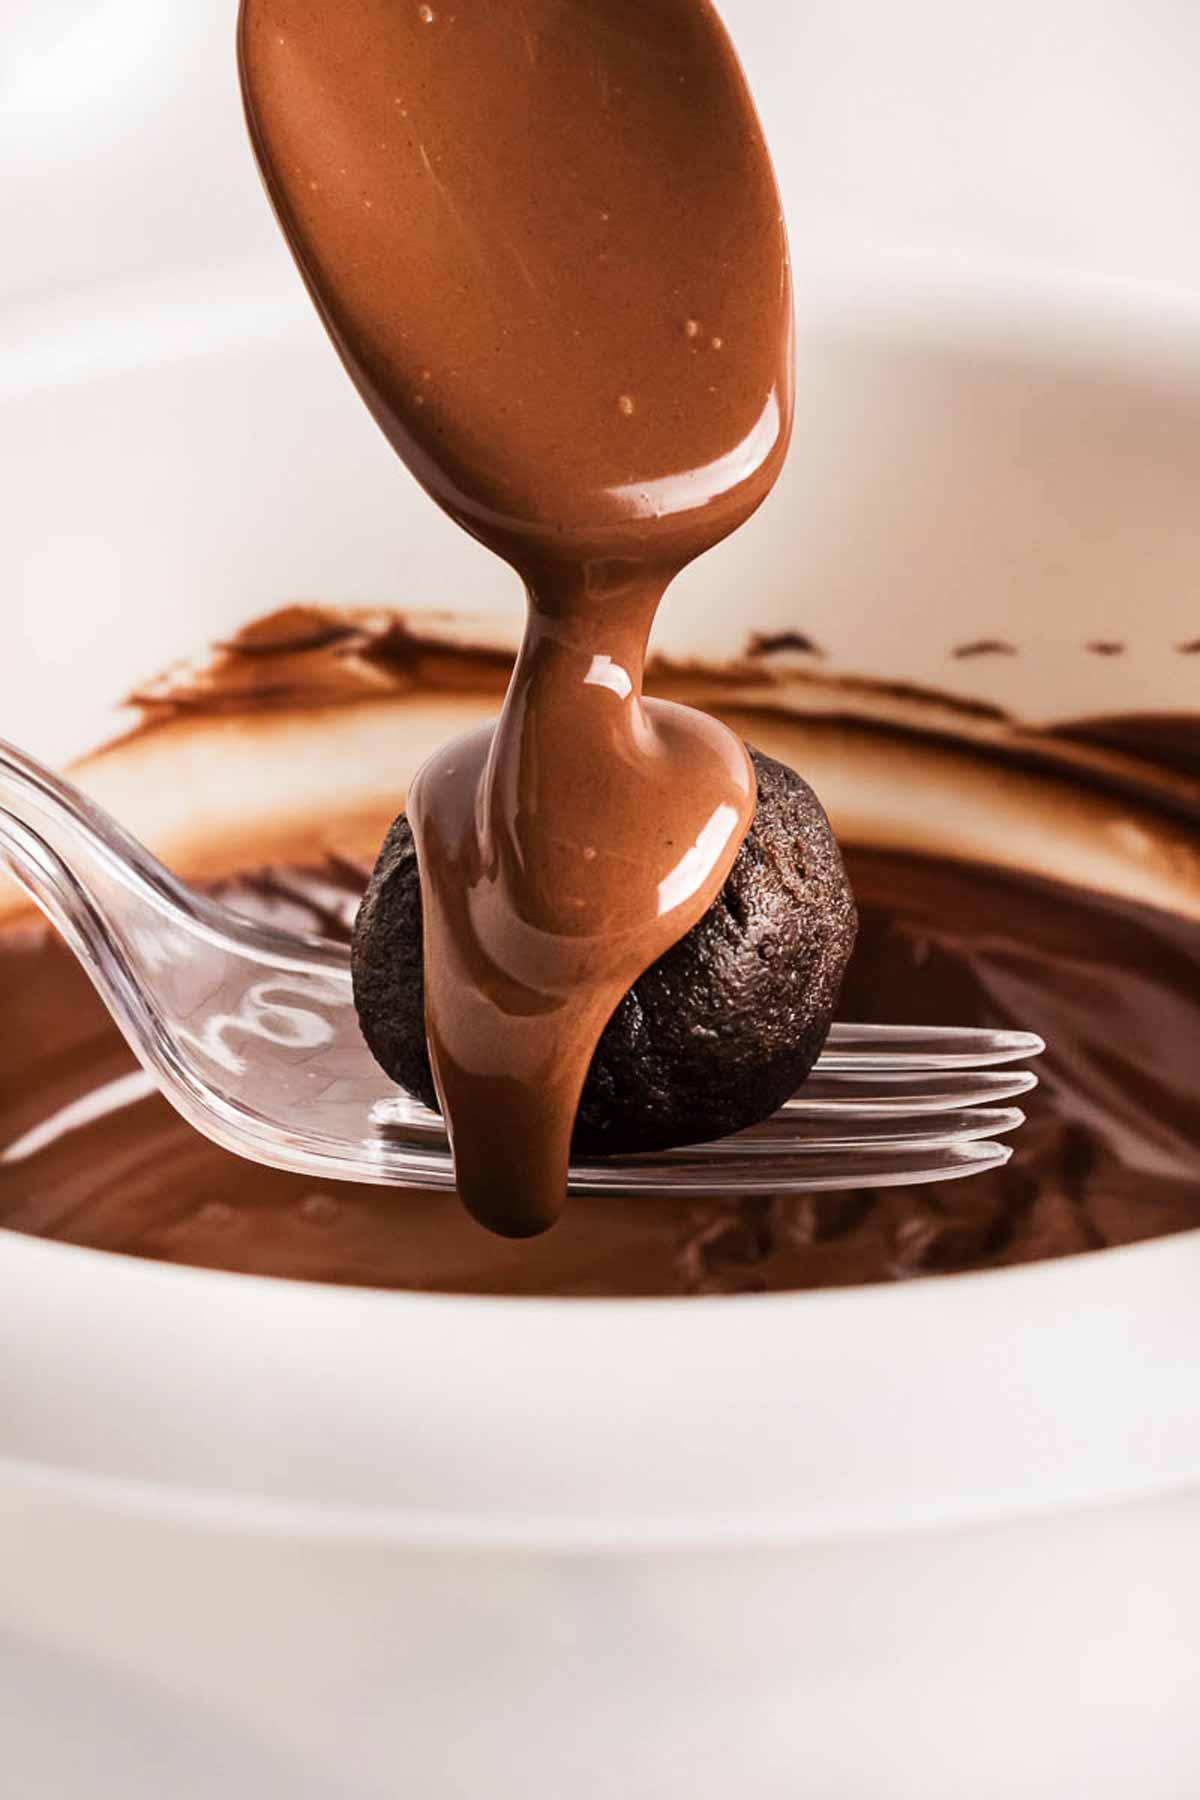
Take a truffle from the freezer and place it on a fork (don’t skewer it – just let it rest there). Dip the bottom of the truffle into the melted chocolate, then use a spoon to drizzle chocolate over the top until it’s fully coated.
Let the extra chocolate drip off, and gently slide the truffle back and forth on the fork to wipe off any excess from the bottom. Use a toothpick to help slide the coated truffle onto your parchment-lined baking sheet.
Repeat this process until all your truffles are beautifully coated.
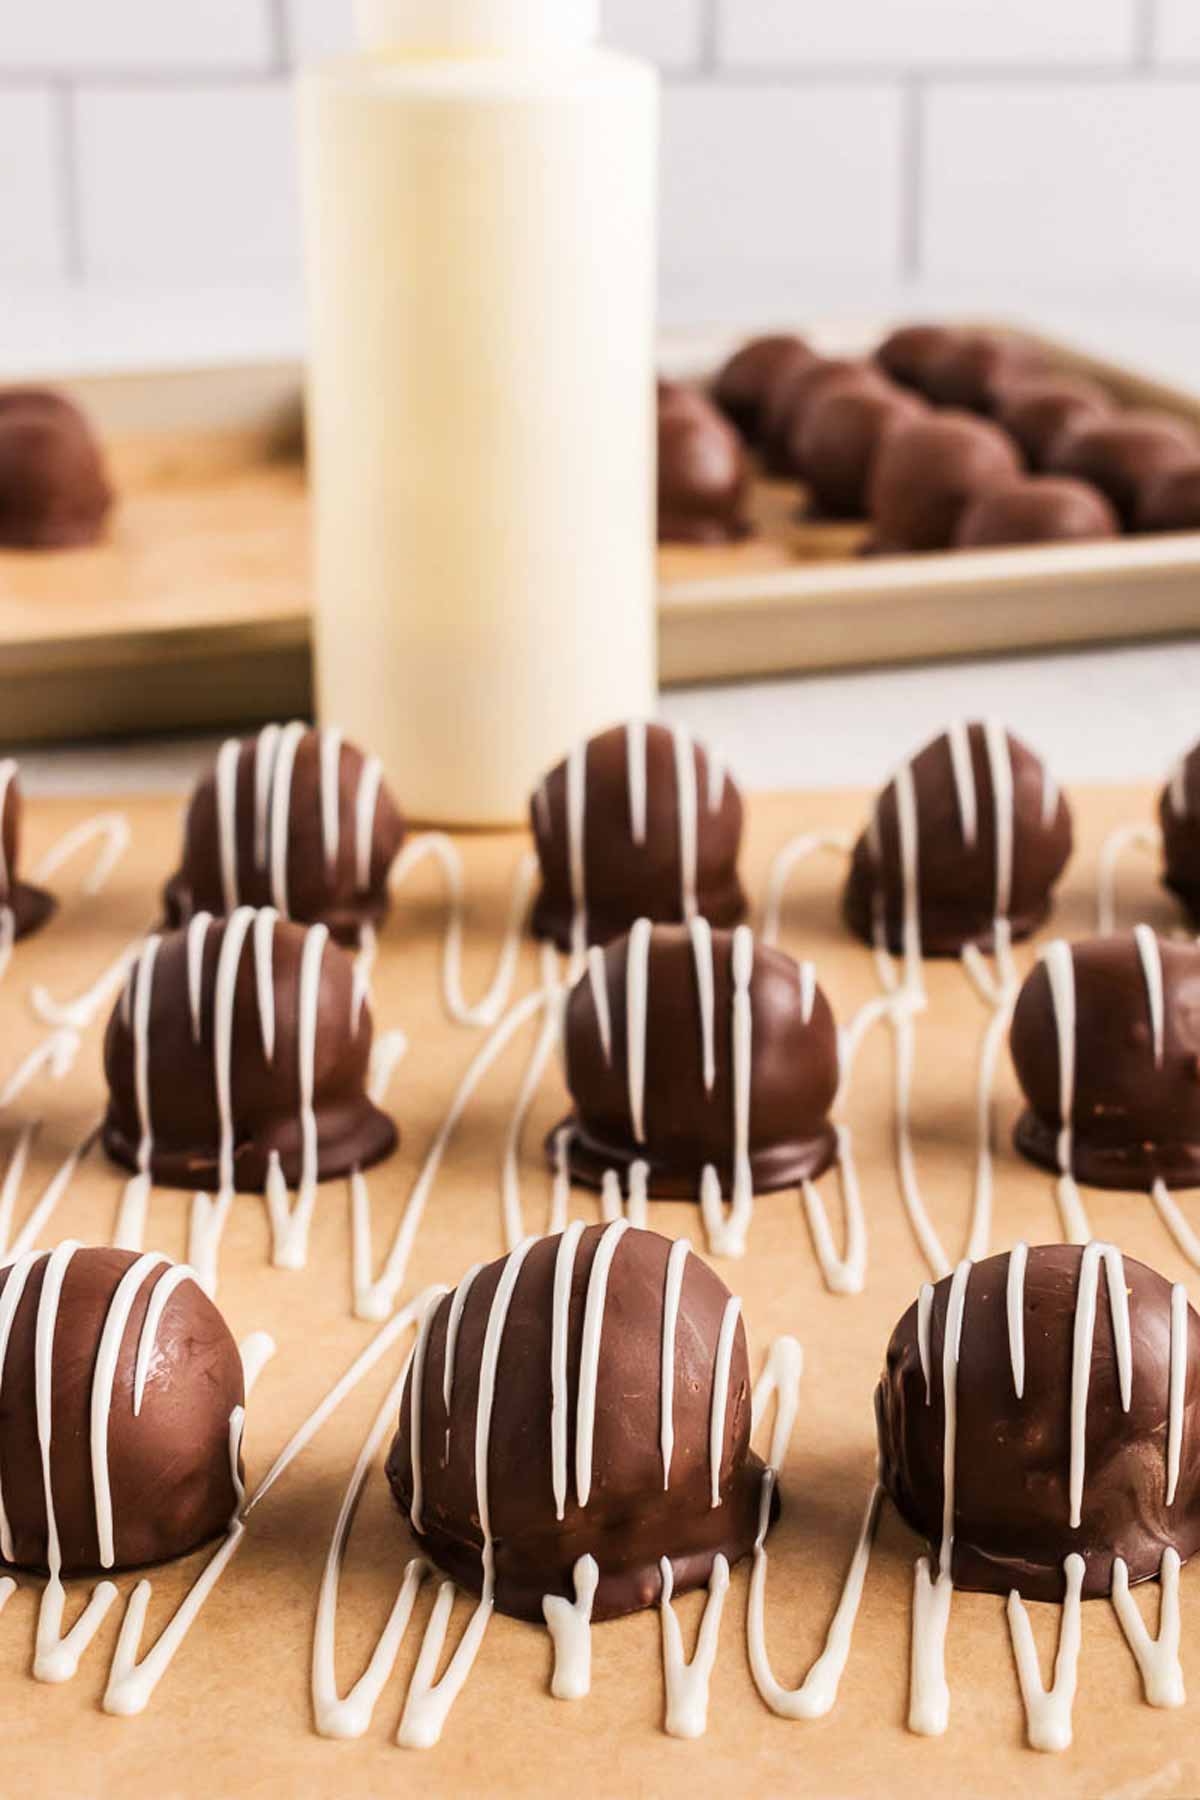
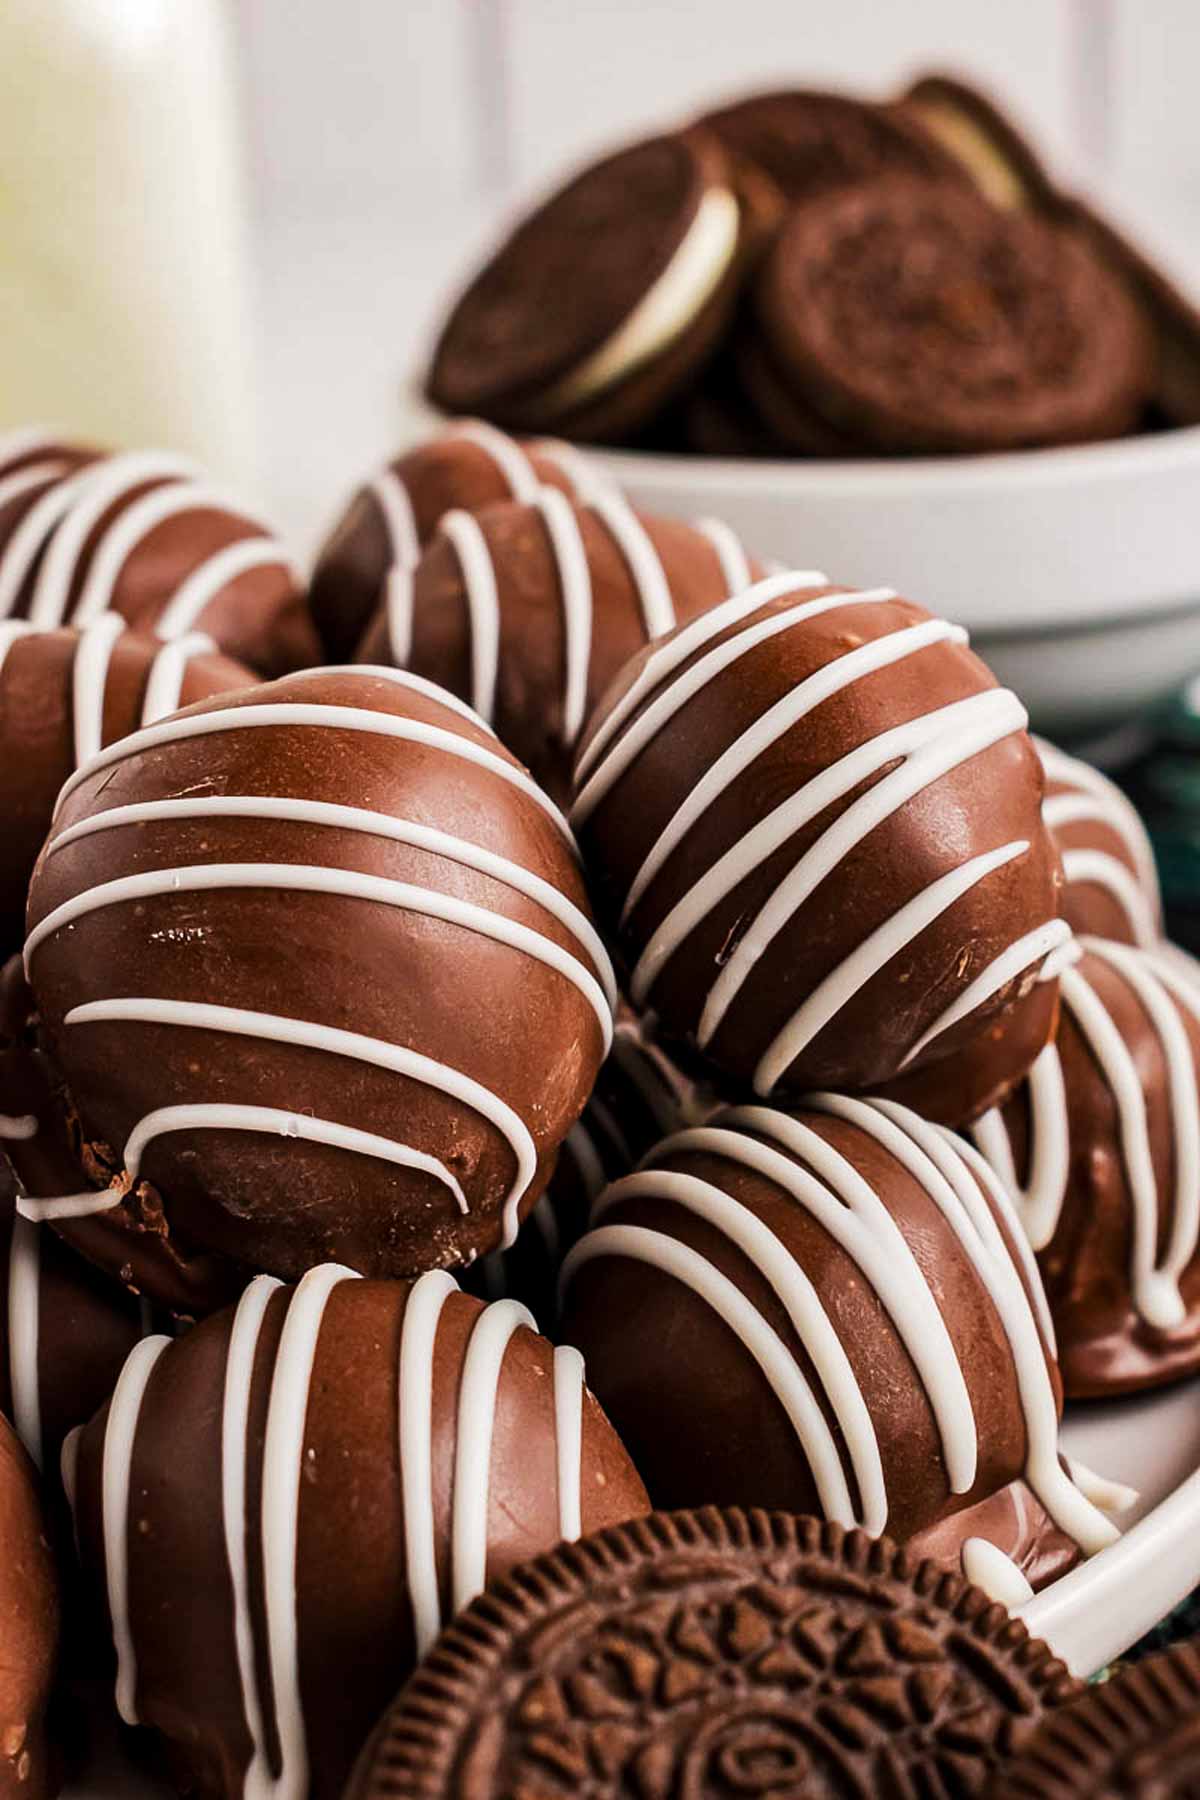
5. Double coat and decorate (optional): Want an even more decadent finish? Once the first layer of chocolate is firm (a quick chill in the freezer works wonders), you can repeat the coating process for a thicker and smoother finish.
If you’re feeling fancy, melt some white chocolate and drizzle it over the top of your truffles. Just make sure the chocolate coating is completely set so the drizzle stays neat and pretty – a little extra effort, but it’s so worth it!
6. Let them set: Finally, let your truffles sit at room temperature or pop them in the fridge until the chocolate coating is completely firm. Once they’re ready, it’s time to enjoy – and maybe sneak a few for yourself before the family finds them!
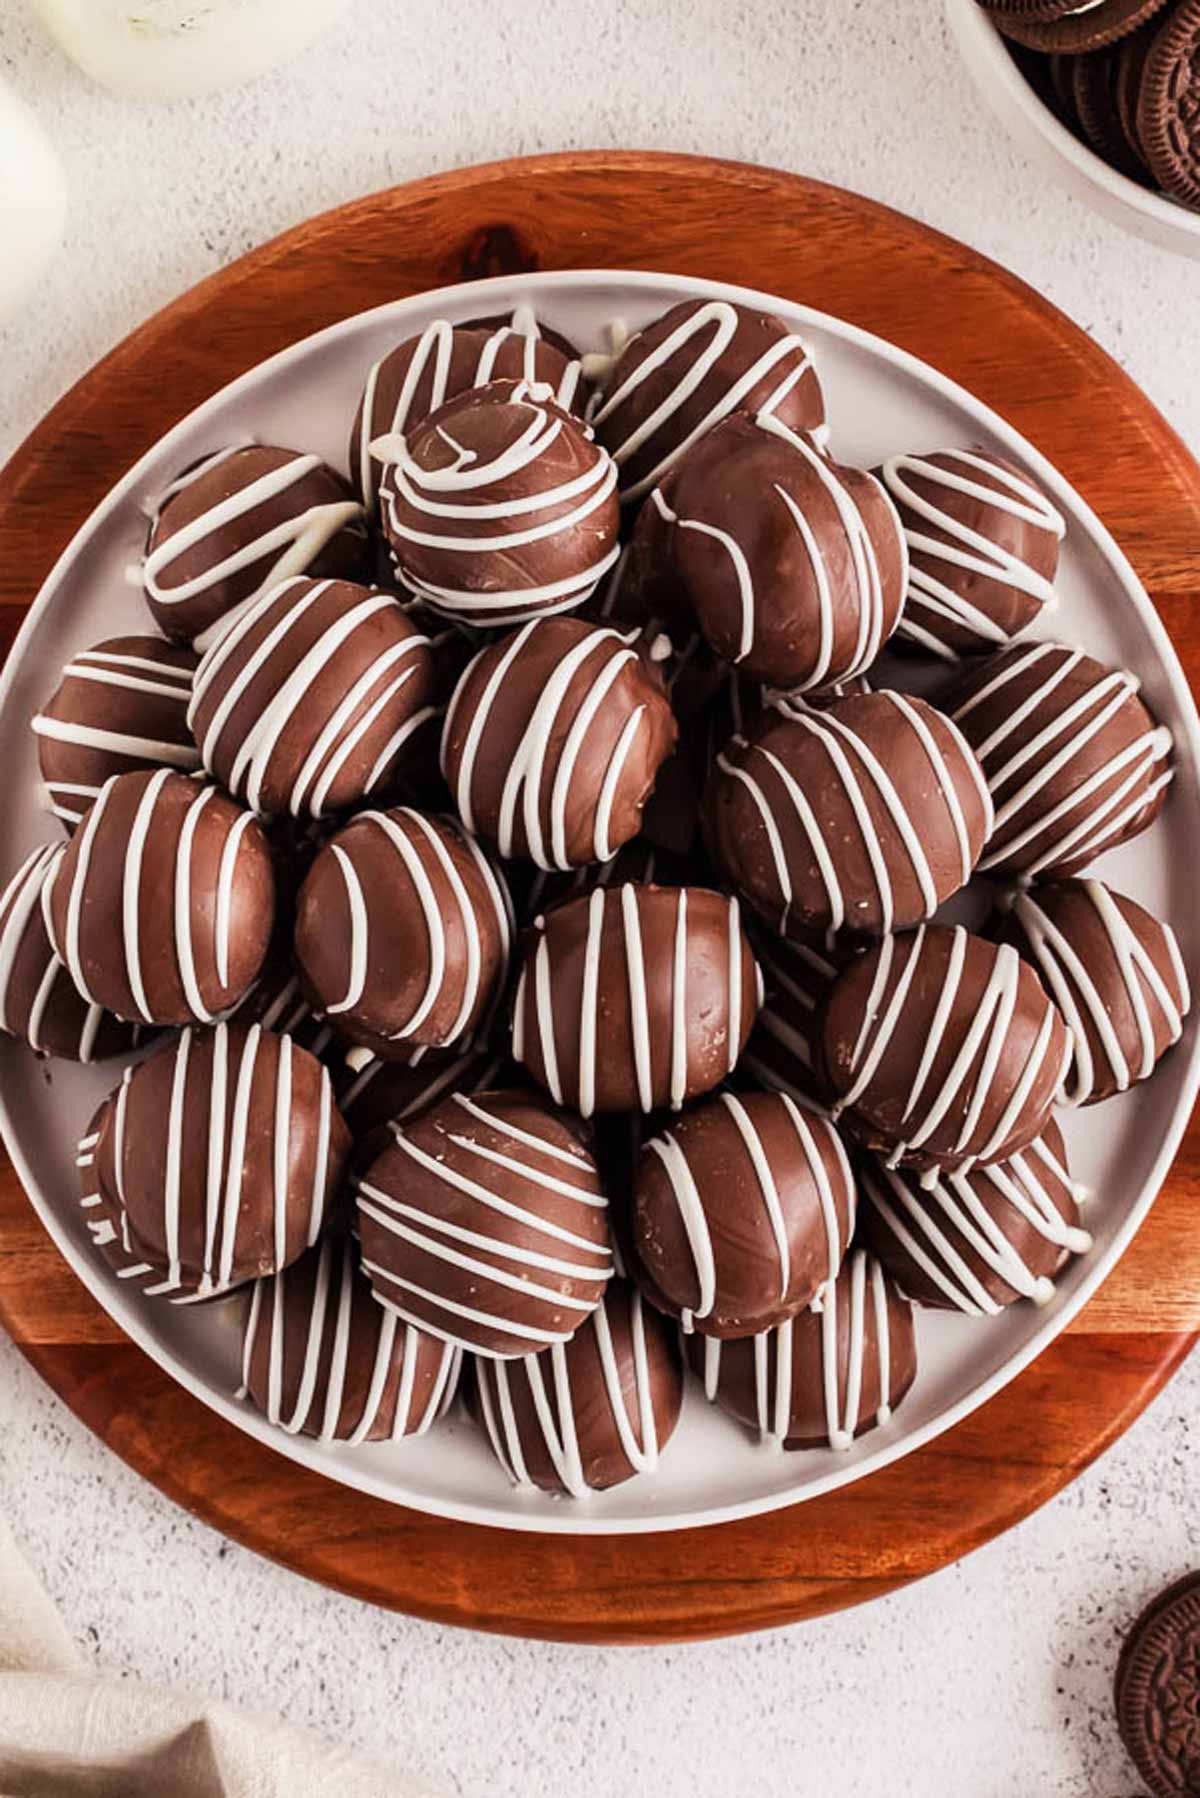
And there you have it – the BEST Oreo truffles, made right in your kitchen! I love how easy these are to whip up, and they’re always a hit with my family.
Trust me, once you taste one, you’ll know why these don’t last long around here!
Top tips for recipe success
- Truffles not holding their shape? If your truffles fall apart while rolling, you may need to process the mixture further, until it balls up into a sticky pile of Oreo bliss. If they fall apart while dipping in chocolate, you’ll need to freeze them for a longer amount of time.
- Chill before coating: Freezing the truffles for at least 15 minutes before dipping is essential. This keeps them firm and prevents them from falling apart in the warm chocolate.
- Use high-quality chocolate: The better the chocolate, the smoother the coating. Melting wafers, almond bark, or good-quality chocolate bars melt easily and coat evenly, making the truffles look (and taste!) professional.
- Don’t skip the parchment paper: Lining your baking sheet with parchment paper makes cleanup a breeze and ensures the truffles don’t stick once the chocolate sets.
- Prep your dipping station: Have your fork, spoon, toothpicks, and a lined baking sheet ready before you start. It saves time and keeps the process smooth and stress-free.
- Work in small batches: Take a few truffles out of the freezer at a time for coating. Keeping the rest chilled prevents them from softening too much before dipping.
- Thin the chocolate if needed: If your chocolate feels too thick, stir in a teaspoon of coconut oil or shortening while melting. This makes it easier to coat the truffles evenly.
- Decorate quickly: If adding white chocolate drizzle, do it once the chocolate coating is firm. If adding sprinkles or flaky sea salt, add it while the chocolate coating is still wet so everything sticks perfectly!
- Be patient while setting: Let the coated truffles set completely at room temperature or in the fridge before handling them. Rushing this step can smudge the chocolate.
How to roll Oreo balls in chocolate
To be honest, this is kind of the hardest part of this recipe.
I know many people struggle with chocolate dipping, but here’s a pretty foolproof method I figured out:
- Melt the chocolate and have a fork, large spoon and a few toothpicks ready. Place a sheet of baking parchment on a sheet pan next to your melted chocolate.
- Place an Oreo ball on the fork and hold it into the melted chocolate so just the bottom is submerged. Use a spoon to spoon melted chocolate over the truffle. Allow excess to drip off.
- Use the toothpick to gently slide the coated truffle back and forth on the fork to wipe away any excess chocolate from the bottom of the fork.
- Carefully slide the coated truffle off the fork and onto the lined baking sheet.
Helpful recipe hints
Recipe variations
- Minty magic: Swap regular Oreos for mint-flavored ones, coat them in white chocolate and you’ve got truffles that taste like the holidays in a bite. My kids call these “snowball truffles,” even though there’s zero snow involved.
- Peanut butter perfection: Use peanut butter Oreos and drizzle with melted peanut butter chips/sprinkle with sea salt after coating in chocolate for a salty-sweet combo that’s chef’s kiss. My husband claims these are his favorite, but honestly, I think he says that about all of them.
- Festive fun: Grab seasonal Oreos (like pumpkin spice or red velvet) to match the occasion. Add coordinating sprinkles for an extra festive touch – my 5-year-old is the sprinkle master in our house!
- Double chocolate delight: Use chocolate Oreos, coat them in dark chocolate, and finish with a white chocolate drizzle. Because, let’s face it, there’s no such thing as too much chocolate.
- Birthday party bites: Use golden Oreos and stir rainbow sprinkles into the Oreo mixture before rolling. Coat in white chocolate and decorate with more sprinkles. My kids think these are better than cake – and that’s saying something!
Feel free to mix and match your favorite flavors – I always say, when it comes to Oreo truffles, there’s no wrong way to make them delicious. (But I do reserve the right to eat the “test” batch all by myself, ha!)
Storage tips
Make-ahead magic: Oreo truffles are perfect for prepping ahead! Roll and freeze the truffle balls (before coating them) for up to 2 months.
When you’re ready to finish, just thaw them slightly and dip them in chocolate – they’ll taste freshly made.
Storing leftovers: If you manage to have any left (a rare occurrence in my house), keep them in an airtight container in the fridge for up to 2 weeks.
The chocolate stays firm, and the filling stays creamy – the perfect snack for when those sweet cravings hit!
Freezer-friendly treat: Fully coated truffles can also be frozen. Place them in a single layer in an airtight container or freezer bag, and they’ll last up to 2 months.
To enjoy, just thaw them in the fridge for a few hours or at room temperature for about 20 minutes – no one will ever guess they’ve been frozen! The one thing that might happen is that the chocolate loses its sheen a little, but they are still perfectly delicious.
Serving and gifting ideas
Oreo truffles are my secret weapon for making any occasion feel special. Whether it’s a family gathering, a cozy night at home, or a thoughtful gift, these little bites of chocolatey heaven always steal the show. Here are five of my favorite ways to serve them:
- Dessert platters: I love creating an impressive dessert spread with Oreo truffles as the star! Pair them with No-Bake Millionaire’s Shortbread Bars, fresh berries, and my favorite Chocolate Chip Cookies. It’s perfect for holidays, birthday parties, or any time I want to wow my guests with little treats.
- Snack occasions: Family movie nights in our house are incomplete without these truffles. They’re perfect for snacking – no plates, and a guaranteed crowd-pleaser for all ages (even my 5-year-old who thinks popcorn is a major food group). They’re also a hit for game nights or casual get-togethers with friends!
- Holiday parties: These truffles always shine at holiday parties, especially when I dress them up with a white chocolate drizzle or festive sprinkles. I love setting out a platter alongside other finger foods and desserts (Peppermint Bark!) – they’re guaranteed to disappear before the night is over.
- Gifting options: Homemade gifts are my jam, and Oreo truffles are one of my favorites to give. I’ll pack them in a cute tin with parchment paper and let the kids help decorate a few for a personal touch. It’s a fun family project, and the finished product is a thoughtful (and delicious) gift that everyone loves.
- Bake sale MVPs: Whenever there’s a school bake sale, these truffles are my go-to. They’re easy to make, look professional, and sell like hotcakes. Plus, they’re perfect for moms like me who might have waited until the last minute – no judgment here!
No matter the occasion, Oreo truffles are always a win. They’re easy, versatile, and so good that I usually have to hide a few for myself before sharing them with the world!
More no bake treats

PS If you try this recipe, please leave a review in the comment section and add a star rating in the recipe card – I appreciate your feedback! Follow along on Pinterest, Facebook or Instagram.

No Bake Oreo Truffles
Recipe details
Ingredients
- 1 package Oreos (36 cookies); you can use regular or double stuffed
- 1 (8-oz) brick cream cheese IMPORTANT: use 4 ounces if using double stuffed Oreos!
- 8 oz melting chocolate see post for notes on which chocolate to use; will need 16oz if wanting to coat truffles twice!
- 2 oz white melting chocolate to decorate (optional)
Instructions
- Process cookies: Place Oreos and cream cheese in a food processor with the blade attachment and process until completely crushed and starting to ball up.
- Roll truffles: Roll mix into 1-inch balls (about 1-2 teaspoons of cookie mixture) and place on a lined baking sheet. Freeze for at least 15 minutes or until completely firm, otherwise they may fall apart during coating.
- Coat with chocolate: Melt 8 oz of chocolate according to package instructions. Coat the Oreo truffles with chocolate (see IMPORTANT tips and instructions in the notes below to keep them from falling apart!!) and place back on the lined baking sheet.
- Optional double coat/decorate: If wanting to coat twice, place them in the freezer until firm and then repeat the coating process. To decorate with white chocolate, make sure the dark chocolate coating is completely firm first.
- Set and store: Allow the chocolate to completely firm up, either at room temperature or in the fridge. Store truffles in an airtight container in the fridge for up to 2 weeks.
Notes
- Melt the chocolate and have a fork, large spoon and a few toothpicks ready. Place a sheet of baking parchment on a sheet pan next to your melted chocolate.
- Place an Oreo ball on the fork (do not skewer it, just sit it on the fork) and hold it into the melted chocolate so just the bottom is submerged. Use a spoon to spoon melted chocolate over the truffle. Allow excess to drip off.
- Use the toothpick to gently slide the coated truffle back and forth on the fork to wipe away any excess chocolate from the bottom of the fork.
- Carefully slide the coated truffle off the fork and onto the lined baking sheet.
Nutrition
More recipe information
Recipe first published in 2018. Updated in May 2019 with new text, and in December 2024 with new photos and much improved text/instructions and tips.


Steph says
I was gifted a HUGE box of broken Oreo pieces — literally crushed Oreos! Any idea how many cups a regular package of Oreos makes?
Nora Rusev says
Oh gosh Steph, I have NO idea! But sounds like an amazing gift, haha. What I found in a quick online research, 35 Oreos seem to be around 2 cups of crushed Oreos. Hope that helps at all!
Ashley Aliff says
So I made these and the consistency was sticky so was hard to keep the ball shape. Is that normal ? Or did I overprocess the mixture in the food processor? Thoughts? ???
Nora Rusev says
Ashley, they are definitely a little bit messy to make. What kind of Oreos did you use? And did you use brick-style cream cheese or did you use cream cheese spread? Did you freeze the rolled balls until they were firm before coating with chocolate? I just checked a few recipes online and they’re literally all the same ? so if you followed the recipe I think it was just normal stickiness. It helps to roll them really tightly, and to slightly dampen your hands when you roll them so they don’t stick so much. Hope that helps!
Ashley Aliff says
Yeah they have the consistency of goop lol I read around and they mentioned to freeze them so they have more of a clay like texture and then roll into balls. ? worked like a champ, thank you for the recipe! ?
Nora Rusev says
Thanks for coming back to let me know ? I’ll add a note to the recipe about the freezing if the mix is too sloppy!
Sberri says
Making them now and its too goopy as well. Going to stick in freezer for a few min then roll!
Nora Rusev says
Going to update the post to add this to the instructions as soon as the kids grant me a minute of peace 😉
Nora says
This is a test comment