• Skip to primary navigation
  • Skip to main content
  • Skip to primary sidebar
  • Skip to footer

Savory Nothings logo

  • Recipe Index
    • Easy Dinner Recipes
      • Slow Cooker
      • One Pot Meals
      • Quick Meals
      • Instant Pot
    • Side Dishes
    • Breakfast
    • Dessert
    • Small Meals
  • Dinner Ideas
  • About
  • Subscribe
menu icon
go to homepage
subscribe
search icon
Homepage link
  • Recipes
  • Dinner Ideas
  • Easter
  • Holidays & Occasions
  • About
  • Subscribe
×

Home / Recipes / No Knead Homemade French Bread!!

No Knead Homemade French Bread!!

2 hrs 30 mins
| 52 Comments |
4.80 from 35 votes
Jump to Recipe 01/22/18 | Updated: 05/26/20 | by Nora

Now you can make crusty, artisan-like no knead HOMEMADE French Bread from scratch with barely any effort! This is one of the best lazy cook’s/baker’s hack I’ve ever found – no kneading, no shaping, no overnight rise, and it comes out perfect every time with just 5 MINUTES PREP and about 10 minutes active time in total!

Holding a homemade French bread.

Can you tell how excited I am about this recipe?? I think the two exclamation marks in the title might have given it away already. This recipe is magical. Harry Potter level magic, I’m telling you.

The method used for it is… Not traditional. Definitely not authentic. And most likely something any artisan bakery owner in Paris would shout a flurry of French swear words at me for. Merde! Zut! Imbécile!

All you need to do for this magical homemade French bread is:

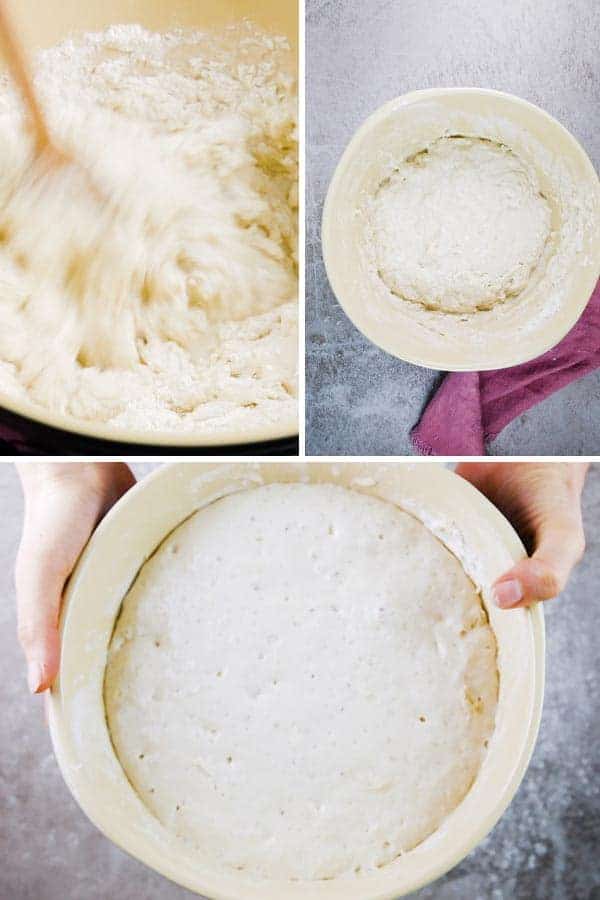
  1. Chuck water, yeast, a pinch of sugar, flour and salt into a bowl.
  2. Stir just until no dry flour remains.
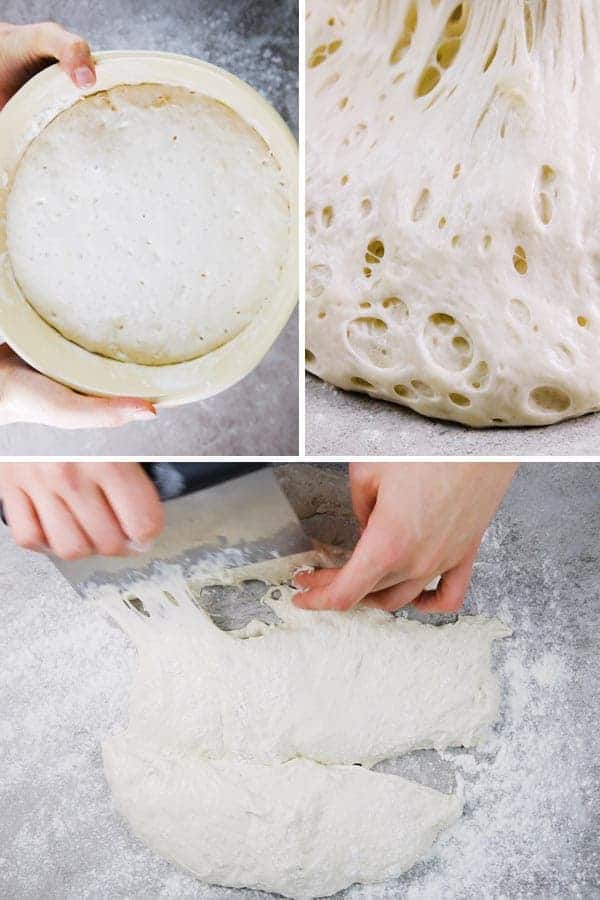
  3. Cover and forget about it for two hours.
  4. Then all that’s left to do is cutting it in half or into thirds and baking it on high heat with a bowl of water in the oven for an extra crusty… Crust. (That was so eloquent.)

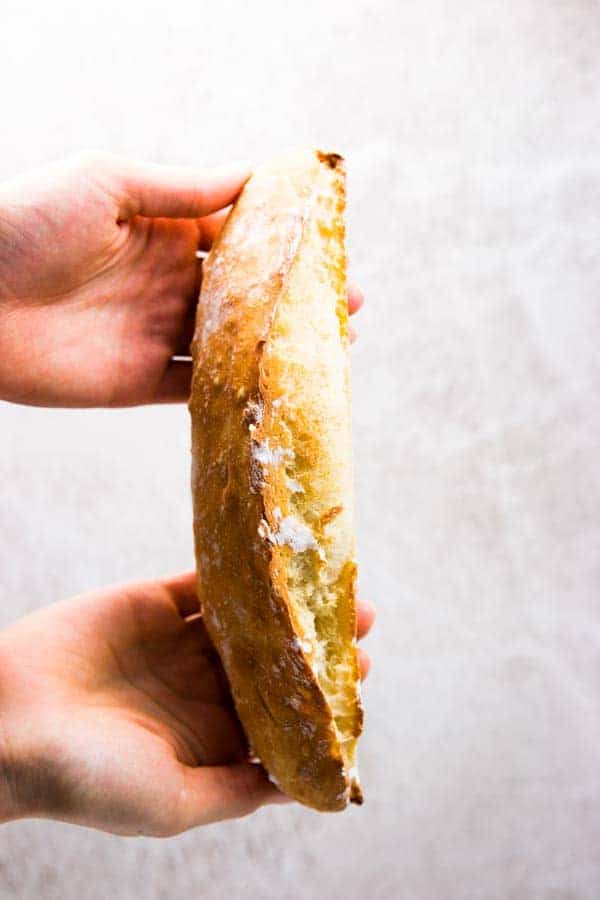
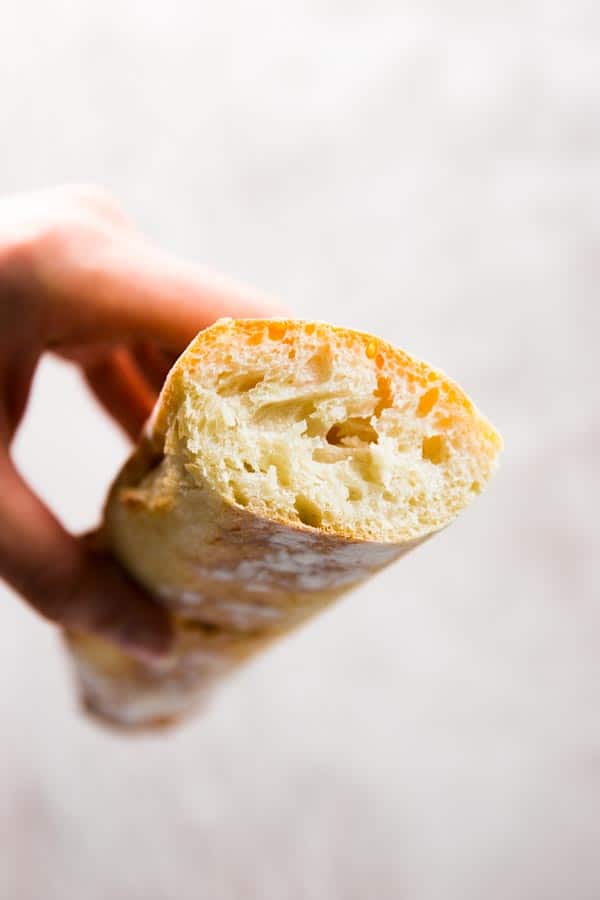
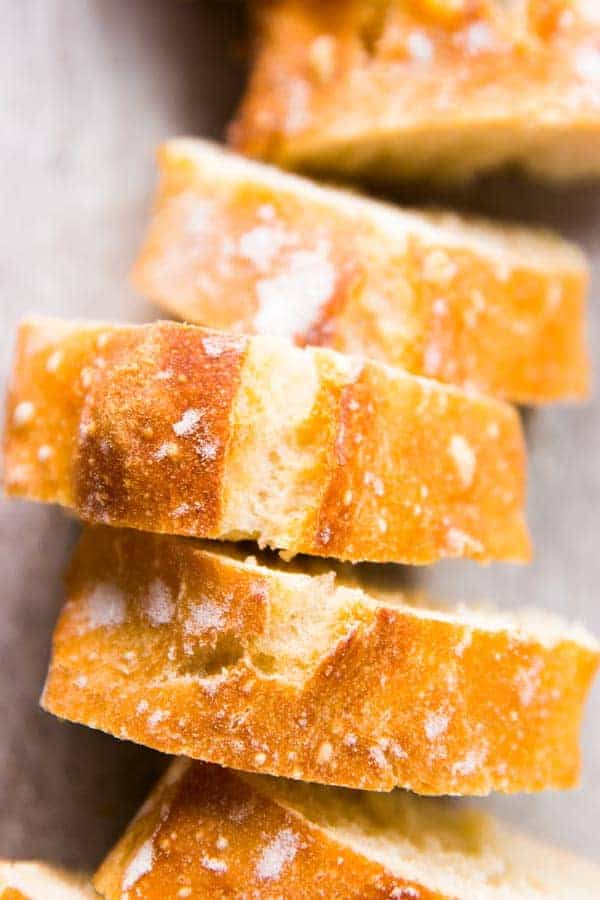
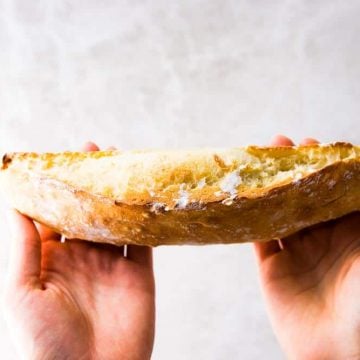
And the result is… As I said before: Magical. Extraordinary. So good you’ll want to stuff your face with the entire loaf right as it comes out of the oven.

The crust has a crunch to it, the interior is fluffy and chewy and has this nice, large, open crumb. Can you tell I’m obsessed?

Holding a sliced homemade French bread.

I first heard about the Dutch oven no knead bread from a friend’s husband, about three years ago. I was suuuuper sceptic, because I believe in kneading yeast dough to develop the gluten. I mean, to be honest, I usually do bread quite differently. I activate the yeast. Then I make a sponge. I knead until the gluten has developed. I do multiple rises.

See my Challah Bread and Cinnamon Rolls for proof! And while they both turn out absolutely magnificent, I don’t even know what to believe anymore with all this no-knead business.

One major difference here is how slack the dough is with no-knead breads. You couldn’t knead it even if you tried, and the high moisture content is what gives the nice texture and crust.

And for the same reason (as with regular Dutch oven no-knead breads), this baguette magique can’t be slashed before baking, it just rips open randomly while in the oven. Which gives it that homey, artisan feel and makes the crack ultra-crispy.

Crust of a no knead homemade French bread.

I found this recipe on a German blog and I’ve been hooked every since. I made it three times last week alone ? Did you see my Insta-Story yesterday?? It’s just too good. We love it so much, my husband even ordered me a baguette pan as a surprise!

Now I will say, the bread does turn out with the best shape in a baguette pan, BUT I made it plenty times without one before!

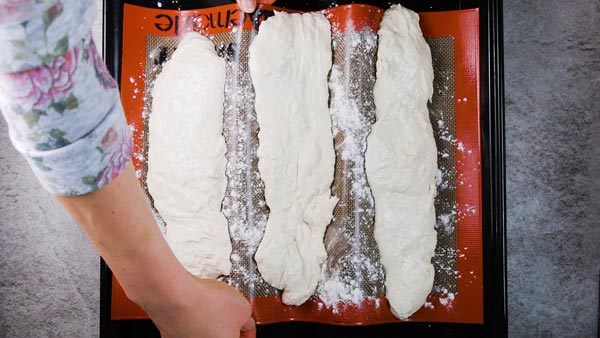
It definitely needs something to hold it together though, so what I did before I had the special pan was to just use a Silpat mat, pulling it up between the baguettes to create long creases. Take a peak at the step photos below or scroll down to see it in the video – it’s easy peasy! And if you don’t have silicone baking mats, you can shape some aluminium foil and cover it with baking parchment!

Step By Step Photos for How To Make No Knead Homemade French Bread
Stirring the dough and letting it rise!
Step By Step Photos for How To Make No Knead Homemade French Bread
Risen dough with big air bubbles – cut into thirds.
Step By Step Photos for How To Make No Knead Homemade French Bread
Make-shift baguette pan with a silicone baking mat!

I want to make my recipes as accessible to anyone and I’m usually very against over-purchasing single use objects for the kitchen, but if you’re planning on baking your own bread a lot and just happen to love a crusty French bread, I think the 15$ for an easy-to-store pan are justifiable ?

Buttered slices of no knead homemade French bread.

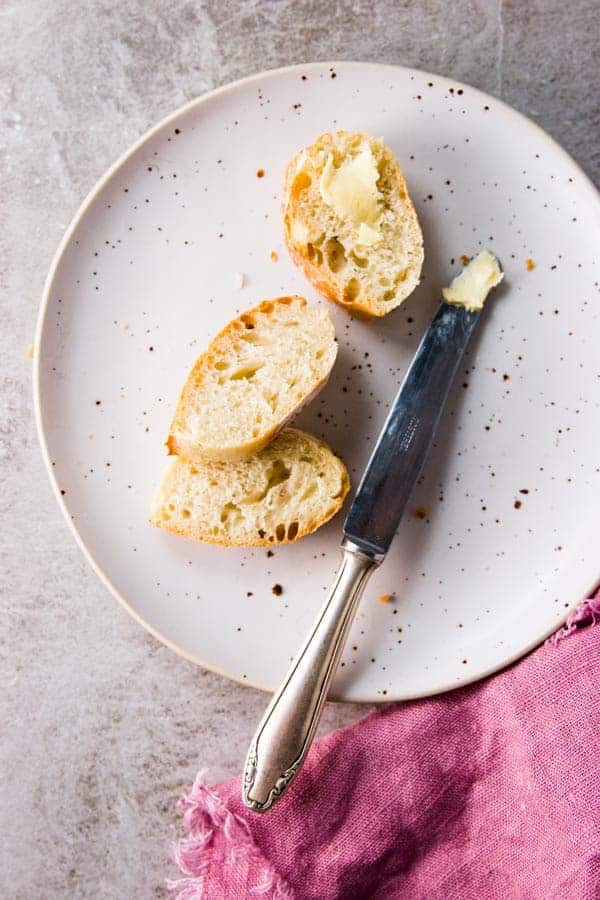
We have this for Sunday brunch. Or with a bowl of soup. Or topped with brie and prosciutto (hey, fusion cuisine!) for a quick lunch.

I initially tried this recipe just to prove it doesn’t work, but now I can’t stop making it – I hope you’ll try it too, let yourself be amazed by it and leave me a comment/star rating to let me know what you think about it!

– Nora xo

Watch how to make no knead homemade French bread:

Get the printable recipe:

Printable Recipe Card
No Knead Homemade French Bread, freshly baked.
Save Recipe Saved!

No Knead Homemade French Bread

Now you can make crusty, artisan-like HOMEMADE French Bread from scratch with barely any effort - no kneading, no complicated techniques or overnight rises! Just 5 minutes prep!
Recipe by Nora from Savory Nothings
made it? tap the stars to add your rating!
4.80 from 35 votes
Print Add Review

Recipe details

Prep 5 mins
Cook 25 mins
Total 2 hrs 30 mins
Servings 3 loaves

Ingredients
 

  • 1 ½ teaspoons active dry yeast
  • 1 ¼ cups lukewarm water
  • ½ teaspoon white sugar
  • 3 cups all-purpose flour
  • 1 teaspoon salt

Instructions
 

  • Make the dough: Stir the yeast, water and sugar together in a large bowl. Stir in the flour and salt just until combined. Cover with a clean dish towel and allow to rest at room temperature for 2 hours.
  • Cut the dough: Once the dough has risen, preheat the oven to 465°F. Place a rimmed cookie sheet on the lowest rack. Generously flour a work surface. Very carefully tip the dough on the worktop - try not to knock out any air. Cut the dough into three equal longish pieces (you can also do two for larger baguettes).
  • Shape the bread: Carefully place the dough in a French bread pan. (Check the notes if you don't have a French bread pan - I made this without a French bread pan many times and this recipe works like a charm!)
  • Bake: Fill the rimmed cookie sheet you placed in the oven earlier with water to create steam. Immediately put the bread on the middle rack and bake for 20-25 minutes (25-30 if making two larger baguettes), or until crusty on top. Turn the bread upside down and finish baking on the upper-middle rack for about 5 more minutes, or until the bottom is browned and crusty, too.
Want to save this recipe?Create an account for free to start your personal recipe box. Save any recipe by tapping the heart in the bottom right corner.
Join Now

Notes

If you don't have a French bread pan, use a silicone baking mat to pull up between the French bread loaves. This will create a similar effect to the special pan. For more tips and photos/video of this, check the post above!

Nutrition

Calories: 477.08kcalCarbohydrates: 98.53gProtein: 15.34gFat: 1.68gSaturated Fat: 0.25gSodium: 780.73mgPotassium: 191.05mgFiber: 4.99gSugar: 1gCalcium: 18.75mgIron: 5.93mg
Nutrition is an estimate.

More recipe information

Course: Side Dish
Cuisine: French

Nora Rusev from Savory Nothings
About Nora 
When I got married to my professional chef husband, I realized I had to step up my game in the kitchen. Now I share my favorite foolproof family recipes here on Savory Nothings: Chef-approved, kid-vetted and easy enough for everyday home cooks like you and me!   Learn more.

Reader Interactions

dipping a bread chip into a bowl with crock pot bbq bacon cheeseburger dip

< Previous Post

Homemade chicken pot pie with the first slice taken out.

Next Post >

Add a Review or Ask a Question Cancel reply

Your email address will not be published. Required fields are marked *

Made this recipe? Rate it:


Comments

  1. Savannah Spencer says

    February 04, 2022 at 4:15 pm

    Can you freeze the bread? If so, how long?

    Reply
    • Nora says

      February 05, 2022 at 2:25 pm

      You can freeze the baked and cooled bread for 3 months. I highly recommend wrapping it well in plastic wrap, then place it in a freezer bag as well. Else it will suffer from freezer burn. To defrost, unwrap fully and place on a wire rack on the counter for several hours, until thawed. We love it lightly toasted. Hope this helps!

      Reply
  2. Anne says

    November 20, 2021 at 4:53 pm

    How many packets of yeast are you using for 1 1/2 tsp?

    Reply
  3. Vicki says

    August 22, 2021 at 8:04 pm

    5 stars
    This recipe is so awesome. Easy and delicious with simple ingredients. When we took the loaves out of the oven, the crunch in the bread was a dream come true. We had the butter waiting and it was an amazing experience. Lol. Just ordered the baguette baking tray because I definitely plan on making this bread again.

    Reply
    • Nora says

      September 25, 2021 at 5:39 pm

      I’m so glad, Vicki! And your description is making me want to bake bread ASAP 😂😍

      Reply
  4. Kirsten says

    June 22, 2021 at 2:51 pm

    5 stars
    I make this at least a few times a week. With an extra 0.5tsp yeast it’s ready to bake in an hour. I’ve also been experimenting with flavour and it’s delicious with black olives & no salt added or favourite so far is sundried tomatoes, olives and chive

    Reply
    • Nora says

      June 26, 2021 at 3:07 pm

      I’m so glad, Kirsten! And I love the idea of adding things, I absolutely have to try olives and sun-dried tomatoes! I might add some Feta cheese… Hmm, thanks for the idea!

      Reply
  5. Yoeung says

    February 25, 2021 at 1:46 am

    4 stars
    Hello,
    I made your recipe exactly, only thing I did differently was made one large French loaf. It was the ugliest dough I’ve ever made and I wasn’t sure it’ll turn out well. It puffed in the oven and looked like a turtle shell (per my husband’s description). I wasn’t impressed AT ALL….. but then I cut it and it had very nice bubbles, great texture and tasted AMAZiNG! I couldn’t believe it was so easy to make, my kids loved it too (It was like sourdough but not sour). Thank you so much for sharing your recipe.

    Reply
    • Nora says

      February 27, 2021 at 1:25 pm

      Haha, I love the turtle shell description. Glad it tastes great though 😉

      Reply
  6. Bill Muto says

    January 09, 2021 at 7:00 am

    5 stars
    Have made this recipe and it’s always great. Wondering what you might suggest if we wanted to make pizza with it. Thanks, Bill, Tucson

    Reply
    • Nora says

      January 10, 2021 at 4:17 pm

      Bill, making pizza works so great with this dough! It’s what I pretty much always use. I have instructions for it here: https://www.savorynothings.com/easy-homemade-pizza-dough/

      Hope this helps!

      Reply
  7. Christina Truter says

    October 30, 2020 at 7:01 am

    5 stars
    Lovely recipe I will definitely make it again! I added another half a cup of water though and my bread was not as airy as in the picture, so I still need to experiment some more.

    Reply
  8. Marion says

    September 12, 2020 at 7:11 pm

    5 stars
    I’m still baking, and loving, this recipe. I’ve been experimenting with a brief second rise, while it’s in the pan, instead of putting it in immediately as you suggest. Fifteen minutes, maybe. Letting the oven get good and hot at the same time. Have you ever tried this? What are your thoughts?

    all best to you and thanks!

    Reply
    • Nora says

      September 16, 2020 at 10:25 am

      Marion, I have never tried a brief second rise but I will have to give it a go!

      Reply
  9. Criss says

    September 11, 2020 at 5:38 pm

    5 stars
    So easy and so yummy! These baguettes do not last more than an hour in my house. Thank you, Nora!

    Reply
  10. marion says

    May 30, 2020 at 2:35 pm

    5 stars
    One more question — I’ve been trying and comparing different no-knead recipes. I thing the folding step is kind of fun, and wonder what you think about folding this dough after the 2 hour rise but before shaping into loaves? Do you think it would help or hurt? I’m making the bread today… will check back in a bit. thanks

    Reply
    • Nora says

      May 30, 2020 at 10:29 pm

      Marion, no harm in folding the dough! It’s not necessary and I do it occasionally because the kids think it’s fun. If you enjoy it (I don’t, haha!) then please fold away!

      Reply
      • Marion says

        May 31, 2020 at 2:59 pm

        Yeah — I tried it, but I don’t think it made much difference either way. One tip I have that people could try is doing the two-hour rise in an oven set to 100 degrees. This has been working great for me with a wide variety of bread recipes. I also oiled the bread pan with olive oil, added a bit of crunch to the crust. Also — I accidentally left the de-panned loaves in the oven an extra 8-10 minutes, I thought they would be ruined but I think they might have been better!

        Reply
  11. marion says

    May 18, 2020 at 4:43 pm

    Can you double it?

    Reply
    • Nora Rusev says

      May 18, 2020 at 8:52 pm

      Yes, absolutely, Marion!

      Reply
      • Marion says

        June 06, 2020 at 4:27 pm

        Making the bread yet again — double recipe as mentioned. I am wondering if letting it go longer than 2 hours is a good thing or a bad thing. Thoughts?

        Reply
        • Nora says

          June 09, 2020 at 3:44 pm

          Marion, I have been baking a lot of bread with as little yeast as possible lately and it works great. So if you need to let it sit for longer than 2 hours I recommend cutting back on the yeast. Eg if you’ll use half of the yeast the recipe calls for, you’ll need to give it around 4 hours to proof. Hope that helps!

          Reply
  12. Jane says

    April 23, 2020 at 12:06 am

    5 stars
    Great recipe, and couldn’t be easier!
    DELICIOUS!

    Reply
  13. Jordan says

    April 20, 2020 at 12:55 am

    Made this today! So yummy and so easy! It has such a nice crispy crust.

    Reply
  14. JoAnn M OBrien says

    April 06, 2020 at 3:42 pm

    Curious how the blobs on the silpat turn out to be nicely shaped and with a perfect incision in the first pic.

    Reply
    • Nora Rusev says

      April 07, 2020 at 12:31 pm

      JoAnn, thanks for sharing your concerns. Like I said in the post, the dough is too slack to slash, so it just randomly rips open during baking. The incision you thought you noticed in the picture is actually just the bread ripping open during baking. It’s one of the coolest parts of this recipe if you ask me – no need to be a pro at slashing bread.

      As far as the transformation from blob to French bread goes: I don’t know how much bread you bake, but yeast produces carbon dioxide during fermentation, and this carbon dioxide expands in the heat of the oven before it sets. Every bread changes shape during baking; if it doesn’t, the recipe isn’t very good. Finally, the Maillard reaction helps to make the finished French bread look so good – this is the reaction that reduces sugar and amino acids in the heat of the oven, resulting in a nicely browned crust.

      I hope this helps to alleviate some of your concerns about the recipe. Quite frankly, I find it a little insulting you would suggest I faked the photos – I take great pride in providing accurately tested recipes with transparency and integrity on this site. Have a nice day!

      Reply
      • JoAnn M OBrien says

        April 27, 2020 at 6:08 am

        I do bake bread an awful lot with great success and understand the chemistry. I followed the recipe and the bread turned out okay. I have been a fan of Sally’s blog and her recipes for quite some time and her pics of the bread are closer to the actual result. No need to explain anything, thanks.

        Reply
    • Lynn says

      March 28, 2021 at 1:03 am

      5 stars
      I’ve made this recipe many times – it’s a frequently requested addition to dinners! We really love it.
      When mixing, my dough is nowhere near as wet as yours…I do aerate my flour etc. How much extra water can I safely add? Or decrease the flour a little? I am using canadian flour, as I’m in Canada – I have read it’s a little stronger than American flour?
      We certainly enjoy the bread the way it comes together now, I’m just wondering if it can get any better than it is!

      Reply
      • Nora says

        March 28, 2021 at 11:36 pm

        Lynn, many factors can affect bread dough – from the exact flour you’re using to your altitude. If you want to try to get a wetter dough, I would just add more water tablespoon by tablespoon until you reach a consistency you’re looking for. And if it ends up too wet, work in some extra flour before shaping.

        Reply
  15. Allison says

    March 10, 2020 at 12:14 am

    3 stars
    Hi, just made 2 larger rather than 3 smaller loaves this morning and while tasty, my bread is quite dense. I used the silpat makeshift pan and did not stretch out the dough. I did add the recommended 5 minutes to the initial bake. My dough was not wet, just a little sticky when cutting with the bench scraper. Any thoughts? I’d sure like to get this incredibly fast and easy recipe right. Thank you 🙂

    Reply
    • Nora Rusev says

      March 10, 2020 at 9:27 pm

      Allison, I’m not 100% sure! One of my thoughts would be too much kneading, and my other thought underproofing and/or yeast that’s lost its power a little. Eg when I use organic dried yeast, I always have to proof for much longer because it’s less potent, else I get a more dense bread. Please let me know if you have any other questions!

      Reply
      • Allison Burgett says

        March 24, 2020 at 6:40 pm

        5 stars
        I tried the recipe again this time with an additional 1/4 cup of water thinking the lack of humidity where I live might be the issue and that solved the problem! I also made the dough the day before and proofed it overnight in the frig so I could have it for breakfast. It turned out wonderful! Soooo, if you live in the desert, you might want more water. I added the 1/4 cup 1 tablespoon at a time until my dough looked like the illustration. Thank you so much for this wonderful and very easy recipe .

        Reply
        • Nora Rusev says

          March 26, 2020 at 10:20 pm

          I’m so glad you figured this out, Allison! Thank you so much for sharing, I hope this will help other bread bakers who live in very dry climates – thanks again!

          Reply
  16. Kim says

    November 20, 2019 at 5:17 pm

    Throwing this together for the first time and no mats or aluminum foil on hand. Can I use a loaf glass pan?? This is going with homemade cheddar broccoli soup tonight.

    Reply
    • Nora Rusev says

      November 20, 2019 at 5:36 pm

      Kim, did you see this: https://www.savorynothings.com/no-knead-bread-recipe/ you can bake it as a loaf in a Dutch oven. I’m sure a loaf pan would work as well, but if you’re going to bake it as one loaf the Dutch oven does give the best crust 🙂

      Reply
  17. Lily says

    October 31, 2019 at 6:05 pm

    5 stars
    I admit I was a bit skeptical with such a short rise time, but it was such an easy recipe that I figured I’d try it out. I’m so glad I did because it was dee-lish!! Crusty on the outside, soft on the inside with a beautiful crumb. Tasty and easy recipe…what more can you ask for??! Thanks for posting!

    Reply
  18. Shelley says

    July 12, 2019 at 7:23 pm

    So I’m making this right now…my initial stirred dough ball is extremely dry… is that normal? So excited to try!

    Reply
    • Nora says

      July 12, 2019 at 11:08 pm

      Hi Shelley, hm no, it shouldn’t be extremely dry. I just made this today and the dough is definitely not dry. It’s hard to describe the consistency – a little like slime to play with, haha! If you’re using cups to measure out the ingredients, it might be that you accidentally used too much flour, it happens to me all the time.

      Reply
  19. Irene says

    May 26, 2019 at 6:26 pm

    5 stars
    WOW, wonderful crusty tasty treat…. a keeper for sure. I have tried other no-knead breads but were soft crust, this one is perfect to go with my balsamic vinegar and olive oil. Made 3 loaves and they disappeared faster than Merlin could accomplish!!!!!! Thanks a million.

    Reply
    • Nora says

      June 06, 2019 at 3:19 pm

      I’m so happy to read this, Irene! And yes, this bread disappears at lightning speed over here, too!

      Reply
  20. Phyllis says

    April 05, 2019 at 12:36 am

    5 stars
    I made this and FINALLY…a crusty, rustic, delicious French bread! I made it into two loaves using a Silpat. Perfect! 😋

    Reply
    • Nora says

      June 06, 2019 at 3:27 pm

      So glad to hear this, Phyllis!

      Reply
  21. Michelle Collins says

    December 29, 2018 at 4:36 pm

    Hello! I got a french baguette pan for Christmas and your recipe looks perfect. I have been making no knead breads for years and they all require bread flour but your recipe uses regular all purpose flour. Can I use bread flour in your recipe?

    I’m going to make this bread tomorrow as it looks amazing and I’ve loved every no knead recipe I’ve tried so far!

    Thanks so much!

    Reply
    • Nora says

      January 02, 2019 at 7:41 pm

      Hi Michelle, so sorry it took me this long to get back to you! I think it would be OK to use bread flour. I’ve made it with Tipo 00 before, and also with whole wheat. The amount of water might vary ever so slightly though. Did you end up trying it?

      Reply
  22. Lori says

    May 19, 2018 at 6:45 pm

    I have been wanting to try to make a baguette for a long time but found traditional recipes rather daunting. So glad I found this and can’t wait to try it. I do have a couple of questions, though – can I replace the sugar with honey and, if so, how much? Also, the dough looks so sticky in the video – do you oil the bowl to help it slide out? Looking forward to your response, Thanks!

    Reply
    • Nora says

      May 19, 2018 at 9:58 pm

      Hi Lori, so glad you want to try this recipe – it’s a reader favorite. You can absolutely use a scant teaspoon of honey in place of the sugar. The dough is incredibly sticky. I never oil the bowl and just scrape it out with my hand. It’s a little messy at first, but when you get used to the recipe it takes no time at all. Hope that helps!

      Reply
  23. Marta Hernandez-Craven says

    April 28, 2018 at 10:42 pm

    Hi, Nora…the bread looks yummy! I just have one question though…how did you get the pieces of dough from the worktop onto the silicone baking mat? Any tips/tricks would be appreciated. Thank you for sharing your recipe & I can’t wait to try it soon!!! Marta

    Reply
    • Nora says

      April 29, 2018 at 10:46 pm

      Hi Marta, I put a lot of flour on my worktop, so the dough doesn’t stick. And then I just lift up the dough pieces by holding them on both ends. They stretch out into a long-ish shape that way, which is perfect for the French bred shape 🙂 Hope that helps, and I hope you’ll enjoy the bread!

      Reply
  24. Linda J says

    April 11, 2018 at 10:47 am

    5 stars
    This bread was delicious! And super easy to make! I’m going to try it with my sourdough starter next. Thanks for the recipe!

    Reply
    • Nora says

      April 11, 2018 at 7:29 pm

      So glad you liked the bread, Linda! And do let me know how your sourdough version turns out – I’m curious!

      Reply
  25. Prema Hoffman says

    January 28, 2018 at 12:27 am

    5 stars
    Such a simple , delicious recipe . Thank you for sharing it .

    Reply
    • Nora says

      January 30, 2018 at 9:17 pm

      Prema, I’m so glad you enjoyed the homemade French bread. It’s really so simple, sometimes these turn out to be the best recipes! – Nora x

      Reply

Primary Sidebar

Nora Rusev from Savory Nothings

welcome to

logo for the Savory Nothings brand

Hi, I'm Nora! I wasn't always a good cook, but then I fell in love with a professional chef and learned my way around the kitchen. Now I share all my secrets to effortlessly great food here on my blog, bite-sized for home cooks just like me and you.

More about me →

Easter Recipes

  • close up photo of glazed carrots with parsley
    Perfect Glazed Carrots
  • overhead view of strawberry rhubarb pie with dish towel and fresh fruit next to it
    Strawberry Rhubarb Pie
  • frontal view of sliced lemon loaf cake
    Glazed Lemon Loaf Cake
  • overhead view of roasted carrots on foil lined pan
    Honey Roasted Carrots

see all >

Popular

  • overhead close up view of garlic parmesan oven fried chicken piece on black pan
    Garlic Parmesan Crispy Oven Fried Chicken
  • overhead view of three oven baked chicken breasts in white casserole dish
    Oven Baked Chicken Breast
  • overhead close up photo of a piece of oven fried chicken on a black sheet pan
    Crispy Oven Fried Chicken
  • overhead close up photo of chocolate chip baked oats
    TikTok Baked Oats: 6 Ways!
  • white bowl with rigatoni bolognese
    One Pot Rigatoni Bolognese
  • chicken tacos on wooden platter
    Southwestern Crockpot Chicken Tacos
  • casserole dish with shepherd's pie
    Homemade Shepherd’s Pie
  • close up photo of a sliced banana bread
    Whole Wheat Cinnamon Crunch Banana Bread

Trending on Pinterest

  • Balsamic Chicken Marinade
  • Swedish Meatballs
  • Mexican Beef and Rice Skillet
  • Instant Pot Pot Roast
  • Homemade Salisbury Steak
  • About
  • Contact

Footer

Footer

Follow Along


Recipes

Breakfast
Lunch
Dinner
Sides
Dessert
Appetizers

Instant Pot
Slow Cooker
One Pot
Casseroles
Ground Beef
Chicken

Featured On

different logos of publications Savory Nothings' content has been featured on

↑ back to top

About | Contact | Work with Us

Copyright Savory Nothings © 2023

Made with lots of love and spices ♥︎
PRIVACY POLICY | ACCESSIBILITY STATEMENT |
As an Amazon associate, I earn from qualifying purchases.

  • Facebook
  • Pinterest
  • Email
  • Yummly
  • Mix